A Step-by-Step Guide to Fix Wave Noise in Photos Like a Pro
Wave noise in photos can make your images look strange or low quality. Whether you are a new user or a person editing photographs on a daily basis, being able to eliminate wave noise is a must if you expect your photographs to be crisp and clear. In this article, we are going to talk about what wave noise is, why it happens, how to avoid it while taking photographs, and how to reduce wave noise in image editing. One of the finest tools for doing this is HitPaw FotorPea, an intelligent AI-powered photo editor. Let's begin.
Part 1: What Is Wave Noise in Images?
Wave noise is one type of unwanted pattern in digital images. It typically presents itself as wavy lines or weird textures that don't belong anywhere in the image. It's not noticeable to your bare eyes when you take the picture, but it will show up in the end photo. Wave noise can make your images look blurry or full of annoying patterns. It happens most often in images with thin lines, patterns, or repeating textures like fabric, screens, or fences - situations where learning how to reduce wave noise in image becomes essential.
Part 2: What Causes Wave Noise in Photos?
Wave noise can be caused by a variety of factors:
- Sensor limitations: When a camera sensor cannot handle tiny details, it can create wave-like patterns.
- Low lighting: Photographing in low light causes the camera to raise ISO, which adds noise.
- High ISO settings: Higher ISO settings make the sensor more sensitive to light, but this also adds more noise.
- Wrong file format or compression: Saving images in low-quality formats adds noise.
- Interference from patterns: Sometimes complex patterns (like a striped shirt or a grid) can interfere with the pixels in the image, causing wave effects.
Part 3: Smart Ways to Avoid Wave Noise During Capture
Wave noise is generally avoidable by doing some things when you snap the shot. Paying attention to your camera settings, lighting, and subject can lower the chances of wave noise happening in your image. The five tips below explain how to reduce wave noise in image captures, helping you keep your photos clean and free from unwelcome wave patterns.
1. Use a Better Camera or Lens
Using a higher camera or lens can reduce wave noise in your photos. Cameras with larger sensors can capture more details and reduce image distortion. A higher-quality lens provides sharper focus and more accurate color, preserving patterns and textures without adding noise. Cheaper lenses or cameras may not be able to handle fine details, especially in intricate scenes.
2. Lower the ISO
ISO controls how sensitive your camera is to light. When you have high ISO, it makes your image light up in low light but will also introduce the likelihood of noise in the form of wave patterns. Low ISO makes images remain nice. In low-light settings, place your camera on a tripod to keep it steady and thus use a slower shutter speed instead of cranking up the ISO. Slow shutter speeds let in more light into your camera without introducing noise.
3. Choose the Right File Format
File format is important when you're trying to preserve low noise. Shooting in RAW instead of JPEG will give you more flexibility during editing and preserve more detail in photos. JPEGs are compressible and therefore smaller, which can cause a loss of quality and make wave noise more prone to appear, especially in areas with detailed patterns or shading; understanding how to reduce wave noise in image can help preserve visual clarity.
4. Watch Out for Patterns
Tight, repeating patterns-like stripes, checks, and small dots-can confuse your camera's sensor and lead to wave noise. This is particularly the case with digital cameras and smartphones that have smaller sensors. Attempt to stay away from subjects that have clothing with complex patterns or steer clear of backgrounds with tight grids or mesh-like surfaces.
5. Use Proper Lighting
Good lighting will allow your camera to shoot more color and information, reducing the need for high ISOs or heavy editing. Natural light wherever possible, and especially early morning or late afternoon, is ideal. Inside, then soft diffused light so you don't get hard shadows and grainy texture.
Part 4: How to Reduce Wave Noise in Post-Editing
Even when you have everything perfect when taking a photo, wave noise can still show up, especially in difficult lighting or complicated scenes. Here are four simple methods on how to reduce wave noise in image editing.
Use Noise Reduction Tools
Noise reduction filters are available in most image editing programs like Adobe Lightroom, Photoshop, and much free software. They smooth out the grainy or textured areas in your photo. You'll usually have the ability to control how intense the effect is with sliders. Use these tools lightly-excessive noise reduction will make your photo soft or lose detail.
Apply Soften Filters
Softening filters may be used to soften wave noise by softly blurring the noisy regions of your image. This is a good method when the noise is not extreme or the noise is in the background. Filters like "Gaussian Blur" or "Surface Blur" in Photoshop allow you to smoothen ugly textures without losing the main features of the photo and appearing artificial. Soften always in small ratios. If you blur too much, your entire picture can become blurry. Applying these filters to distinct parts of the picture, rather than the entire image, is a safer approach.
Try Frequency Separation
Frequency separation is advanced editing that divides an image into two layers-texture (fine detail) and color and tone. This technique is used most frequently in high-end image retouching and is especially effective for removing such noise as wave patterns. When you retouch the texture layer, you can learn how to reduce wave noise in image effectively, eliminating unwanted noise without affecting the color or structure of the image. There is more control with this technique, but it requires practice and time to master.
Sharpen Carefully
Sharpening can sharpen the photos so that they seem clearer, but should be attempted with care every time wave noise has been added. Sharpening a photo tainted by noise only worsens the problem by making the wave forms more defined. That is why there exists a need to reduce the noise before using any type of sharpening tool. After the noise becomes tolerable, you sharpen only where appropriate; say eyes in a photograph or the outline of the figure. Less that is more where sharpening is concerned in images with noise.
Part 5: Best Way to Reduce Wave Noise with HitPaw FotorPea
If you are looking for an effortless yet very effective tool to correct wave noise in your photos, the best choice would be HitPaw FotorPea. This application employs AI to automatically detect and remove wave noise, grain, and other unwanted effects from the imageNo editing skills are needed-you simply upload your photo, and the application handles how to reduce wave noise in image automatically. FotorPea is an online application, so no software installation is necessary, and it offers fast editing with a click-and-done process.
Key Features of HitPaw FotorPea
- Powerful AI image enhancer for Windows and Mac, perfect for upgrading photo quality with sharp details and vibrant colors effortlessly.
- Intelligent AI image generator that turns simple text descriptions into visually stunning and imaginative artworks within moments.
- Next-generation AI portrait generator that creates realistic, naturally expressive portraits with fine attention to every subtle detail.
- Easy-to-use AI object remover that quickly eliminates unwanted items from any photo, delivering clean and professional-looking results.
Steps to Use HitPaw FotorPea
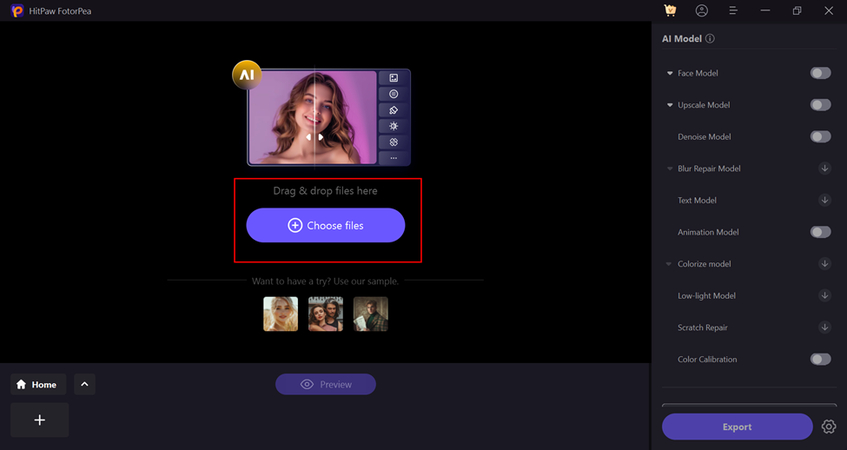
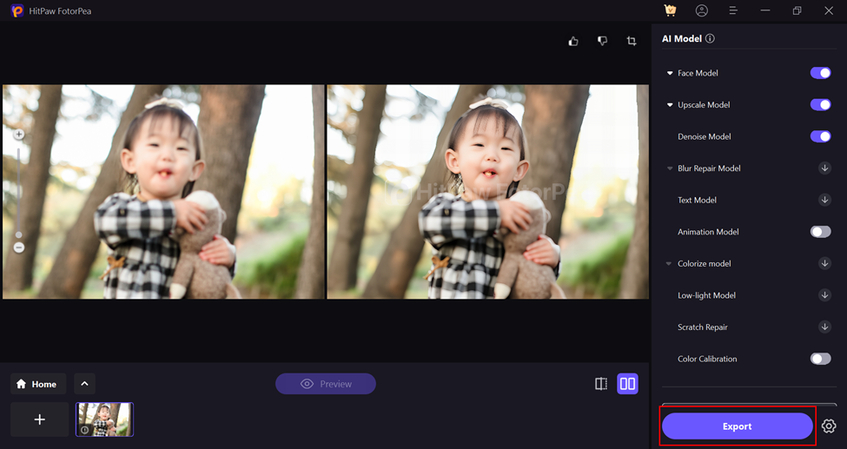
Step 1:Open the HitPaw FotorPea application on your device. You can either click to select an image or simply drag and drop the JPG file into the interface for quick upload.

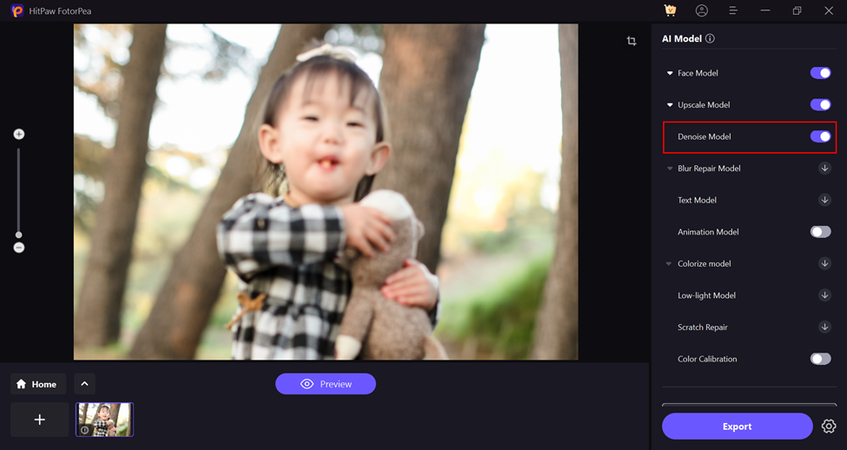
Step 2:Once your image is uploaded, choose the Denoise model from the available enhancement options. This tool is designed to target and reduce JPG compression artefacts like blurriness and blocky pixels.

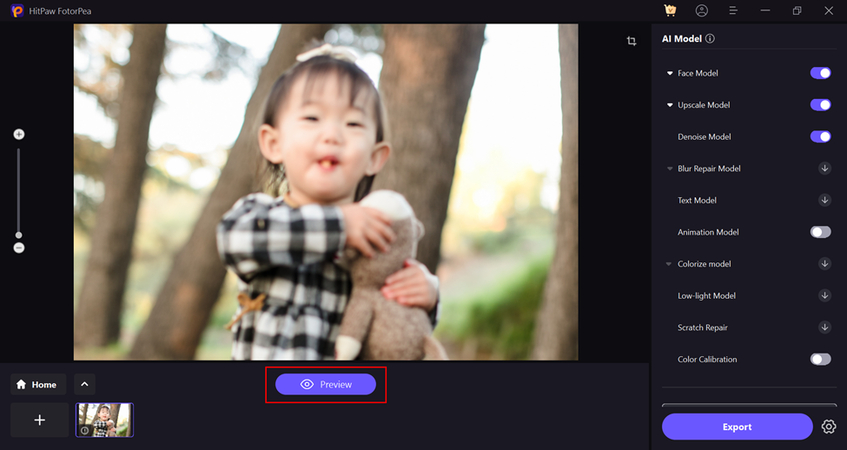
Step 3:After selecting the Denoise model, click on the Preview button. This allows you to see how the AI enhancement will affect your image before finalizing any changes.

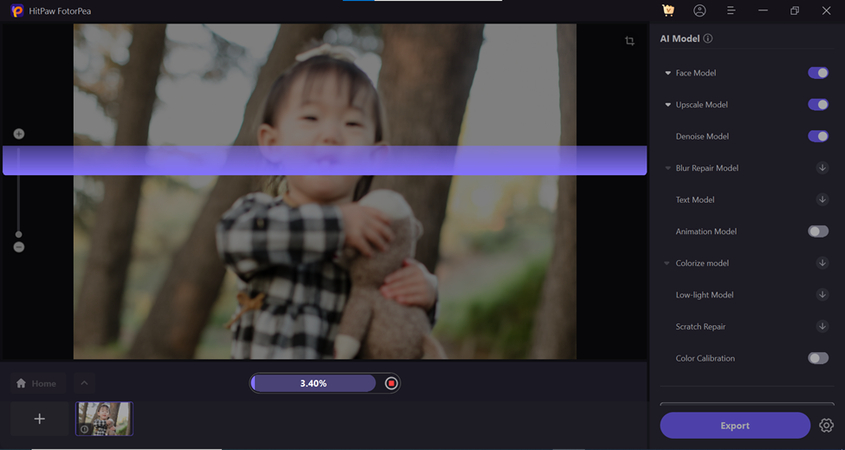
Step 4:HitPaw FotorPea will now analyze and process the image to detect and remove artefacts. Depending on the image size, this might take a few seconds, so be patient while it works in the background.

Step 5:Once processing is finished, you can view the improved version of your image. If you're satisfied with the results, click Export to save the cleaned image without JPG artefacts.

FAQs About Wave Noise in Images
Q1. Is wave noise the same as the moiré effect?
A1. No, but it's related. The moiré effect is a type of wave noise that happens when patterns overlap. Wave noise can be caused by a variety of things, including light and sensor problems, and not just patterns.
Q2. Can phone cameras produce wave noise too?
A2. Yes. Although phone cameras have come a long way, they still sometimes show wave noise - especially under low-light conditions or when shooting fine patterns - leading many users to wonder how to reduce wave noise in image captures. Less expensive phones will more likely suffer from this issue.
Q3. Does cropping reduce wave noise?
A3. Not necessarily. Cropping can get rid of the noisier section of the picture, but it will not solve the actual problem. You will have to edit with some software like HitPaw FotorPea to actually clean it out.
Conclusion
Wave noise can ruin an otherwise good photograph, but now you know how to reduce wave noise in an image. Firstly, try to avoid it during shooting by using good lighting, low ISO, and optimal camera settings. If the wave noise persists, you can get rid of it during post-processing using noise reduction software or AI tools. To get a simple yet highly efficient solution, HitPaw FotorPea is ready for you. It's intelligent, intuitive, and performs all the wizardry with a mere pair of clicks. Whether you need to edit one image, or a big list of images, FotorPea simplifies noise removal hassle-free.



 HitPaw Univd (Video Converter)
 HitPaw VoicePea
  HitPaw VikPea (Video Enhancer)


Share this article:
Select the product rating:
Daniel Walker
Editor-in-Chief
This post was written by Editor Daniel Walker whose passion lies in bridging the gap between cutting-edge technology and everyday creativity. The content he created inspires the audience to embrace digital tools confidently.
View all ArticlesLeave a Comment
Create your review for HitPaw articles