10 Best Video Sharpeners to Transform Blurry Footage into Crystal Clear Video
Finding the right video sharpener can make the difference between a grainy, unusable clip and a clear, watchable video. Whether you need to restore old home movies, rescue shaky smartphone footage, or sharpen compressed clips for publishing, modern ai video sharpening tools deliver dramatic improvements. This guide reviews top desktop apps, browser extensions, online tools, and mobile apps so you can choose the best ai video sharpener for your needs.
Part 1. What is AI-powered Video Sharpener?
AI-powered video sharpener tools use machine learning models to analyze video frames, reconstruct lost detail, and intelligently enhance edges and textures. Rather than applying a simple high-pass filter, these systems predict and restore fine detail, reduce noise, and compensate for motion blur. The result is a much clearer image with fewer artifacts than classic sharpening methods, and often with preserved color and natural-looking detail.
Traditional Video Sharpener vs. AI Video Sharpener
Traditional sharpening applies mathematical filters that increase local contrast around edges, which can create halos and amplify noise. These classic filters are fast and useful for minor fixes but struggle with heavy blur or low-resolution sources.
AI video sharpener approaches model how real-world detail should look, reconstruct missing textures, reduce noise intelligently, and adapt to motion. AI methods are better at sharpening video while minimizing artifacts and recovering plausible details for footage that was previously unusable.
Part 2. Best AI Video Sharpeners to Make Old/Blurry Videos Crystal-Clear
This section covers top desktop software that delivers professional ai video sharpening and upscaling. Each entry includes an introduction, pros and cons, and step-by-step usage so you can sharpen video quickly and reliably.
1. HitPaw VikPea Video Sharpener
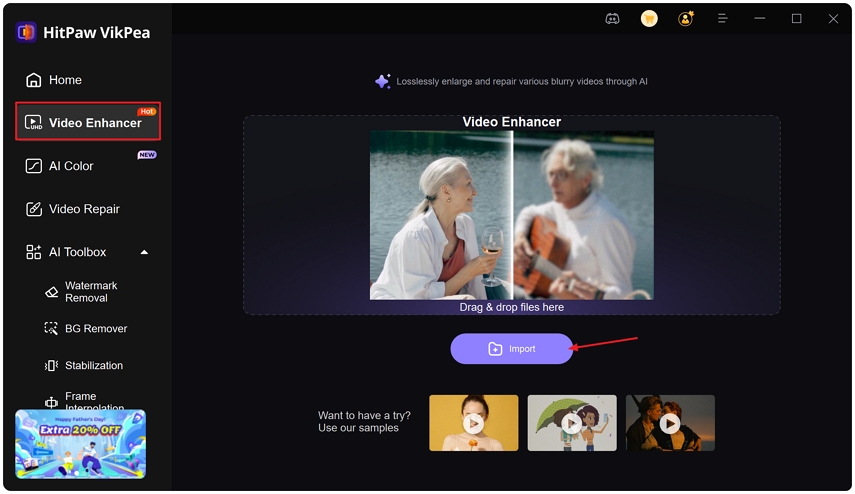
HitPaw VikPea is an ai video sharpener focused on easy restoration and high quality upscaling. It offers several AI models tailored to different issues such as general sharpening, portrait enhancement, and video quality repair for heavily degraded footage. Users can choose presets or fine tune export resolution up to 4K or 8K, and preview results before exporting. The interface is friendly for beginners while still offering advanced options for pros who need batch processing and targeted restoration.
Step 1.Download and Launch HitPaw VikPea on your computer.Import your video by clicking on "Choose file". The drag and drop method also works for importing video to the software menu.

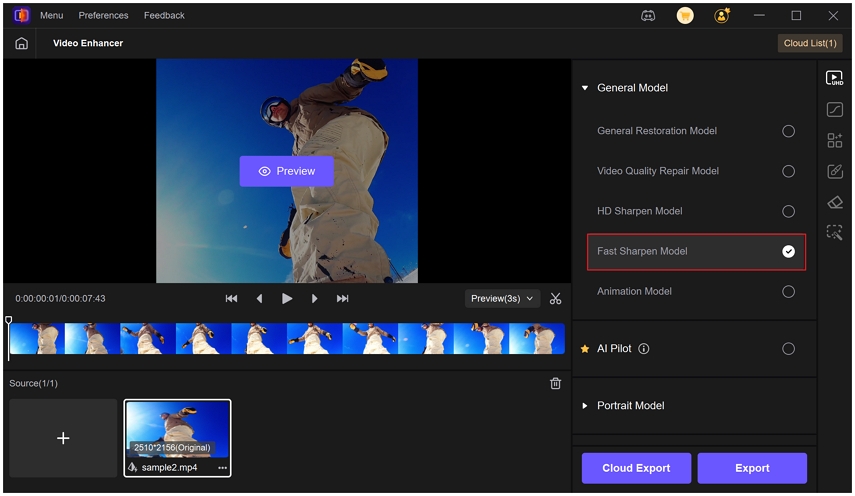
Step 2.This software offers mutiple AI models such as General Model, Sharpen Model, Potrait Model and Video Quality Repair Model. Select a suitable models based on your needs.

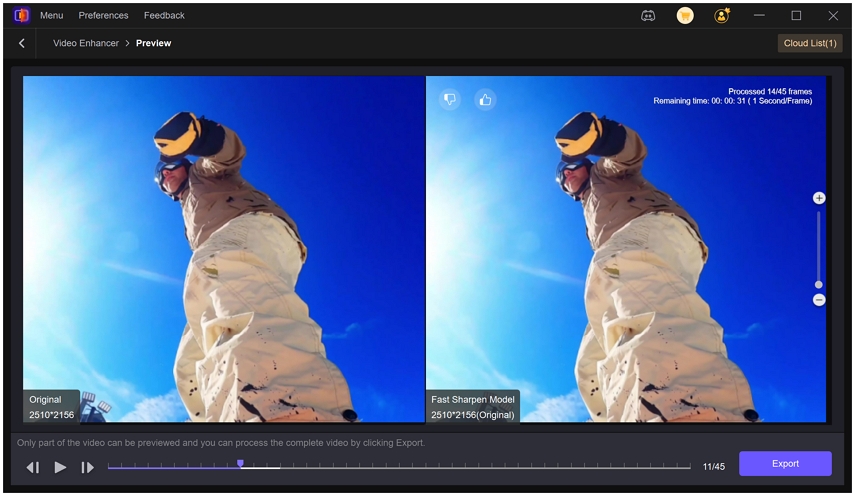
Step 3.Under Export Settings, choose your desired resolution. VikPea supports upscaling up to 4K or 8K. Click on "Preview" to see your video. If satisfied, Press the "Export" option to save your video.

Pros
- Multiple AI models for targeted sharpening and restoration
- Supports upscaling up to 4K and 8K resolution outputs
- Batch processing for speeding up multiple video conversions
- Preserves original colors and recovers fine detail well
- Intuitive interface suitable for beginners and pros alike
- Fast GPU acceleration reduces processing time significantly overall
Cons
- Paid license required for full feature access and updates
- High system requirements may limit use on older devices
2. Topaz Video AI
Topaz Video AI is widely known as a high-end ai video sharpener and upscaler used by professionals. Its collection of models such as Rhea, Theia, and Artemis targets different restoration tasks, from general sharpening to motion blur correction and noise reduction. Topaz is especially strong at preserving texture and producing natural detail, and its export pipeline is flexible for high resolution outputs. Because it focuses on quality, it often produces industry-leading results for both film restoration and modern footage.
Step 1.Open the AI video sharpener and import your blurry video in it.
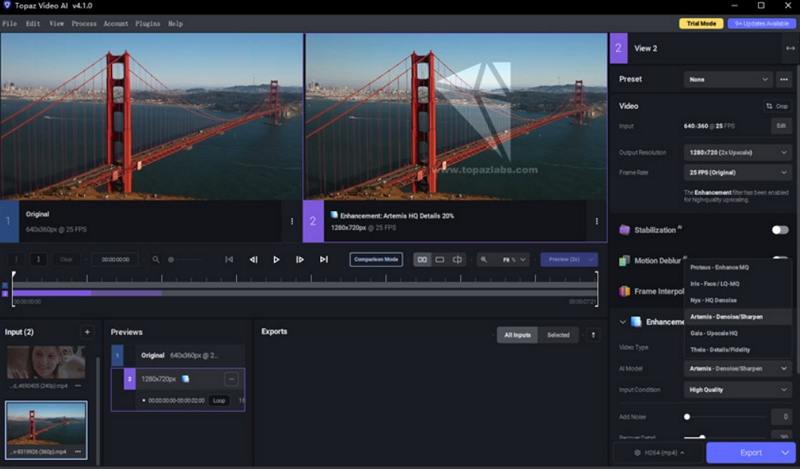
Step 2.On the right-hand panel, choose to upscale the video by 2x. Then in the Enhancement section, there are various AI models available, each designed for specific purposes. Choose an AI model based on the source video. For example:

Rhea is good for general sharpening with HQ footage.
Theia is great when you need additional detail and sharpening in your footage.
Artemis will deliver different levels of noise reduction and video sharpening.
Here I choose Artemis model. It also contains models to sharpen videos with motion blur and out of focus blur.
Step 3.Check the preview and try different models if needed. If you're satisfied with the sharpened video quality, click Export to render the video.
Pros
- Industry leading AI models for professional sharpening and detail
- Excellent results for motion blur and out of focus footage
- Advanced denoising preserves detail without over smoothing significantly
- Customizable models like Rhea Theia Artemis for flexible sharpening
- Strong community resources and frequent software updates available
Cons
- Expensive license cost for casual users and hobbyists
- Steep learning curve for optimal settings and models
- Heavy GPU requirements may require powerful hardware resources
- Long rendering times on very high resolution projects
3. UniFab Video Upscaler AI
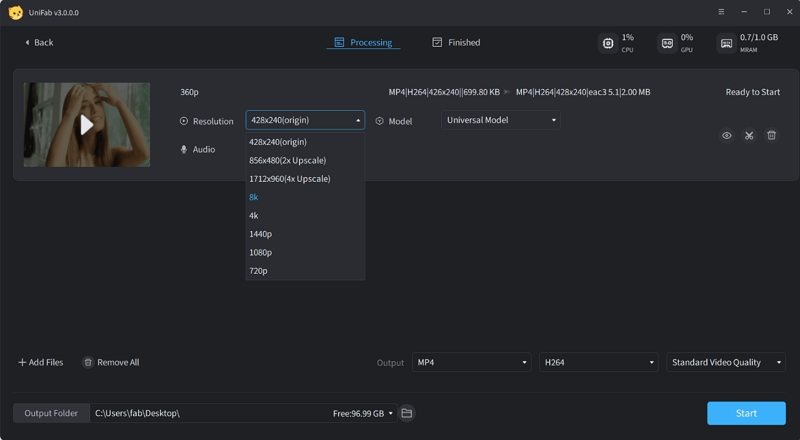
UniFab Video Upscaler AI provides an accessible set of sharpening and upscaling tools designed for both hobbyists and professionals. It focuses on reliable 2x and 4x upscaling with models tuned for universal high quality and specific media types like anime. The toolkit is straightforward to install and offers good default settings so you can begin sharpening video quickly. UniFab is a solid midrange option when you want a capable ai video sharpener without top tier pricing.
Step 1.Download the UniFab toolkit and install it. Then open it and choose UniFab Video Upscaler AI from the main interface.
Step 2.Click Add Video to import the video you'd like to sharpen. Once imported, choose the resolution (e.g., 2x upscale, 4x upscale) you want. Then in the Model dropdown menu, choose Universal-High Quality unless the source video is an anime.
Step 3.You can click the small preview button to check the sharpened video quality. If you're OK with it, go back to the interface and click Start.

Pros
- Easy to use toolkit for quick upscaling and sharpening
- Supports 2x and 4x upscaling options for clarity
- Universal high quality model works on varied footage types
- Affordable pricing compared to other professional alternatives available
Cons
- Occasional artifacts visible on very noisy source videos
- Limited model choices for niche video types like anime
- Requires manual tweaking for best sharpening results often
4. AVClabs Video AI
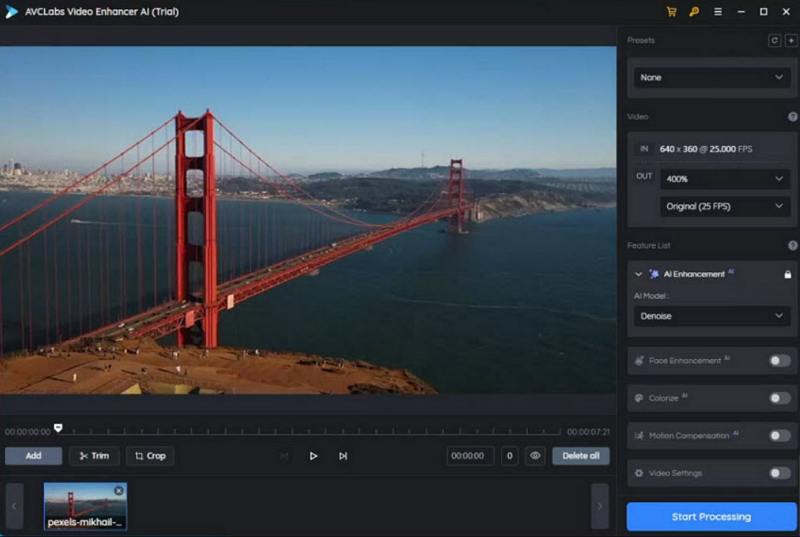
AVClabs Video Enhancer AI is an accessible ai video sharpener offering multiple restoration models and batch processing. It is designed to help users restore old clips, denoise footage, and sharpen faded details. AVClabs emphasizes ease of use with straightforward model selection and export controls. The initial model downloads can be long, but once installed the tool can process multiple files and produce reliable improvements in clarity and texture.
Step 1.Download and open AVCLabs Video Enhancer AI. The installation may take quite a long time to download the AI models.
Step 2.Open the AI video sharpener and click Browse to import the blurry video to sharpen.
Step 3.Select a desired output resolution. For the best quality, I usually start with 2x upscaling. Next in the AI Enhancement section, choose an AI model based on your video. Here I choose Standard.
Step 4.There is no preview option. So after the settings, click Start Processing. During the processing, you can see the difference between the original and sharpened video. You can cancel the process and make any change.

Pros
- Multiple AI models tailored for restoration and sharpening tasks
- User friendly interface suitable for non technical users
- Good batch processing for larger video libraries efficiently
- Supports popular formats and export resolution choices easily
- Decent noise reduction combined with sharpening options available
- Affordable subscription tiers for varied user needs available
Cons
- Slow model downloads increase setup time for first use
- No preview option for some workflows leading to reprocess
5. Adobe Premiere Pro
Adobe Premiere Pro is a professional non linear editor with manual sharpening tools that editors use to refine footage. While not solely an ai video sharpener, Premiere offers powerful effects such as Unsharp Mask and a range of denoise, stabilization, and color correction tools. For users who already work in the Adobe ecosystem, Premiere Pro enables precise control over sharpening, keyframed adjustments, and professional export presets for web and broadcast.
Step 1.Import the blurry or out of focus you want to sharpen in Premiere Pro. Then drag the clip onto the timeline.
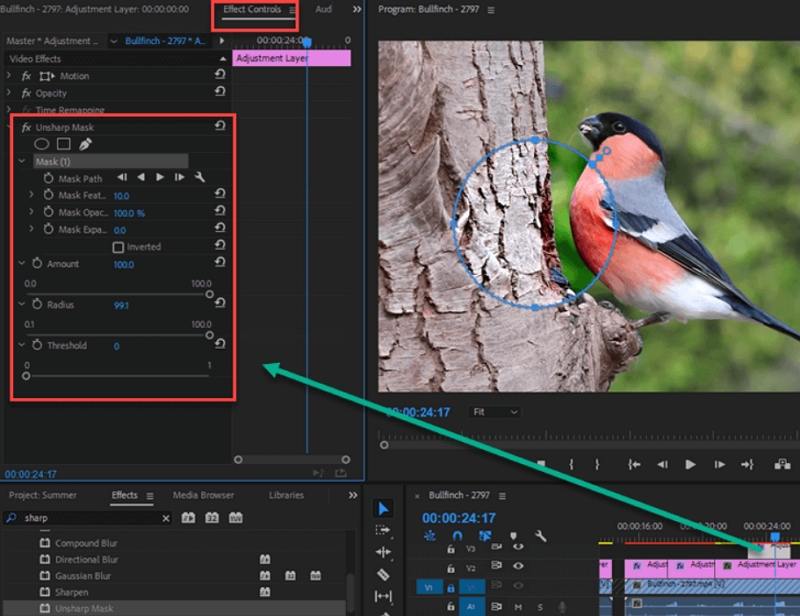
Step 2.Next, head over to the "Effects" panel and find the Unsharp Mask effect. Then drag the sharpening effect onto the blurry video in the timeline.
Step 3.Now, go to the "Effect Controls" panel and you will see several settings to tweak:
Amount: Controls the sharpening intensity. Start with a low value (around 20-50) and gradually increase it. Do not go too high, or you'll get halos and artifacts.
Radius: Determines areas around each edge affected. A smaller radius (around 1-2) sharpens fine details, while a larger radius (around 3-5) sharpens larger areas. Also start with a small radius.
Threshold: Controls the contrast level for sharpening. A lower threshold harpens more of the image, while a higher threshold sharpens only high-contrast areas. I often increase it slightly to minimize noise in flat areas.

Step 4.Play the video to check if it sharpens the video as you like. You can go back to adjust the settings until it delivers the desired sharpness and quality. You can also apply other quality improving effects if needed, such as denoise.
Once you're satisfied with the sharpening, click File > Export > Media to export the sharpened video.
Pros
- Industry standard NLE with extensive editing capabilities available
- Precise manual sharpening controls like Unsharp Mask effect
- Integrates well with other Adobe Creative Cloud apps
- Powerful color correction and denoise tools for polish
- Professional export settings for broadcast and web delivery
Cons
- Requires paid subscription for full feature access
- Steep learning curve for beginners without editing experience
- Not specifically AI focused for automated sharpening enhancements
- Resource intensive may slow older computers during render
Part 3. Best AI Video Sharpener Google Extension and Online
If you prefer browser-based tools or a video sharpener google extension, there are excellent options that let you sharpen video without heavy installs. These solutions are ideal for quick fixes, social media clips, or users who want basic sharpening and upscaling directly in the browser. They range from full editors with AI features to lightweight extensions that boost clarity during playback.
1. CapCut
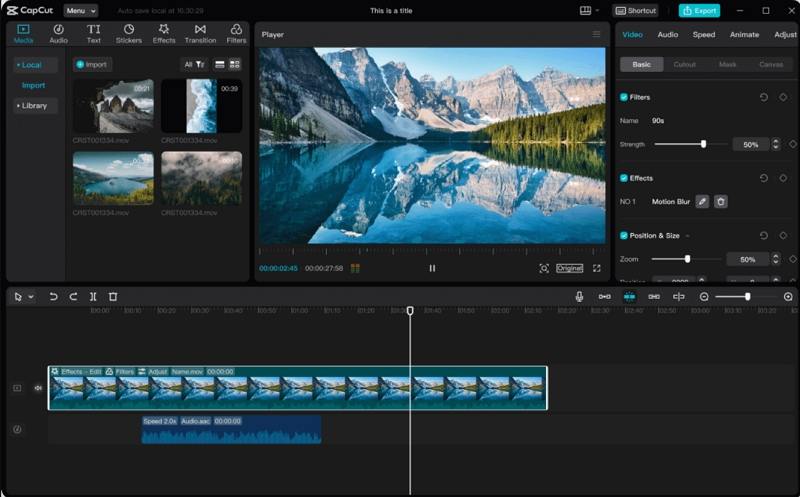
CapCut is a widely used editor offering both desktop and mobile apps with sharpening controls and upscaling features. While CapCut is known for editing and social media workflows, its adjustment tools include simple sharpen sliders and automated upscaling when exporting at higher resolutions. CapCut is a practical choice when you need a quick sharpen and polish, and it integrates well with social platforms for fast sharing.
Step 1.Download, install, and open CapCut on your computer. Then import the video into it.
Step 2.Drag the video clip to the timeline. On the right-hand panel, click on Adjustment and choose the Sharpen effect. Drag the slider to control the amount of sharpening. Preview the video until you are satisfied with the sharpened quality.

Step 3.Click Export button and in the output settings, if you choose to upscale the video to a higher resolution, CapCut will apply some sharpening automatically as part of that process.
Pros
- Free to use with many built in effects and filters
- Supports timeline editing and simple sharpening controls intuitively
- Desktop and mobile support across platforms available
- Hardware acceleration for faster exports on supported machines
- Good preset options for quick sharpening and enhancement
Cons
- Upscaling results sometimes lack fine detail in footage
- Watermark on free version limits professional use often
- Advanced features require learning time for full mastery
2. Flixier
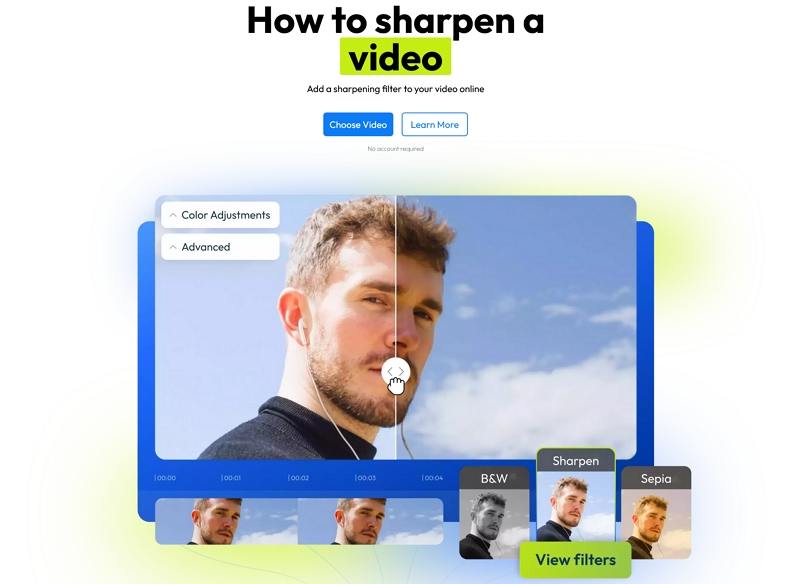
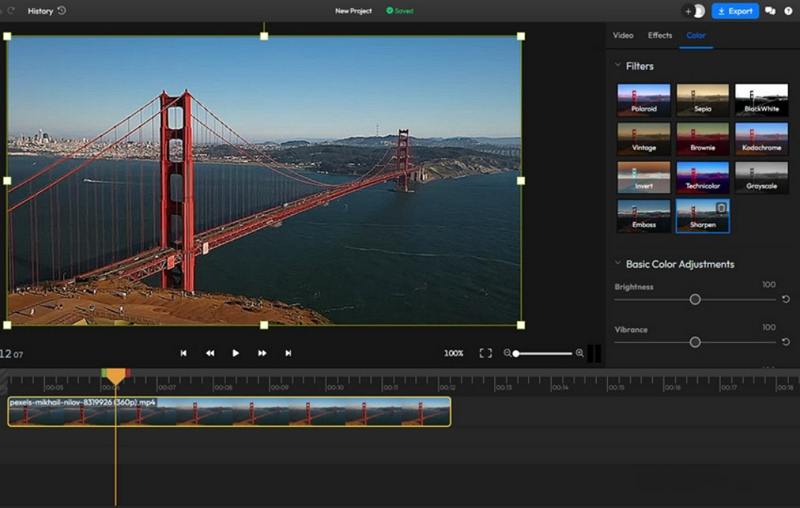
Flixier is an online editor with simple color and sharpen controls that run in the browser. It is useful for quick sharpen jobs without installing software. Upload a video, apply the sharpen filter and color adjustments, and export. Flixier also supports collaborative workflows and a fast cloud rendering backend.
Step 1.Open the Flixier site and click the Choose Video button on the page. Then choose and upload your blurry or low-quality video to it.

Step 2.Once the source video is uploaded, drag it to the timeline. On the right-hand panel, click the Color tab. In the Filters, find and click Sharpen.

Step 3.It will then sharpen the video quality. You can also adjust the brightness, vibrance, contrast, saturation, etc. to improve the quality.
Step 4.Then click the Export button on the top to save the sharpened video to your local computer.
Pros
- Fast cloud based editor for quick online sharpening
- No installation required works in most modern browsers
- Simple color and sharpen controls for easy adjustment
- Export options include multiple formats and quality presets
Cons
- Limited advanced AI sharpening compared to desktop alternatives
- Upload size limits may restrict large video files
- Dependent on internet speed for smooth editing experience
3. Video Image Control (video sharpener Google extension)
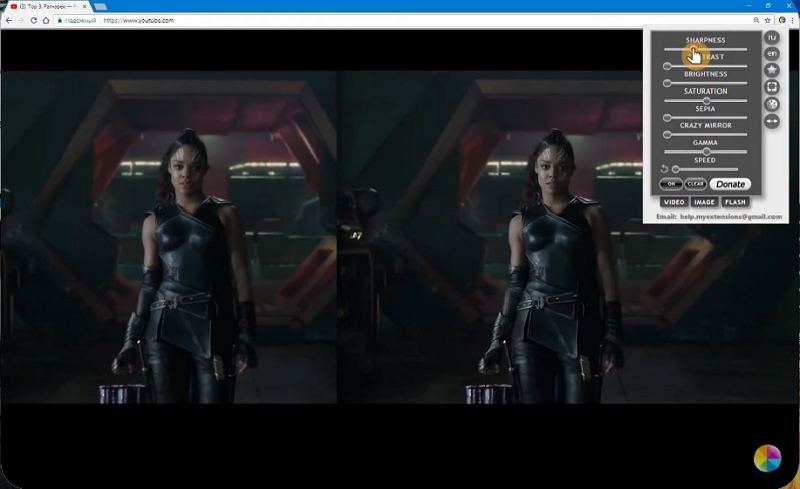
Video Image Control is a video sharpener google extension that enhances clarity directly inside your browser. It offers on the fly sharpening and user-adjustable sliders so you can boost clarity when watching embedded or streaming videos. It is lightweight and convenient, making sharpening video during playback simple and immediate.
Step 1.To use the extension, simply navigate to a video you want to watch.
Step 2.Click on Sharpening video. It will automatically apply the sharpening effect as soon as the video starts playing.

Pros
- Instant sharpening within browser without additional software needed
- Works on many streaming sites for immediate clarity boost
- Toggle on and off for quick comparison while watching videos
- Lightweight extension minimal performance impact on most systems
- Custom adjustment sliders for user preferred sharpening intensity
- Free and easy to install from Chrome Web Store
Cons
- May not work on DRM protected streams like Netflix
- Quality gains vary greatly depending on original source quality
Part 4. Best AI Video Sharpener Apps for iOS and Android
Mobile apps make sharpening video accessible anywhere. While they may not match desktop AI engines for heavy restoration, many mobile sharpeners offer surprisingly good results for smartphone footage and social media clips. Here are two mobile options that focus on sharpening video and improving clarity.
1. HiQuality (Android)
HiQuality is an Android app focused on clarity improvements and quick enhancement. It offers various effects such as Clarity, Contrast, Ambience, and Vibrance, along with sharpening controls. The app is optimized for fast processing on mobile chips and allows direct export and sharing. For quick on-device sharpening of captured clips, HiQuality is a practical choice.
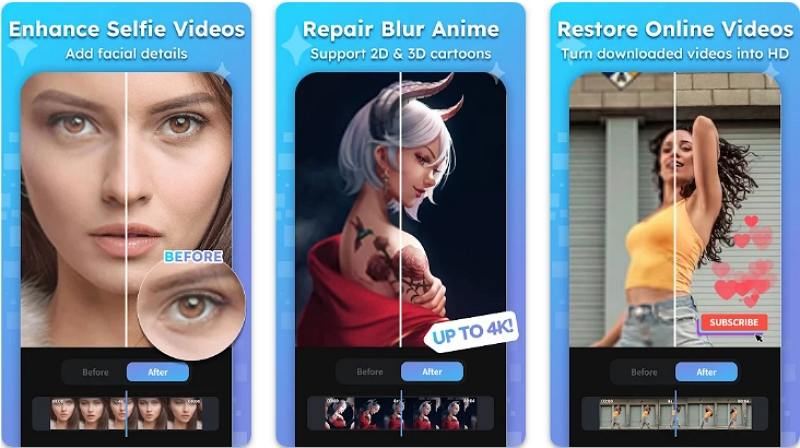
- Step 1.Open the AI Video Enhancer - HiQuality App on your Android device and add the video you want to edit.
- Step 2.Select from the various effects available, such as Clarity, Contrast, Ambience, Vibrance, Exposure, etc. If you wish to sharpen the video quality, adjust the controls accordingly.
- Step 3.After enhancing your video, save it to photos or files and share it effortlessly.
Pros
- Simple interface for one tap enhancement and sharpening
- Includes clarity, contrast and vibrance controls for tuning
- Quick processing optimized for mobile devices and speed
- Export directly share to social apps without extra steps
Cons
- Free version shows ads that interrupt editing workflow
- May produce artifacts when sharpening heavily compressed videos
- Limited control compared to desktop AI video sharpeners
2. Sharpen Video (iPhone)
Sharpen Video on iPhone focuses specifically on improving clarity for mobile clips. The app provides a sharpening slider, color adjustments, and a preview workflow so you can see results before saving. It is convenient for quick fixes and for users who need mobile-first tools without complex desktop installs.
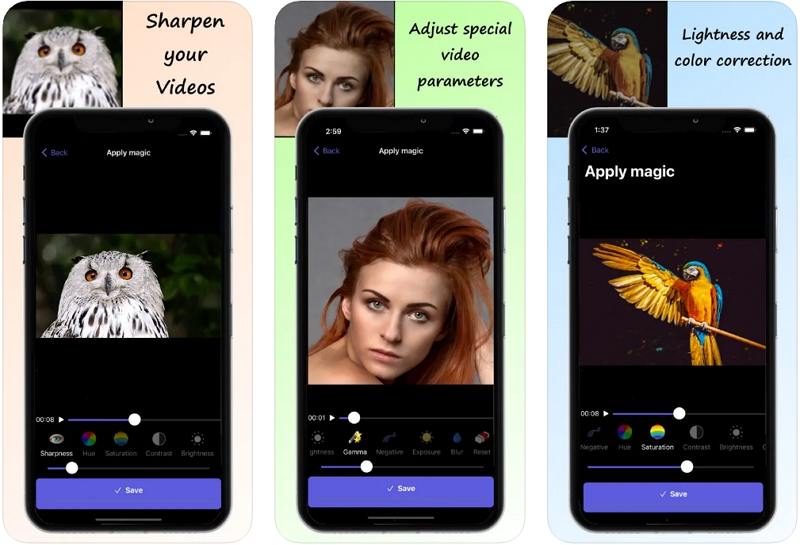
- Step 1.Begin by selecting "Open file" to load the video for which you want to sharpen video quality.
- Step 2.Apply the sharpening effect and modify the color settings to improve the video's quality according to your preferences.
- Step 3.Preview the enhanced video, then save it to your photos or files.
Pros
- Designed specifically to sharpen videos on iPhone devices
- Easy file import and quick preview before saving edits
- Adjustable sharpening slider for fine tuning results quickly
- Export to Photos and share directly to apps
Cons
- Paid upgrades unlock better algorithms and higher resolutions
- Processing large files can be slow on older devices
- Limited noise reduction options compared to desktop apps
FAQs about Video Sharpening
The best way to sharpen video quality depends on the source and your goals. For minor fixes use an editor with Unsharp Mask or sharpen filters. For heavily blurred or low-resolution footage, choose an ai video sharpener like HitPaw VikPea that offers denoising, motion blur correction, and upscaling models to recover lost detail while minimizing artifacts.
Yes, AI can sharpen a video by using trained models to predict and restore high frequency detail, reduce noise, and correct motion blur. Ai video sharpening often produces more natural and effective results than traditional filters, especially on severely degraded or low resolution footage.
Sharpening a video improves edge clarity, makes subjects more readable, helps text and facial features stand out, and can improve perceived quality for streaming or social sharing. When paired with denoising and color correction, sharpening video can turn unusable clips into publishable footage.
Sharpening increases local contrast around edges and enhances perceived detail. Traditional sharpening emphasizes edges and can add halos, while ai sharpening reconstructs and restores fine textures and detail. Proper sharpening reveals hidden information and improves the overall visual crispness of the video.
Conclusion
Choosing the right video sharpener comes down to your source material, budget, and desired workflow. For best-in-class restoration and ai video sharpening, tools like Topaz Video AI and HitPaw VikPea deliver exceptional results. UniFab and AVClabs provide affordable, capable alternatives, while Premiere Pro gives precise manual control for editors who prefer hands-on adjustment. For quick fixes and browser-based sharpening, CapCut, Flixier, and the video sharpener google extension offer convenient options. Mobile users can rely on HiQuality or Sharpen Video for on-the-go sharpening. Test a couple of tools with a short clip to see which ai video sharpener fits your needs and hardware best, and always keep a backup of original footage before processing.
Leave a Comment
Create your review for HitPaw articles


