How to Create, Edit, and Convert HDR Video in Final Cut Pro
Working with HDR video in Final Cut Pro unlocks a new level of visual fidelity, offering deeper blacks, brighter highlights, and richer color than standard footage. Whether you're an independent filmmaker or content creator, mastering HDR Final Cut Pro workflows ensures your projects look their best on modern displays. In this guide, we cover everything from basic support to advanced conversion techniques, including how to fix issues like Final Cut Pro HDR too bright and how to handle Final Cut Pro HDR to SDR down-conversions.
Part 1. Does Final Cut Pro support HDR?
Yes, Final Cut Pro fully supports High Dynamic Range content. Apple introduced FCPX HDR capabilities to let editors import, grade, and export HDR footage natively. With support for wide-gamut color spaces such as Rec. 2020 HLG and PQ, Final Cut Pro lets you produce stunning visuals that leverage the full dynamic range of modern cameras and displays.
Part 2. How to Create or Edit HDR Video in Final Cut Pro?
Creating and editing HDR footage in Final Cut Pro involves setting up a wide-gamut library, importing original HDR clips, and ensuring your project settings match your source format. By following a few simple steps, you can take advantage of the powerful color grading and export options of Final Cut Pro without compromising quality.
1. Set Up a Wide Gamut HDR Library:In Final Cut Pro, choose File > New > Library, then select Wide Gamut HDR to enable HDR Final Cut Pro features.

2. Import Your HDR Footage:Import original HDR video files (not proxies) to preserve full quality. For iPhone or other HDR cameras, ensure you bring in the uncompressed masters.
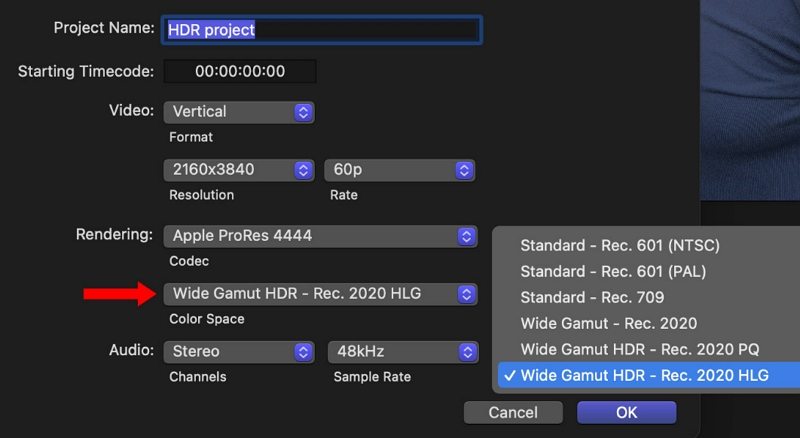
3. Create a Wide Gamut HDR Project:Choose File > New > Project. Under Color Space, select Wide Gamut HDR - Rec. 2020 HLG. This matches your project to native HDR camera output.

4. Edit Your Project:Add HDR clips to your timeline. Edit as usual, knowing the viewer may display a tone-mapped version if you lack an HDR monitor.
5. Export Your HDR Video:Choose Share > Master File. Under Settings, select HEVC 10-bit or HLG Master File. This retains full HDR metadata for compatible displays.
Part 3. How to Convert SDR to HDR in Final Cut Pro?
Converting standard dynamic range (SDR) footage to high dynamic range (HDR) in Final Cut Pro can breathe new life into your projects, offering richer colors, deeper contrast, and enhanced highlights. Even if your clips were shot in SDR, Final Cut Pro's built-in tools make it possible to simulate HDR output without the need for expensive hardware or Log shooting workflows. In this section, we'll walk through how to transform your SDR clips into HDR-ready content in just a few simple steps.
1. Update to Final Cut Pro 10.6.6 or Later:Ensure you're running FCP 10.6.6 or a newer version, which introduced the Color Conform setting for SDRto HDR conversion.
2. Import and Select Your SDR Clip:In the Timeline or Browser, click your SDR clip to highlight it.
3. Open the Video Inspector:With the clip selected, go to the upper right corner and click the "Inspector" icon. Then choose the "Video" tab.
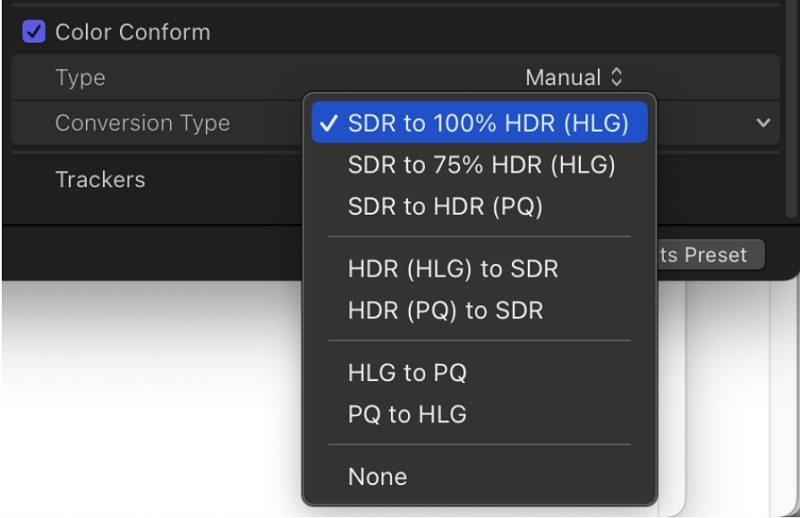
4. Enable Color Conform:Scroll to the bottom of the Video Inspector and locate the Color Conform section. Check the box to enable Color Conform for your selected clip.
5. Choose an HDR Color Space:In the Color Conform dropdown, select the HDR format you want (for example, Rec. 2020 PQ or Rec. 2020 HLG).
- SDR to 100% HDR (HLG) - maps 100% SDR white to 100% HLG white.
- SDR to 75% HDR (HLG) - maps 100% SDR white to 75% HLG white.
- SDR to HDR (PQ) - maps 100% SDR white to 58% PQ (203 nits).

6. Adjust HDR Brightness Level:Use the brightness slider to set your desired maximum nits. You can push your highlights higher to achieve a more dramatic look.
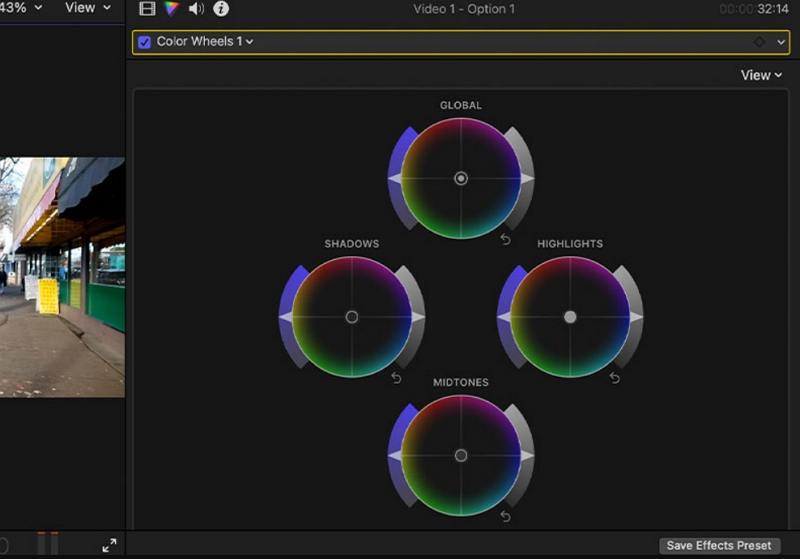
7. Fine-Tune with Color Wheels or Curves:Open the Color Wheels or Color Curves inspector to tweak shadows, midtones, and highlights under the new HDR space. Small adjustments here can help prevent clipping or crushed blacks.

8. Monitor with HDR Scopes:Activate HDR Video Scopes (View > Show in Viewer > HDR) to accurately see nit levels and color balance.Ensure your highlights do not exceed your target maximum nit value.
9. Apply to Multiple Clips (Optional Batch Workflow):To convert multiple SDR clips at once, select all clips in the Timeline, then enable Color Conform and set the color space and brightness level in the Video Inspector simultaneously.
10. Export Your HDR Master:Go to File > Share > Export File (or use a custom preset). In the Settings tab, choose Video Codec: Apple ProRes 422 HQ and set Color Space to match your HDR format. Click Next and save your HDR master file.
By following these steps, you can effectively repurpose SDR footage for HDR delivery, unlocking more vibrant and dynamic visuals even if you did not originally shoot in a wide-gamut or Log profile.
Part 4. Best Way to Convert Low-Res SDR Videos to HDR With AI?
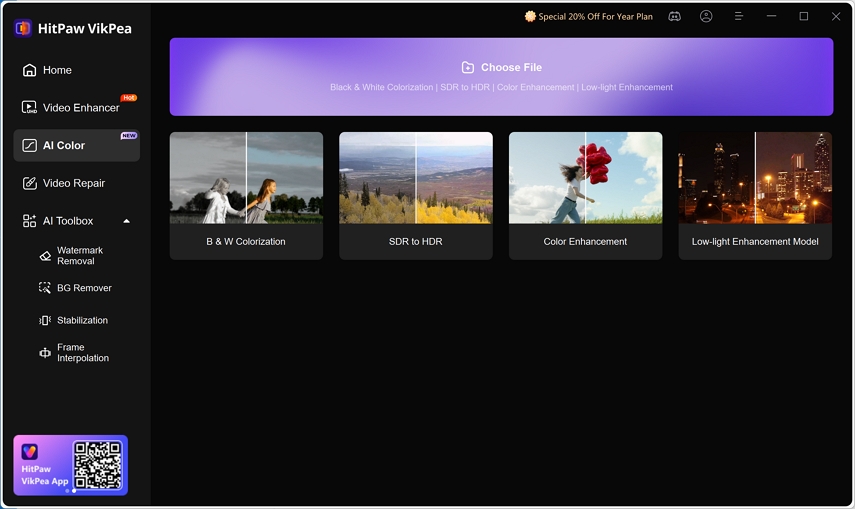
For footage that predates HDR or lacks sufficient dynamic range, AI-powered up-mapping offers an efficient solution. HitPaw VikPea uses deep learning to intelligently expand luminance and enrich color depth, turning ordinary SDR Video into vibrant HDR-like clips. This method preserves detail in both shadows and highlights, and can upscale low-resolution SDR sources to meet modern display standards without manual color grading.
- AI-driven SDR to HDR conversion adds cinematic contrast and depth
- Intelligent low-light enhancement recovers hidden shadow detail
- Color depth expansion produces richer, more accurate hues
- Batch processing converts multiple files for efficient workflow
- Metadata preservation keeps original clip data intact automatically
- Upscaling support boosts resolution up to 4K or 8K outputs
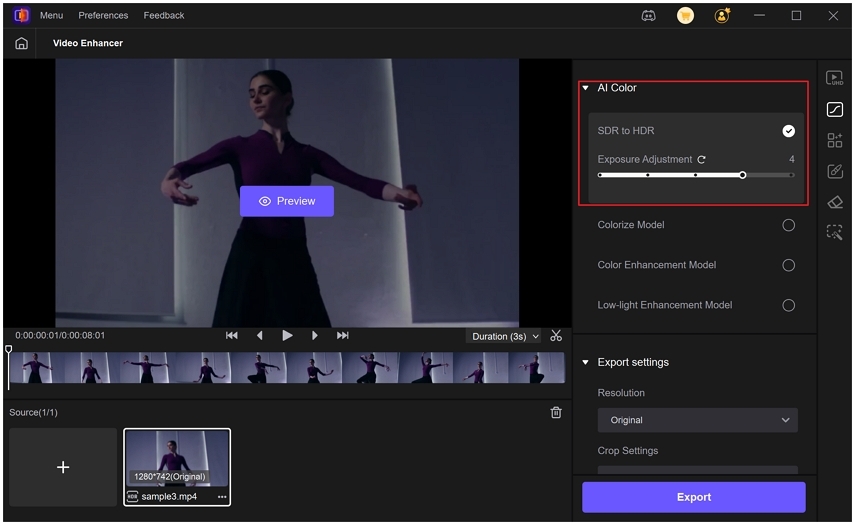
Step 1.Download HitPaw VikPea, open it, then choose AI Color > SDR to HDR Model and import your video.

Step 2.Use the Exposure Adjustment slider to fine-tune brightness after dynamic range expansion.

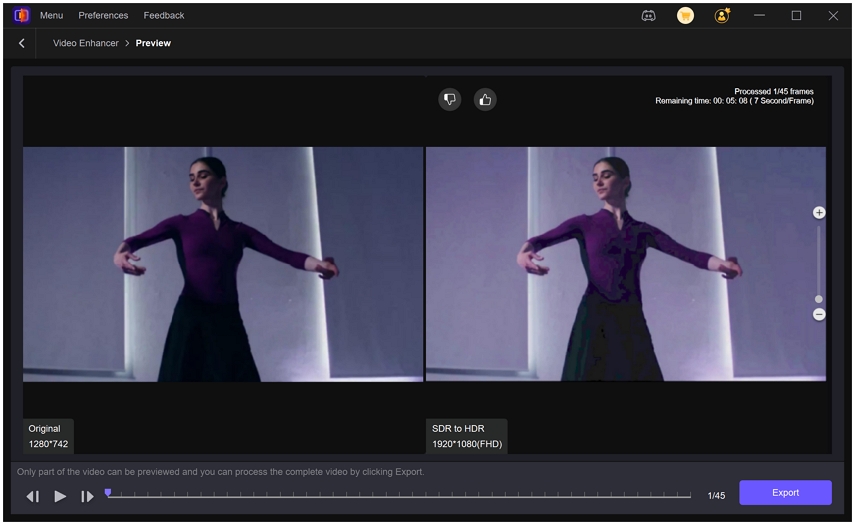
Step 3.Set your target resolution (up to 8K), preview the side-by-side comparison, and click Export to save your HDR-enhanced video.

Part 5. Frequently Asked Questions on Final Cut Pro HDR
Final Cut Pro users often face questions when working with HDR video. This section answers common issues such as fixing HDR brightness, understanding why HDR may not display correctly, and how to preview HDR content accurately using the tone mapping feature in the viewer.
1. How to Fix Final Cut Pro HDR Too Bright?
When HDR clips appear over-exposed, you can tame the highlights directly within FCP:
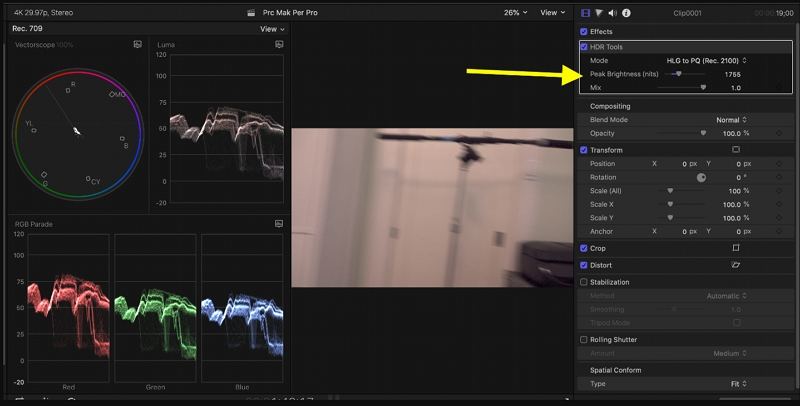
- In the Video Inspector, locate the HDR Tools effect on your clip.
Reduce the Peak Brightness slider (found under the PQ modes) until highlights fall back into a natural range. For HLG projects, switch to the Custom mode in HDR Tools and drag the Threshold control down to clip fewer nits above your target level.

- If you've applied additional color-correction effects (Color Wheels, Color Curves), ensure HDR Tools is placed last in the effect stack so it remaps any overshoot caused by grading.
- Optionally, add a Color Wheels effect before HDR Tools and pull down the Highlights wheel to catch any remaining hot spots.
2. Why Doesn't Final Cut Pro X Handle HDR Video Well by Default?
By default, Final Cut Pro previews all clips on the standard viewer which is SDR-calibrated. If you haven't configured an HDR-capable library or connected an HDR monitor, FCP will automatically tone-map your footage to SDR for display:
- Library Settings: If your Library isn't set to Wide Gamut HDR, Final Cut treats all media as SDR, flattening extended brightness and color information.
- Viewer Limitations: The built-in Viewer in Final Cut Pro is SDR by default. Without choosing Show HDR as Tone Mapped, you won't see true HDR output unless you route video to an external HDR display via HDMI or Pro Display XDR.
- Media Proxies: When working with proxies, HDR metadata is stripped away, so you must switch back to original media to regain full dynamic range.
3. How Do You Show HDR as Tone Mapped in Final Cut Pro?
To preview HDR clips accurately on an SDR monitor or within the standard viewer:
- Select an HDR clip in the timeline or Browser so it appears in the Viewer.
- Click the View pop-up menu in the upper-right corner of the Viewer.
- under the display section, enable show hdr as tone mapped.
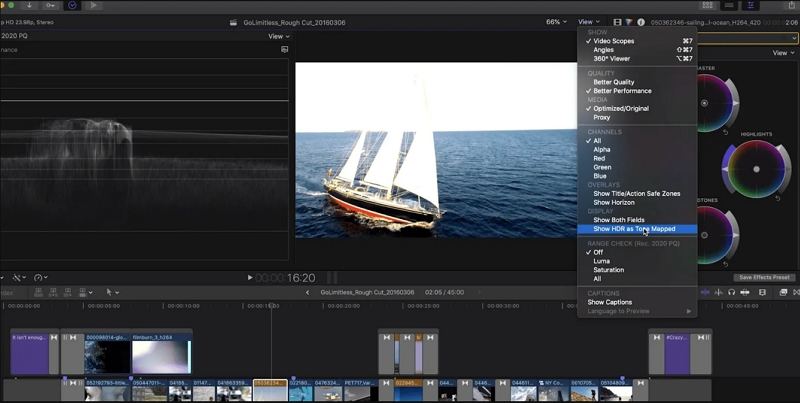
Final Cut Pro will apply a real-time SDR conversion that simulates how the HDR content will look on non-HDR displays, ensuring your color grades and exposure adjustments translate correctly.
Conclusion
Mastering Final Cut Pro HDR Video workflows empowers you to deliver stunning, future-proof content across platforms. Whether you are leveraging native FCPX HDR tools, converting SDR sources to HDR, or applying AI-driven enhancement with HitPaw VikPea, these techniques ensure your videos stand out in a crowded digital landscape. Experiment with each method to find the perfect balance for your projects, and never settle for less than breathtaking results.
Leave a Comment
Create your review for HitPaw articles


