ComfyUI Guide: Pros, Cons, and Workflow Explained
With recent advances in AI image generation, users now have greater control over how images are created and refined. One powerful tool in this space is ComfyUI, known for its flexible, node-based workflow that allows precise control over each stage of image generation. Beyond its native capabilities, ComfyUI can also integrate with external AI tools—such as HitPaw—to further enhance image quality and post-processing results. In this article, we’ll take a closer look at how ComfyUI works and how it fits into a modern, customizable AI image-generation pipeline.
Part 1. What Is ComfyUI
ComfyUI was initially released in January 2023 by “comfyanonymous,” and it has quickly grown in popularity and influence. This tool is a free, open-source, node-based graphical tool with generative AI abilities, popular with image generation models like Stable Diffusion.
This is a popular AI image generation model which creates generated images based on basic prompts and text descriptions. Rather than using a traditional menu or text prompt system, ComfyUI lets you build and customize entire creation workflows.
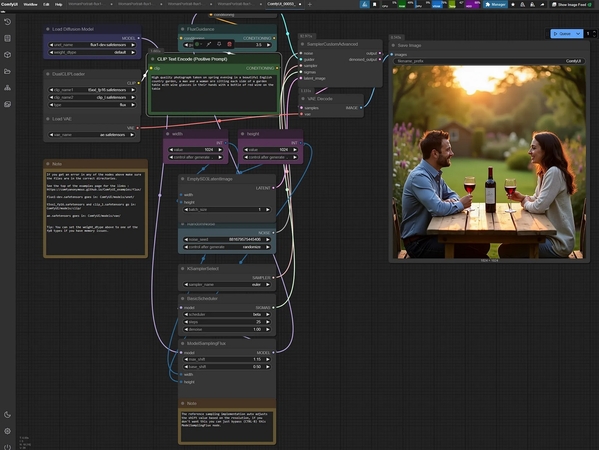
Part 2. What Are the Key Characteristics of ComfyUI AI?
The following are some of the best characteristics or features of the ComfyUI model:
1. Node-Based Interface
ComfyUI uses a visual, block‑and‑wire system where each node, which is draggable, is like a specific step. It is like loading a model, processing a prompt, or upscaling an image.
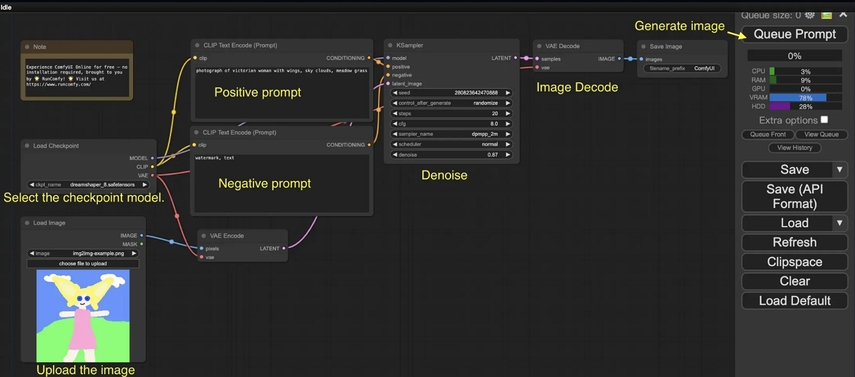
2. Custom Workflow Creation
You’re not limited to preset templates, as you can create any pipeline you desire, like text-to-image, in-painting, and upscaling. Users just connect the nodes in their own sequence and save these workflows as JSON files.
3. Full Pipeline Visibility
The ComfyUI AI tool highlights each node as it runs, showing you the exact order and status of every step. This transparency helps you learn, debug, and refine your workflows.
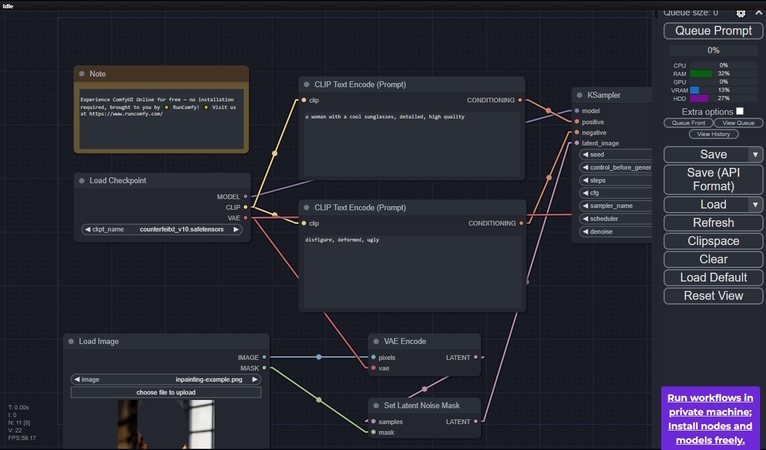
4. Advanced Parameter Control
Every node shows its settings, like sampler type, filtering options, or upscaling strength. Furthermore, you can fine-tune each one manually or connect nodes for better adjustments.
5. Smart Optimization & Low
Other characteristics of ComfyUI include its optimization, which is built to re-run only the parts of your workflow. It also manages memory efficiently, splitting tasks across GPUs and more.

6. Extensibility & Open Source
This open-source tool is fully under GPL‑3.0, so anyone can inspect, modify, or extend it. There’s a rich ecosystem of community-made custom nodes for tasks like animation, interactive selection, and more.
7. Free and Cross‑Platform
For users, the ComfyUI model is a free source that works on Windows, macOS, and Linux without any cost. Moreover, there’s a standalone desktop version with auto‑updates, code-signing, and bundled Python.
Part 3. ComfyUI Examples: Some Real-World Use Cases
Now, let's quickly go through some of the ComfyUI examples given below:
Image & video enhancement
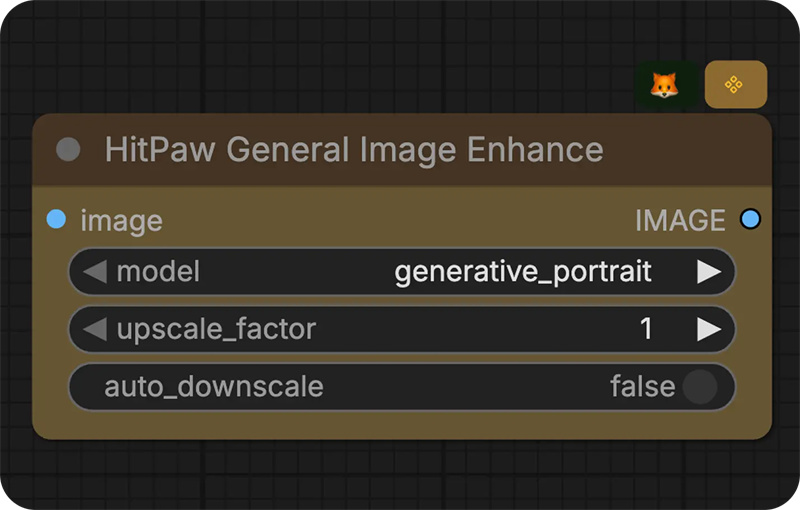
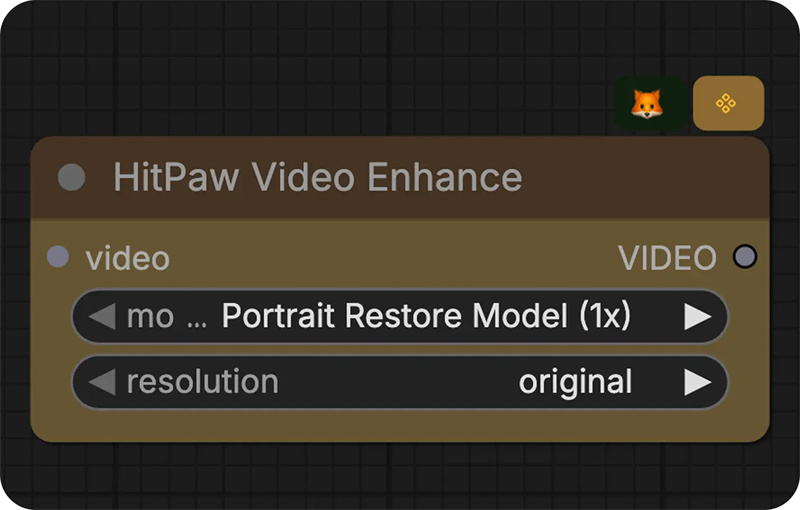
By integrating the HitPaw API, ComfyUI enables professional-grade image and video enhancement—such as upscaling, denoising, and quality refinement—directly within the same node-based workflow.
Text-to-Image Pipeline
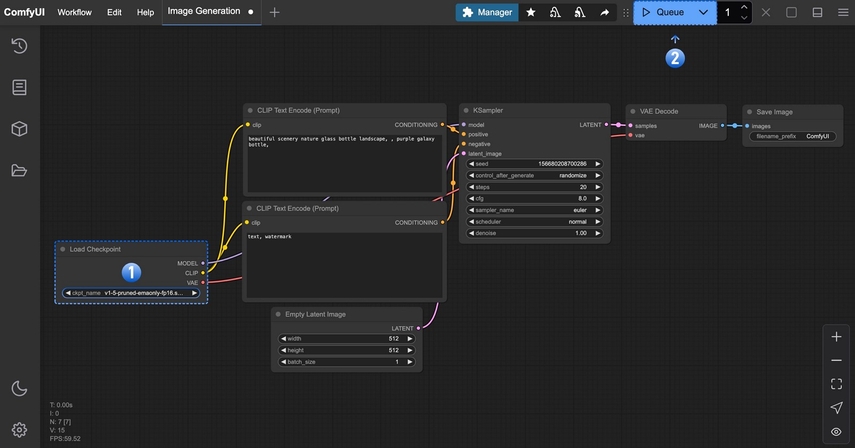
You start with a text prompt, load a Stable Diffusion model, and connect nodes. Tools like Flux.1 can be plugged in for richer visuals. It's perfect for turning text into high-quality artwork by having full control over each setting.
Img2Img and In-painting
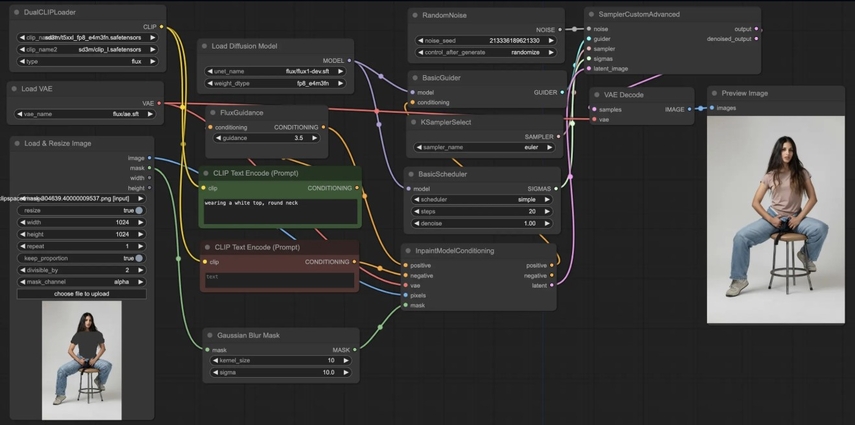
This workflow starts with your base image, which you can reshape using latent and decoders and regenerate refined versions. You can proceed to In-paint things further by selecting a region and recreating it with a prompt.
Interior Design Mockups
ComfyUI is used in interior design to create simple sketches or room blueprints with ControlNet and LoRA models. Its nodes process the sketch into lifelike mockups, allowing clients to preview a live setup.

Multi-Stage Upscaling Workflows
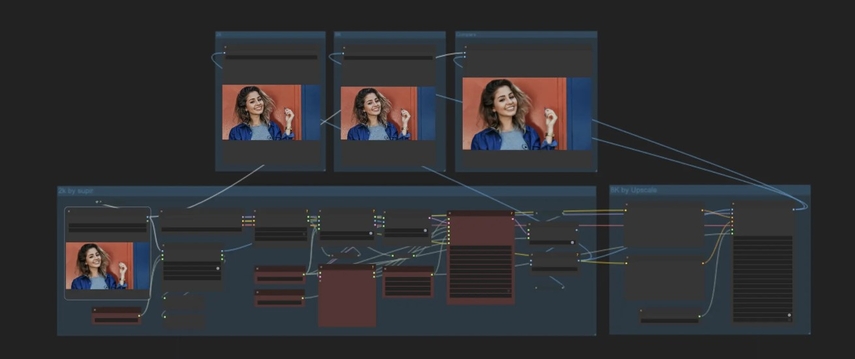
Users can turn a small image into a bigger one without losing quality with its multiple upscaler nodes. Using tiled diffusion or super-resolution models, it produces sharp, high-resolution images. Plus, you can read full AI upscaling handbook in ComfyUI.
Part 4. What Is the Impact of ComfyUI Model on the Design Industry?
ComfyUI is changing how the design world works, so learn how else it's affecting the design industry:
1. Accelerates Prototyping: With ComfyUI AI, designers can turn ideas into visuals in minutes by using modules like ControlNet,
2. Low-End Hardware Friendly: This tool intelligently manages memory, making it efficient with limited VRAM.
3. Enables Complex Design Workflows: It supports highly advanced setups, like image generation, image-to-image node refinement, and detail addition through in-painting.
4. Shifts Skills Toward “Art Engineering”: Designers are no longer just drawing or painting; they’re building smart workflows with ComfyUI.
Part 5. What Are the Pros and Cons of ComfyUI?
As every tool has its advantages and flaws, the ComfyUI model is the same, so go through some of the following:
Pros
- Deep Customization via Nodes: ComfyUI enables you to build visual nodes with functions such as loading models, applying samplers, or upscaling.
- Workflow Transparency and Reusability: The node system lets you see each step clearly so that you can save it in JSON or PNG formats.
- Efficient Memory Use and Speed: The ComfyUI model is rerunning parts of the workflow.
- Rich Plugin Ecosystem and Open-Source Freedom: Being open-source under GPL‑3.0 means anyone can adapt and extend ComfyUI.
Cons
- Steep Learning Curve for Newcomers: The node-based visual system overwhelms newcomers in the industry, like Automatic1111.
- Initial Setup Can Be Technical: You need to get started with Python right away, setting up models.
- Layouts Vary: ComfyUI AI workflow can look different, so it can take time to interpret workflows.
Part 6. Is ComfyUI AI Better Than Traditional Stable Diffusion WebUIs
In comparison to the traditional methods, using it gives you full creative control, optimized speed, and the ability to build professional-grade AI workflows. The following are some other advantages of the ComfyUI model:
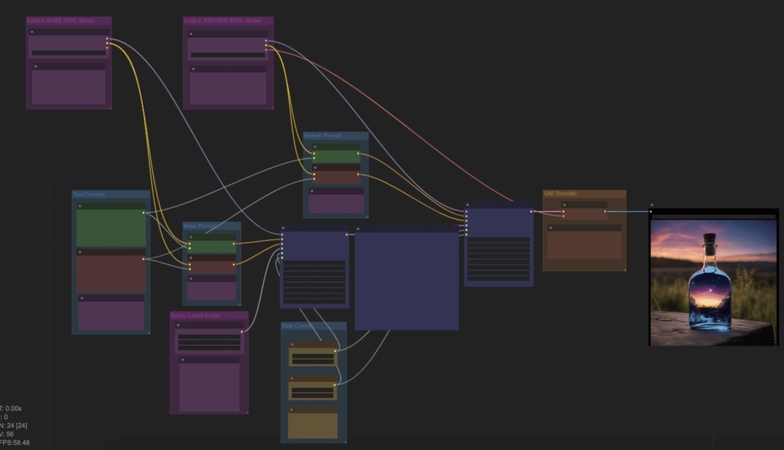
1. Deeper Customization: You can build advanced, custom image workflows using nodes for full control.
2. Visual Workflow Transparency: This tool allows you to see every step in the process and the changes being made.
3. Faster and More Efficient: With the use of smart memory, it makes it faster, especially on low-end hardware.
4. Reusable Workflows: Once satisfied with a workflow, save and reload entire workflows for future use.
5. Large Plugin and Node Library: There are tons of community-created extensions for further animations, upscaling, and more.
Part 7. HitPaw FotorPea: From Complex Pipelines to One-Click AI Photo Enhancer
As discussed in the previous sections, ComfyUI provides powerful generative AI capabilities for transforming existing images through a highly flexible, node-based workflow. However, this flexibility comes with a steeper learning curve, requiring users to understand models, nodes, and parameter settings to achieve optimal results.
When working with images that are blurry, damaged, or poorly colored, HitPaw FotorPea offers a more straightforward enhancement option. Its desktop version is designed for users who want high-quality results without complex setup or technical expertise. With just a few clicks, it can restore details, remove imperfections, and apply realistic color correction using built-in AI models. As for more detailed information about HitPaw X Comfy, you can check here.
Key Features
1. Fixes blurry, scratched, or faded images by sharpening faces and clearing up textures.
2. Restores facial details, like smooth skin, brightens features, and more, while keeping the look natural.
3. Adds realistic color to old black-and-white generative images to make them look natural.
4. Removes scratches, dust, and discoloration from AI-generated photos.
5. Efficiently enhance multiple photos at once up to 4K quality.
Steps for Enhancing Damaged Photos with FotorPea
To understand better how HitPaw works and enhance the damaged image, follow these steps:
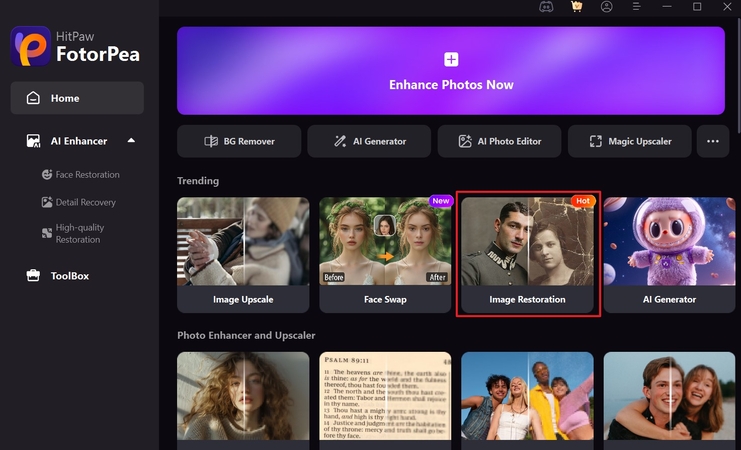
Step 1. Import Image for Photo RestorationOn the main interface of HitPaw FotorPea, click the “Image Restoration” button and insert an image.
Step 2. Add Suitable Prompt and Generate
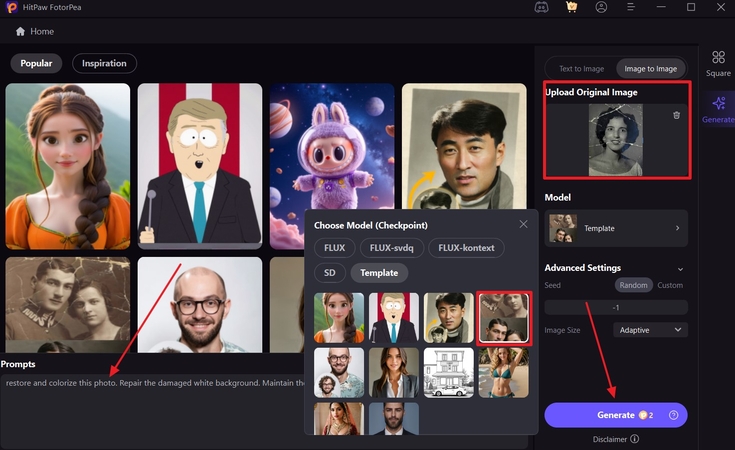
After that, import image under the “Upload Original Image” section, enter the desired prompt, and choose the suitable “Model” in image to image mode. Now, hit the “Generate” button to begin the restoration process.
Step 3. Download the Final Enhanced Picture
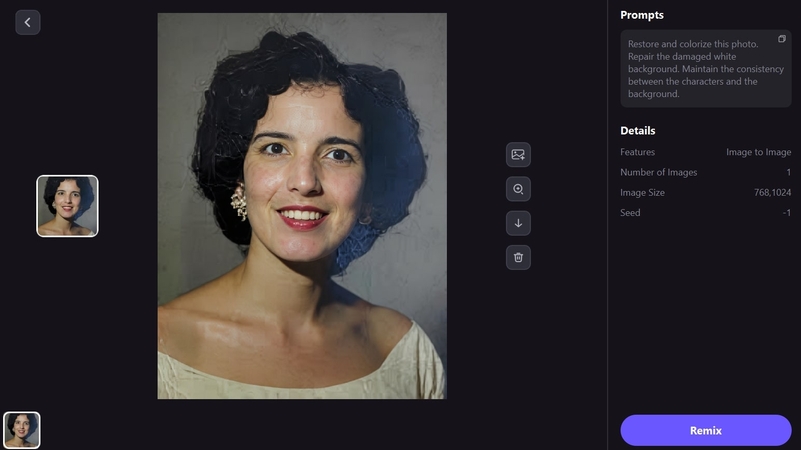
Once that's done, press the “Download” icon on the restored image and save it on your device. You can also enlarge it by clicking on the “Enlarge” icon appearing on the generated image for a better look.

Video Tutorial - HitPaw Image & Video Upscaling to Power Up Your ComfyUI Workflow
Part 8. FAQs on ComfyUI
Q1. What hardware do I need to run ComfyUI?
A1. A decent GPU with 4 GB of VRAM is recommended, along with 16 GB of RAM, SSD storage, and a modern CPU. Moreover, it supports low-VRAM and CPU-only modes, but it comes with a slower performance rate.
Q2. Can beginners learn ComfyUI easily?
A2. ComfyUI is more technical than traditional UIs, with a steeper learning curve due to its node-based workflow. Therefore, it might seem difficult at once, but some users find its modular nature rewarding once mastered.
Q3. How does ComfyUI compare to AUTOMATIC1111?
A3. The AI image generative tool offers faster generation times and more efficient VRAM use with a lower memory footprint. However, the AUTOMATIC1111 is considered simpler and beginner-friendly for creating images.
Q4. Is ComfyUI for regular users?
A4. For casual users who want quick images, the AUTOMATIC1111 is a more straightforward way with a quick response rate. Also, ComfyUI suits intermediate to advanced users who want deep customization to create stunning images for different projects.
Q5. Does ComfyUI support advanced models and extensions?
A5. Yes, it supports Stable Diffusion, like 1.x, 2.x, and SDXL, as well as Flux, ControlNet, LoRA, and other nodes. The community of this tool has developed over 1,600 nodes for different purposes and generations.
Conclusion
In summary, this article introduced users to the concept of ComfyUI, its advanced image generation features, and more. Though it offers a wide range of generative AI nodes, it can sometimes lack in providing the best quality image. Therefore, you can always turn to HitPaw FotorPea to achieve a 4K quality image within seconds.


 HitPaw Edimakor
 HitPaw VikPea (Video Enhancer)
 HitPaw Univd (Video Converter)
![Find My Doppelgänger: 7 AI Face Match Tools on 2026 [100% Useful]](https://images.hitpaw.com/topics/fotorpea/find-my-doppelganger-cover.jpg)


Share this article:
Select the product rating:
Daniel Walker
Editor-in-Chief
This post was written by Editor Daniel Walker whose passion lies in bridging the gap between cutting-edge technology and everyday creativity. The content he created inspires the audience to embrace digital tools confidently.
View all ArticlesLeave a Comment
Create your review for HitPaw articles