How to Compress a Video on iPhone - 4 Easy & Free Methods (2026)
Compressing video on iPhone can be used in many ways: It can allow you to ensure your device has enough memory to store additional media, accelerate transferring of files, reduce the amount of data you use when sharing videos or uploading them, and enables sending large videos via messaging applications and email services that have size limitations. When you understand how to impressively compress videos, you will enhance your iPhone experience and workflow to a higher level.
Ranging from proactive steps you can take before recording to post-recording compression methods utilizing integrated tools, online services, desktop software, and specialized mobile apps, this thorough guide will examine how to compress a video on iPhone.
Part 1. Why You Need to Compress a Video on iPhone
For a variety of everyday reasons iPhone users run across, video compression becomes essential. While producing gorgeous visual content, contemporary iPhones capture 4K resolution high-quality videos that result in big file sizes that can easily fill your device's memory. One of the main reasons for video compression is storage management.
One minute of 4K video might use up from 375MB to 400MB of storage, so a ten-minute film might consume almost 4GB. This storage use might become difficult fast for those using iPhones with 64GB or 128GB. Necessity for video compression is also fueled by sharing and communication requirements. While messenger services such WhatsApp limit video files to 16MB, email providers usually cap attachment sizes to 25MB or less.
Although social media sites have their own compression algorithms, uploading smaller files provides quicker upload speeds and improved user experience.
Part 2. How to Compress iPhone Videos Before Recording
Camera Settings Reducing Video Resolution
The most efficient approach to control video file sizes is to modify your recording settings prior to commencing filming. While still preserving great video quality for most uses, this forward-looking strategy removes post-recording compression necessity.
Adjust the video recording settings of your iPhone by:
- 1.Open the Settings app on your iPhone.
- 2.Scroll down and tap on Camera.
- 3.Choose Record Video
- 4.Select from the following resolutions and frame rates:
- 30 fps, 720p HD (least file size)
- 30 frames per second in 1080p HD: balanced size and quality
- Superior quality and a bigger file are 1080p HD at 60 fps.
- Highest quality, largest file: 4K at 24/30/60 fps.
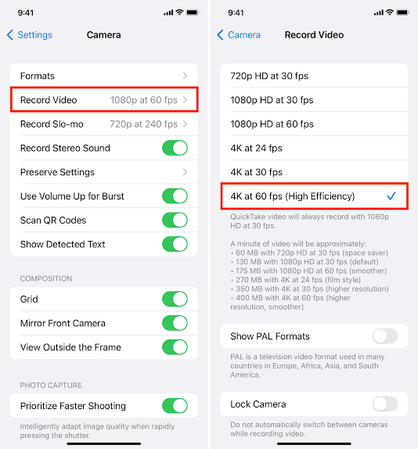
1080p HD at 30 frames per second offers a great equilibrium of video quality and file size for most routine recording needs. While maintaining reasonable file sizes, this configuration enables most devices to show videos that are excellent.
You can also change the Record Slo-mo settings in the same menu to manage the file sizes of slow-motion videos, which have rather big frame rates.
Part 3. How to Compress a Video on iPhone After Recording
Method 1: How to Compress a Video on iPhone After Recording with Built-in Editing Tools
Basic video editing features included in iPhone's built-in Photos app can assist to lower file sizes via trimming and exporting choices.
Making compression using the Photos App:
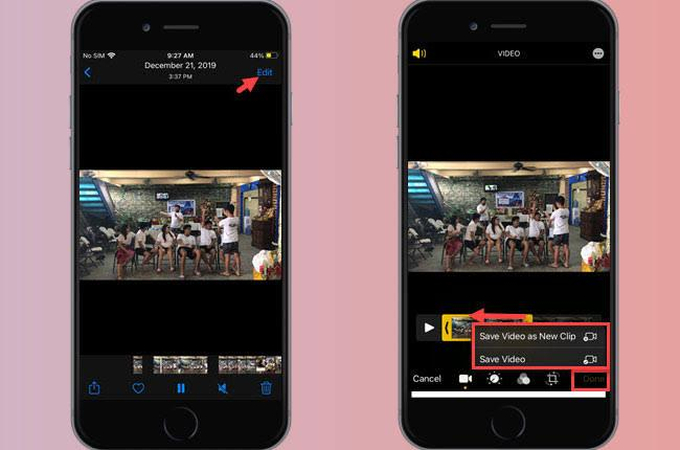
- Open the Photos app and find your video.
- Tap the video to open it.
- Tap Edit in the top right corner.
- Get rid of extra video sections using the trim handles at the bottom.

- To produce a shorter, smaller file, tap Done and choose Save Video.
Making compression using the Share Feature:
- Choose the video in your Photos app.
- Tap the Share button (square with up arrow).
- Select Mail or Messages.
- Choose a lesser file size option by turning "Low quality image mode" toggle on.
- Save the condensed version to your Photos and cancel the message.
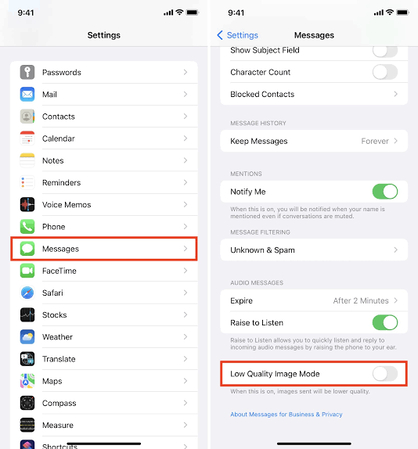
This approach makes use of iOS's automatic compression algorithms that start running when getting files ready to be shared via specific programs.
Method 2: How to Compress a Video on iPhone for Free Using Online Tools
Online video compressors offer convenient solutions for reducing file sizes without installing additional apps. These web-based tools work directly through your iPhone's Safari browser.
1. HitPaw Online Video Compressor
HitPaw Online Video Compressor stands out among online compression tools due to its superior compression algorithms and user-friendly interface designed specifically for mobile users.
Pros:
- Advanced compression technology that maintains video quality while significantly reducing file size
- Mobile-optimized interface that works seamlessly on iPhone browsers
- Support for multiple video formats including MP4, MOV, AVI, and more
- No watermarks added to compressed videos
- Batch compression capabilities for multiple files
Cons
- Doesn't work without internet connection
- Long processing time for very large videos
Steps to Use:
Step 1:Open your browser and navigate to the HitPaw Online Video Compressor

Step 2:Tap Choose Files and select your video from Photos. Choose your desired compression level (Low, Medium, or High compression)

Step 3:Tap Compress and wait for processing to complete. Download the compressed video to your iPhone

2. Clideo
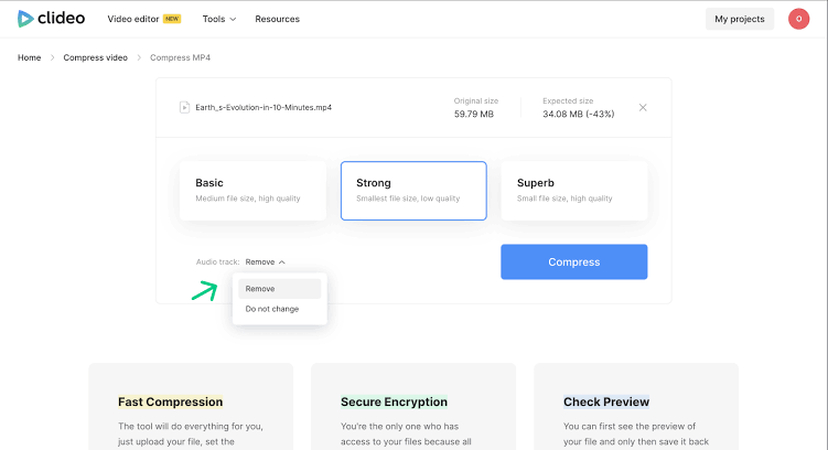
With several output choices meant for various sharing needs, Clideo provides a simple video compression solution. The best part is that it is an easy and simple online video compressor and interface is simple for immediate usage.
Pros:
- Easy, user-friendly interface
- Several compression presets for various platforms
- Supports several input types
Cons:
- Adds a watermark to free versions.
- Free users have little file capacity.
- Needs a dependable internet connection
3. FreeConvert
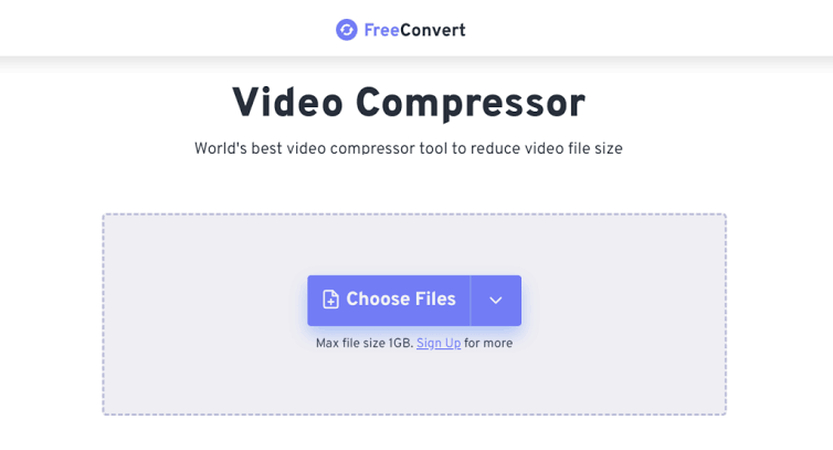
For sophisticated users, free convert offers thorough video compression with many customized options. It is perfect for those who want an advanced level video compressor. It allows the users to adjust video codec and increase or decrease resolution up to 10000% of the original video size.
Pros:
- Video codec options for high resolution videos
- Multiple compression methods to target file size, bitrate, quality, etc.
- Option to add subtitles
- Batch compression capabilities
Cons:
- Beginners may get lost in the complexity of the interface.
- Time for processing could be longer
- Limitations on free accounts regarding file sizes (max 1GB without sign up)
Method 3: How to Reduce a Video File Size on iPhone by Using Desktop Compressors
Desktop compression software offers the most powerful and flexible options for video compression, though they require transferring files between your iPhone and computer.
1. HitPaw Univd (HitPaw Video Compressor)
HitPaw Univd represents the pinnacle of video compression technology, specifically designed to handle 4K and HD video compression while maintaining exceptional quality. This desktop solution offers professional-grade compression capabilities that surpass both online tools and mobile apps.
Outstanding Features:
- Advanced AI-powered compression: Utilizes machine learning algorithms to optimize compression ratios while preserving video quality
- Batch processing capabilities: Compress multiple videos simultaneously, saving significant time
- Lossless compression options: Reduce file sizes without noticeable quality degradation
- Custom compression settings: Fine-tune parameters including bitrate, resolution, and format
- Multi-platform support: Available for both Windows and Mac systems
- Clean, intuitive interface: User-friendly design that makes professional compression accessible
- Format versatility: Supports over 1000 video and audio formats
- High-speed processing: Utilizes hardware acceleration for faster compression times
Steps to Use:
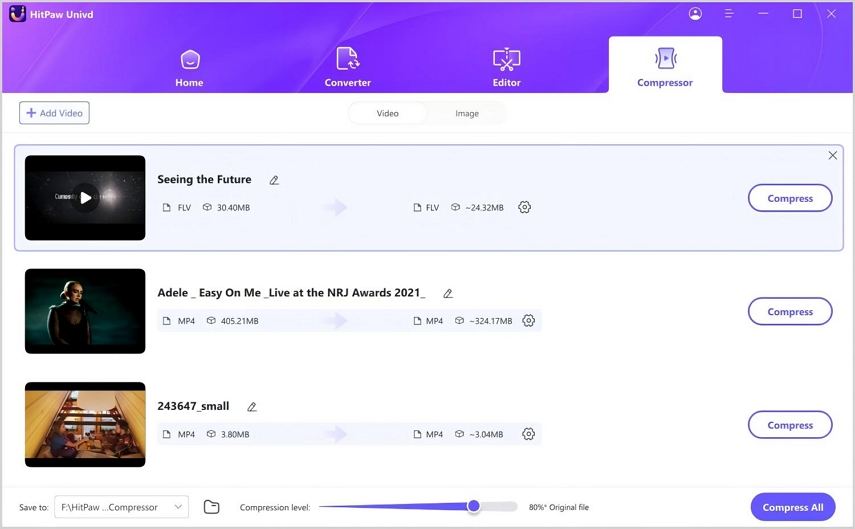
Step 1:Download and install HitPaw Univd on your computer. Transfer videos from iPhone to computer via AirDrop, iCloud, or cable.
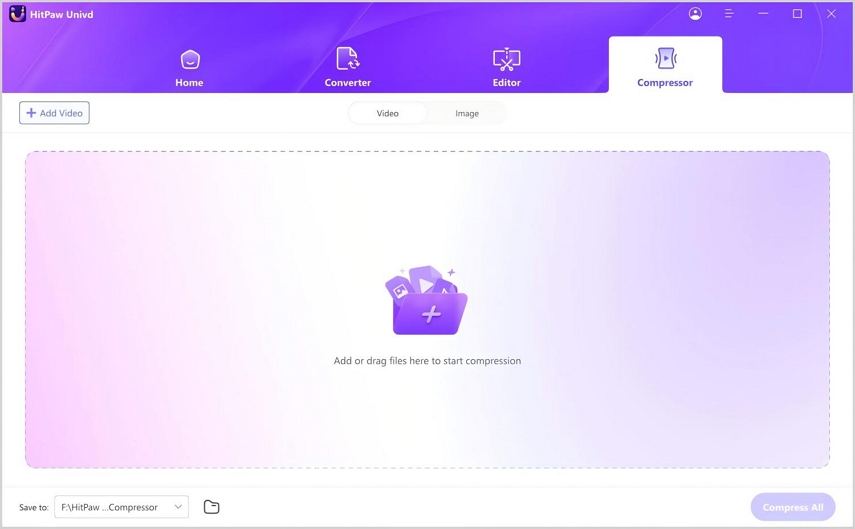
Launch HitPaw Univd and import your videos by clicking on "+" icon.

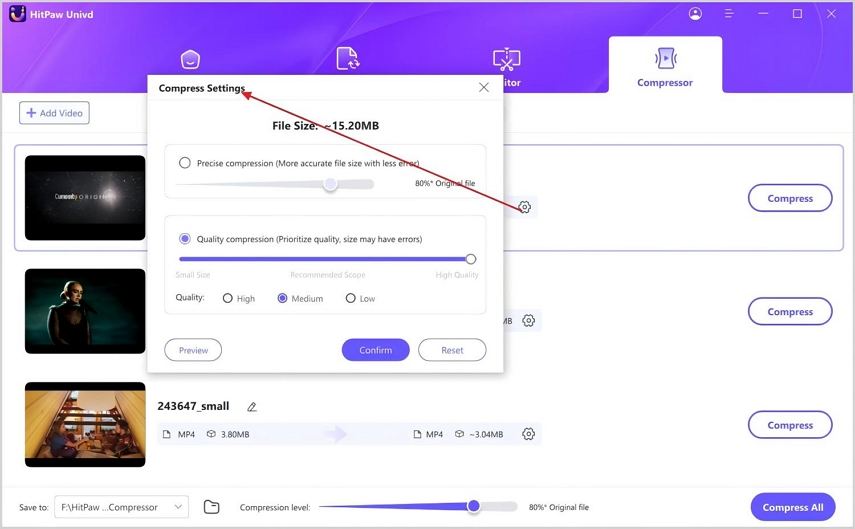
Step 2:To get the Compression Settings menu, press the gear icon next to the file.

Tips:
Accurate Compression: Use to ensure the video is compressed to a pre-set file size (e.g. 15.20MB) and the error is low.
Quality Compression: Select it in order to ensure a quality compression, but the final size can be minorly changed. Set the compression level (High, Medium or Low) according to the appropriate file size-quality relationship.
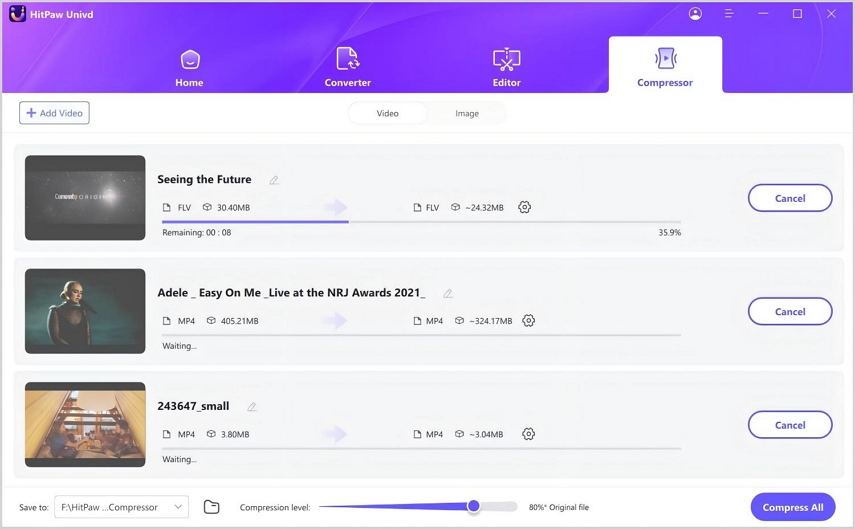
Step 3:After reading the instructions, click on the Preview button to have a preview of the effects of compression.

To save your settings, just click on the Compress button.

Finally, Transfer compressed videos back to your iPhone through USB.
2. VLC Media Player
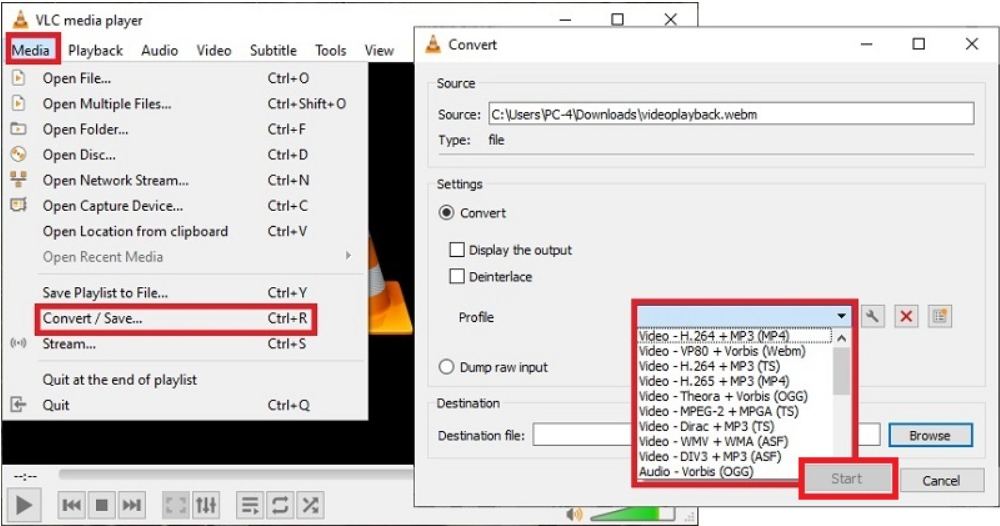
Though mostly known as a media player, VLC Media Player has strong video compression and conversion capabilities. In order to compress the size of your video files on iPhone with VLC, you will require utilizing the desktop version since the iOS has none.
Pros
- Comprehensive format support
- Accessible on all platforms
- Advanced controls with codec and resolution customization options.
Cons:
- Interface not designed with compression chores in mind
- Less preset possibilities
3. Capcut

For consumers who wish to simultaneously edit and compress, CapCut's desktop edition provides video editing with compression tools. You can either use their desktop version or mobile app to carry out the video compression tasks. It also requires you to have some sort of experience in using compression tools and is not beginner friendly.
Pros:
- Combines compression and editing
- Fast and reliable
Cons:
- Restricted sophisticated compression techniques
- In some situations, may add watermarks
Method 4: How to Make a Video Smaller on iPhone with Free Compression Apps
For iPhone users who wish to compress videos straight on their device without utilizing computers or online services, mobile apps offer the most practical answer.
1. iMovie
Apple's iMovie is pre-installed on the majority of iPhones and offers rudimentary compression through its export settings. However, if the users want to create the video that takes less space by adjusting the settings before making the video, it is not possible.
Pros:
- Sinks flawlessly with iOS
- Has core editing tools
- Comes pre-installed on iPhone as an app
Cons:
- Few compression possibilities before export
- Bigger app size
2. Video Compressor
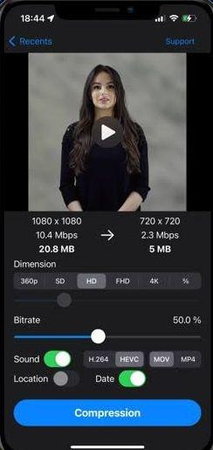
Simple compression is provided by Video Compressor App designed exclusively for iPhone users and is available to download on the App store. Providing multiple compression features including batch compression together with ease of use is its top priority.
Pros:
- Easy, natural UI
- Short compression method
- Multiple output options
Cons:
- Might include commercials
- Quality might vary depending on the source video
- Low processing for high-resolution videos
FAQs about Compressing a Video on iPhone
Q1. How do I compress a video on my iPhone without an app?
A1. By using the built-in sharing feature in the Photos app, you may reduce movies without installing more apps. iOS offers compression choices automatically when you send a video via Messages or Mail. Through Safari browser, which doesn't need app installation, you may also use online compression utilities.
Q2. How do I compress a video to send via email or WhatsApp?
A2. Share from the Mail app for email; automatically compresses videos to fit size restrictions. For WhatsApp, better quality control may be obtained by pre-compressing using any of the techniques indicated above, albeit the app automatically compresses videos during upload. For best outcomes, think about employing online tools like HitPaw Online Video Compressor.
Q3. Will video quality drop after compression?
A3. With little quality loss, contemporary compression algorithms-particularly those used in applications like HitPaw Univd-can help to greatly lower file sizes. But violent compression will always cause some loss in quality. Finding the ideal compromise between file size and acceptable quality for your particular requirements is the key.
Conclusion
From an intricate technical procedure, video compression on iPhones has become a straightforward job anyone may pick up. Whether you choose to prevent large files by adjusting camera settings, use built-in iOS features, leverage online tools, employ desktop software, or install dedicated apps, many options exist to suit your individual needs. HitPaw Univd stands apart as the top option for those looking for the most efficient and professional video compression experience.





 HitPaw VoicePea
  HitPaw VikPea (Video Enhancer)
 HitPaw FotorPea


Share this article:
Select the product rating:
Daniel Walker
Editor-in-Chief
This post was written by Editor Daniel Walker whose passion lies in bridging the gap between cutting-edge technology and everyday creativity. The content he created inspires the audience to embrace digital tools confidently.
View all ArticlesLeave a Comment
Create your review for HitPaw articles