


How to Take a DIY Professional Headshot with the Right Tools
Taking professional portrait photos at home is easy if you have the right tools. First, use a high-quality camera or a smartphone with a high-performance camera. Choose a clean and bright background and natural light from the window is the best choice. Wear simple, clean clothes and smile naturally. Use a tripod or ask a friend to take your photo. Keep the camera at your eye level. You can also fix brightness and sharpness by editing. Create great DIY headshots with a little effort, without the expense of a studio. Relax and be yourself!
Part 1: Why DIY Headshots Are a Smart Option
If you do not want to spend much money on photos, learning how to take DIY headshots is a good idea. You do not need a studio or photographer. You can take your own headshot at home with things you already have. DIY headshots give you control over how you look and when you take the photo. You can take as many photos as you want and choose the one you like. Many people now use DIY headshots for job sites, social media, and business pages.
Here are some simple reasons why this option works:
1. Save Money on Professional Photos
Professional photos can be expensive, especially when asked by a good photographer. However, if you take DIY headshots yourself at home, it is free. This method saves you money and makes you feel professional.
2. You Choose the Best Time and Place
If you take headshot photos yourself, you can always shoot whenever you want. No need to book a studio or wait for a photographer. By choosing a time and place where you can relax and be confident, photos will be better.
3. Take Full Control of the Results
In DIY headshots shooting, you can decide everything, such as appearance, dress, standing position, etc. You can shoot many times until you find a perfect piece. This gives you complete control over the final photo, giving you more satisfaction and happiness.
Part 2: DIY Professional Headshot Background Ideas
Your photo background matters a lot. When you take a DIY headshot, the background should look clean and not pull attention away from your face. You don't need anything fancy. You can use simple items in your home or yard. Try to choose a background that fits the kind of photo you need. If you want a more serious look, keep it plain. If you want it to look friendly, choose something with a little texture.
Here are some useful and easy background ideas:
1. Plain Bedsheets for a Simple Look
If you want a clean and simple background for headshots, a simple sheet is recommended. Tape the wall to prevent wrinkles. Bright colors such as white and gray make your face stand out and give a professional impression.

2. Bookshelf for a Smarter Look
Want to look smart and professional in your headshot? A neat bookshelf behind you works really well. It shows that you are organized and thoughtful. Make sure the books are arranged nicely and the shelf is not messy. This look is perfect for work or study profiles.
3. Greenery for a Natural Feel
When you put plants and trees behind them and shoot outdoors, you can make a fresh and natural headshot. Green adds a soft shade, giving the photo a relaxed atmosphere. If you find a place of good lighting in the quiet outdoors, you can take calm photos with nature motifs.
Part 3: Best DIY Headshot Tools and Accessories to Use
You do not need expensive equipment to shoot good DIY headshots. Several small tools will help you to take better photos with your smartphone or camera. These items are easy to use and cost-free. Make the shooting process simple and comfortable.
- Use a tripod to keep your phone or camera steady and straight.
- Try a ring light for soft light that makes your face look clear.
- A remote shutter helps you take the photo without touching the phone.
- Clip-on phone lenses can give you sharper and wider shots.
- Use a foldable stand or table if you do not have a full tripod.
Part 4: Styling Ideas for a DIY Professional Headshot
Clothing and appearance can greatly change the impression of DIY headshots. There is no need for fancy clothes, but it is important to keep a clean and well-organized impression. Make clothes, hairstyles and makeup simple and clean. The goal is to express your best self.
- Choose plain clothes without loud prints or logos.
- Use light makeup to smooth your skin and brighten your eyes.
- Brush your hair and keep it neat.
- Wear colors that look good with your skin.
- Smile naturally to make your face look relaxed and friendly.
Part 5: Editing Tips for DIY Headshot Perfection
After taking your DIY headshots, a few simple edits can make them better. You don't need to use big or hard software. Easy apps on your phone can do the job. These edits help your face stand out and remove small problems. First, cut your photo to show your face and shoulders clearly. Then, make it brighter to look fresh. If you see small spots or shadows, use easy tools to fix them. Keep the photo looking natural so you can use it for resumes, websites, or ID cards.
- Use simple phone apps for editing, no need for hard software.
- Crop your photo to show your face and shoulders clearly.
- Brighten the photo to make it look fresh.
- Fix small spots or shadows with easy tools.
- Keep the photo natural for use on resumes, websites, or ID cards.
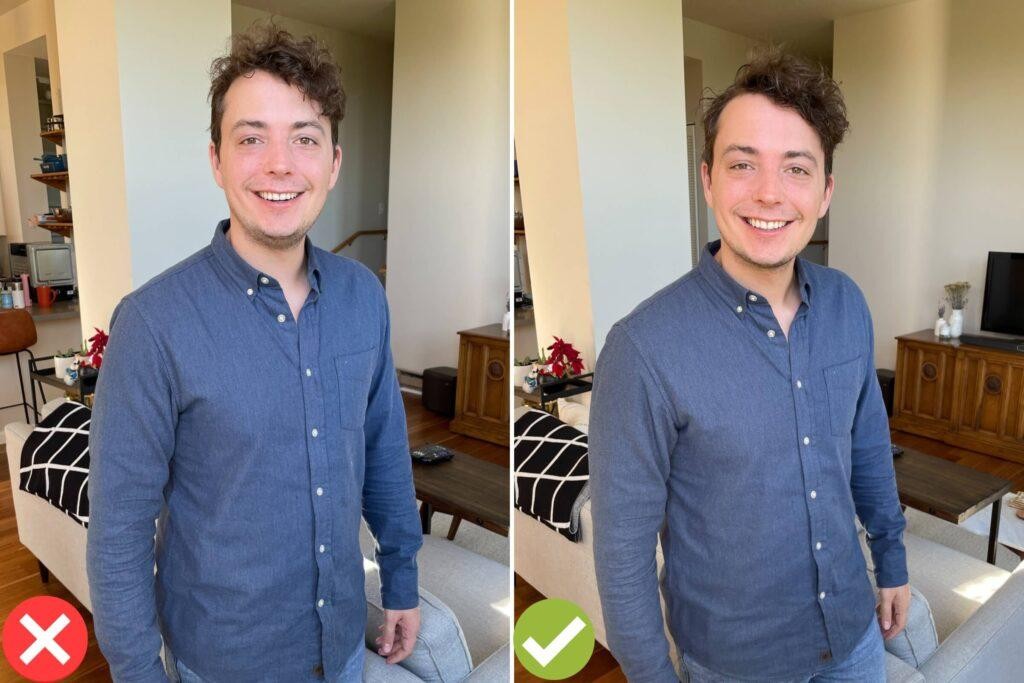
Part 6: [Bonus Tip] Use HitPaw FotorPea ID Photo Tool for Headshot DIY Edits
If you want to quickly edit DIY headshots, HitPaw FotorPea ID Photo Tool is very helpful. This tool helps you make clean headshots that work for many uses, like ID photos, passport photos, or job photos. It is easy to change the background to plain white, blue, or gray. You can also crop the photo to the right size with just a few clicks. This tool is recommended for those who want to fix headshots without learning difficult apps. With this tool, you can finish professional headshots created with DIY with a clean finish that can be used anywhere.
Key Features of HitPaw FotorPea:
- Improve your headshot's clarity and colors using an easy AI photo enhancer.
- Create perfectly sized photos with a simple passport-style photo maker.
- Use an AI portrait tool for smooth and natural-looking DIY headshots.
- Remove unwanted objects from the background to keep your photo clean.


Steps to DIY Headshot with HitPaw FotorPea
Step 1:Open the ID Photo tab in HitPaw FotorPea and click Create to upload your portrait, or drag and drop the image directly into the editor.
Step 2:The AI will instantly remove the background from your photo. To fine-tune details, use the Brush or Erase Selection tool located at the bottom of the interface.
Step 3:Click the Size button and choose your country. HitPaw offers pre-set sizes for common standards like those in the United States, United Kingdom, Japan, and Spain.
Step 4:Align your photo within the frame, select a suitable background color if necessary, and preview the result. Once everything looks right, click Export to download your ready-to-use ID photo.
Conclusion
Taking profile photos with DIY is easy and convenient. No studio or photographer required. You can use simple items such as sheets and walls at home. With proper lighting, a clean shirt and a small smile, you can take clean photos. DIY headshots are ideal for job hunting, LinkedIn, or your own work. It is important to keep your photos clear. Try several times until you can take your favorite photos. If you want to improve your photos, you can use HitPaw FotorPea. It helps you change the background and cut the photo to the right size.

 HitPaw Univd (Video Converter)
 HitPaw VoicePea
  HitPaw VikPea (Video Enhancer)


Share this article:
Select the product rating:
Daniel Walker
Editor-in-Chief
This post was written by Editor Daniel Walker whose passion lies in bridging the gap between cutting-edge technology and everyday creativity. The content he created inspires the audience to embrace digital tools confidently.
View all ArticlesLeave a Comment
Create your review for HitPaw articles