Quick Ways to Fix and Reduce Photographic Photo Noise
You get a shot each time, and you desire your photo to be clear and defined without anything taking your eye from it. On the other hand, maybe it will be grainy and speckled at random moments when the image looks. That is referred to as noise in photography. Noise has the potential to unprofessionalism a photograph, and working with it may be annoying. Luckily, such may be minimized or mitigated and yet take and then later in editing. Here, we are discussing the why there is photographic noise, how to avoid it when photographing, and how to eliminate it when editing.
Part 1: What Is Noise in Photography?
What is noise in photography? Noise in photography is random color or brightness variation in an image, usually in the form of speckles or grain. Randomness causes the image to look less smooth or blurry. The two most frequent types of noise are:
- Luminance Noise: It appears as black-and-white grain in your images. It usually crops up in low-light settings.
- Color Noise: Specks of color, normally in the blacks, and normally in photographs with high ISO values.
Although a few photographers use photographic noise to enhance a picture in order to present it with a retro or artsy look, the majority does not want that. Noise serves to actually ruin the quality of your photos when printed or greatly enlarged.
Part 2: What Causes Photographic Noise?
There are three major reasons why noise occurs in your pictures. Oftentimes, they are due to:
- High ISO Settings: ISO level is how much the sensor of the camera is sensitive to light. If you are in a high ISO, you can take pictures you might otherwise not be able to take without being seen in low light, but it increases the chance of photographic noiseshowing up. Your ISO is greater, the greater chance there is of noise.
- Low Light Conditions: When the light is low to expose the image properly, your sensor in the camera adjusts by increasing the ISO, and this can cause more noise.
- Small Sensor Size: Smaller sensor cameras generate more noise, particularly in low light, than larger sensor cameras.
- Long Exposure Times: Longer exposure time provides more light to hit the camera's sensor. Even though it's useful for low-light scenes, it might also increase the possibilities of noise when the exposure becomes too long.
- Heat: Under certain conditions, the sensor in the camera generates heat, and that increases noise, especially for long exposure shots.
Part 3: Tips to Avoid Photographic Noise When Shooting
While it is possible to reduce photographic noise by editing, it is always better to attempt to prevent it from occurring in the first place. Here are some tips on how to prevent photographic noise in your photography shoot:
Keep ISO as Low as Your Camera Allows
The lower your ISO, the cleaner your photos will be for photographic noise. Raising ISO in low light will help you, but don't take it as far as possible so that the unwanted noise stays away. Most cameras today are good at high ISO, but always use smaller values where you can so your output is cleaner.
Use a Tripod to Stabilize and Allow Longer Shutter Speeds
One method of preventing high ISO is by using a tripod. A tripod holds the camera, and slower shutter speeds are achievable without motion blur. A slow exposure will give a correctly exposed photo without needing to increase the ISO.
Add External Lighting When Possible
If you're shooting indoors or low-light, try to utilize some external light. That can be a flash, softbox, or something else. The more the better because then your camera can use a lower ISO setting, which minimizes noise.
Shoot in RAW for More Flexibility in Editing
If you are shooting in RAW, your camera is able to record more information about the photo, and that makes it more flexible when you are editing. RAW images retain more detail in shadows and highlights so you can alter noise when you process later without having to sacrifice important details.
Part 4: Best Ways to Reduce Photographic Noise in Editing
Occasionally, in spite of your best efforts, there will be noise in your photographs. Happily, there are numerous ways to remove noise with image editing software. Here are a few that are effective:
Use Editing Tools with Noise Reduction Sliders
The majority of image editing programs come equipped with a photographic noise reduction function. In the majority of programs, you will be able to have sliders that allow you to turn up or down the amount of the noise reduction for your photo. The greater the noise reduction, the less of the noise you will notice in your photo, the cleaner and smoother your photo will look.
Tweak Luminance and Color Noise Separately
Most noise reduction systems permit you to separate luminance (brightness-type) and color (color-type) noise and reduce each of them individually. That's because if you reduce the color noise to an extreme, your photograph will look unnatural. Reducing each individually enables you to reduce loss of image quality and remove the objectionable effect.
Apply Selective Reduction to Avoid Loss of Sharpness
When removing noise, you usually have a problem that it softens details in your picture. In order to avoid this, use selective photographic noise reduction. That is, you can lower noise only where you really need to in your picture (typically the shadows and darker areas), without losing crispness in the detail areas of your picture.
Try AI-Powered Editors for Faster, Better Results
Artificial intelligence (AI) has made it simple to decrease noise and streamline it. Noise can be automatically identified by using photo editors with AI features. Photo editors with AI features can automatically remove noise so that the photo will not lose its quality. Photo editors with AI features scan the photo and selectively diminish the noise for you with minimal effort and maximum output.
Part 5: Bonus Tip: Reduce Photographic Noise with HitPaw FotorPea
If you're looking for a quick and effective way to reduce noise in your photos, HitPaw FotorPea is an excellent AI-powered image editor that can help. This tool uses advanced artificial intelligence to detect and reduce photographic noise, ensuring that your photos remain sharp and clear. HitPaw FotorPea is not just very effective, but it's also very easy to use, making it available to photographers of all experience levels. With a few clicks, you can enhance the quality of your photos without compromising important details or textures.
Key Features of HitPaw FotorPea to Reduce Photographic Noise:
- AI Denoise: Uses smart AI to automatically remove noise from photos.
- Keeps Details: Reduces grain without losing sharpness or texture.
- Batch Support: Clean up multiple photos with one click.
- Two Denoise Modes: Choose between Creative (for heavy noise) and Realistic (for natural enhancement).
Steps to Fix Photographic Noise Using HitPaw FotorPea
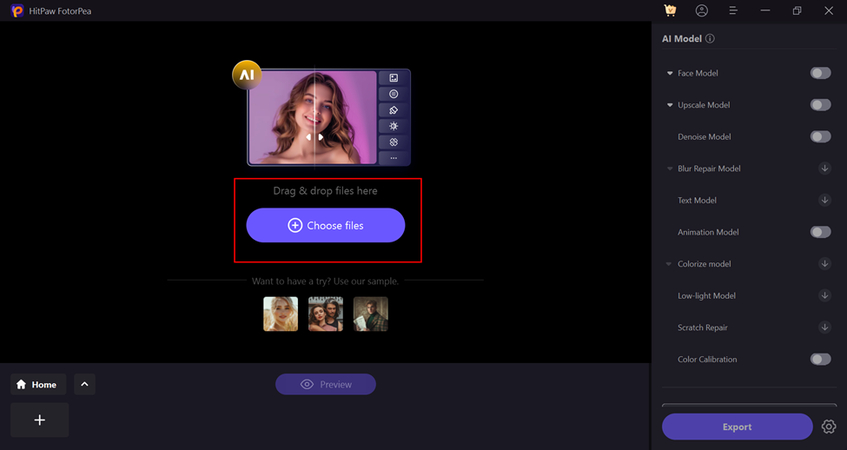
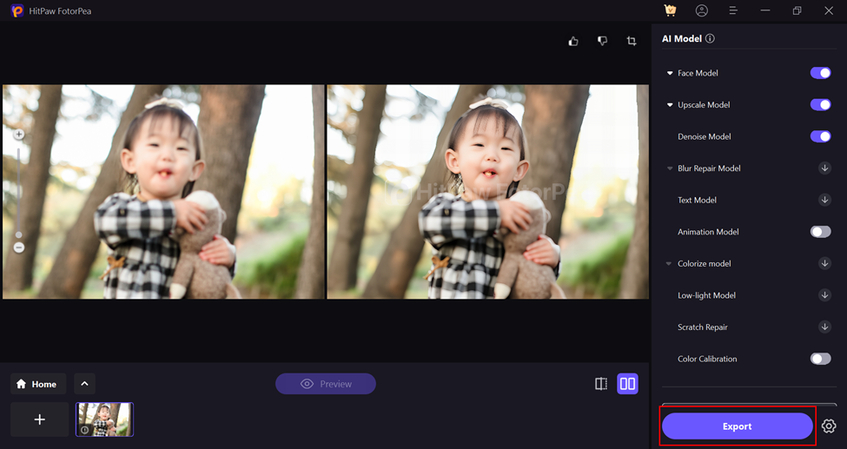
Step 1:Open the HitPaw FotorPea application on your device. You can either click to select an image or simply drag and drop the JPG file into the interface for quick upload.

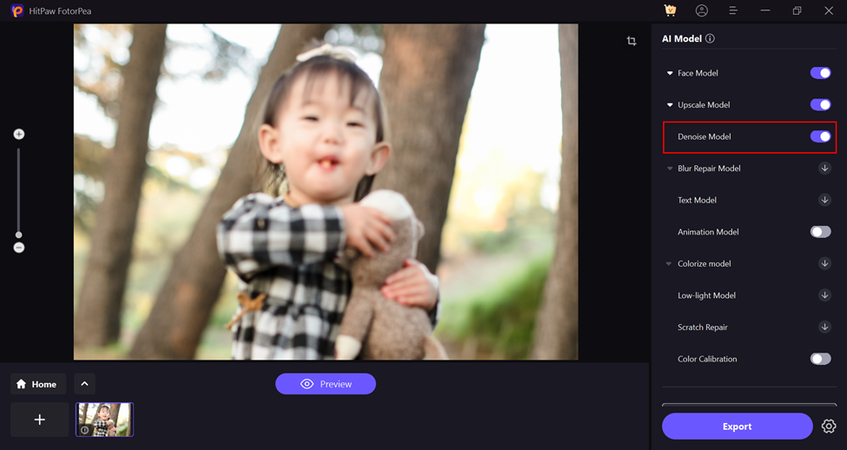
Step 2:Once your image is uploaded, choose the Denoise model from the available enhancement options. This tool is designed to target and reduce JPG compression artefacts like blurriness and blocky pixels.

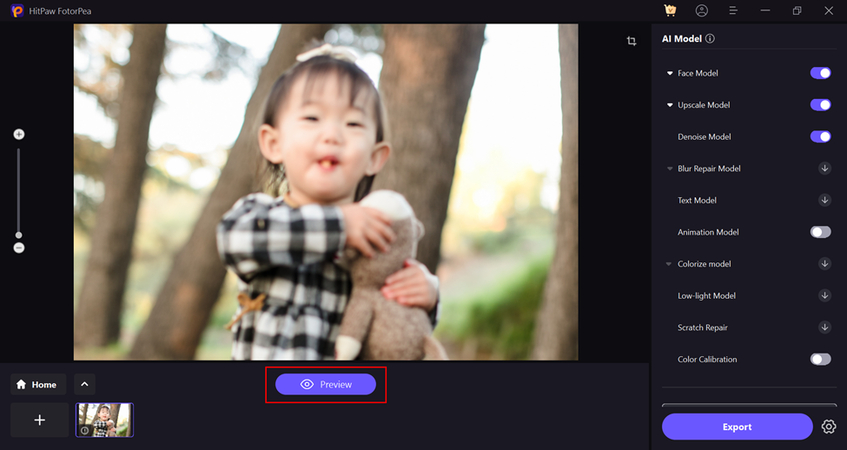
Step 3:After selecting the Denoise model, click on the Preview button. This allows you to see how the AI enhancement will affect your image before finalizing any changes.

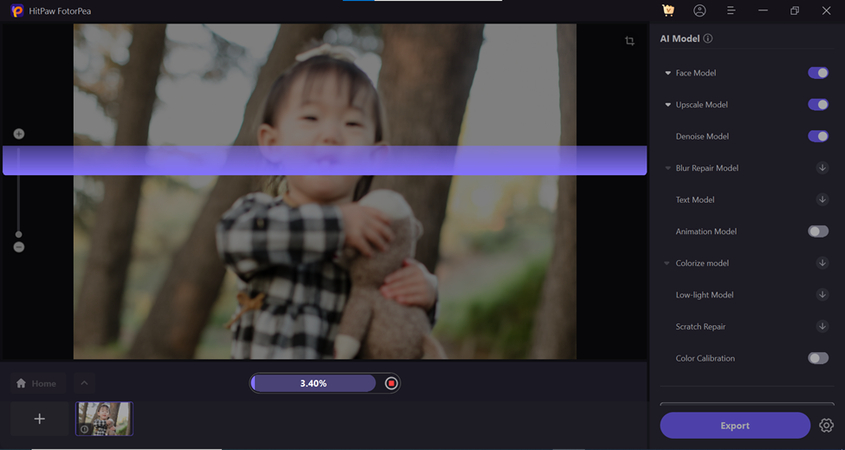
Step 4:HitPaw FotorPea will now analyze and process the image to detect and remove artefacts. Depending on the image size, this might take a few seconds, so be patient while it works in the background.

Step 5:Once processing is finished, you can view the improved version of your image. If you're satisfied with the results, click Export to save the cleaned image without JPG artefacts.

FAQs About Photographic Noise
Q1. Is Noise the Same as Grain in Photography?
A1. No, grain and photographic noise are widely synonymously used but not identical. Noise means unwanted random brightness and color fluctuation, whereas grain is a texture associated with film photography. "Noise" is used more technically in digital photography.
Q2. Can Noise be eliminated with Editing?
A2.
Yes, noise can be eliminated through editing.
Trimming can cut down on the noise as much as possible but still fail to eliminate the noise entirely, particularly in the event of over-noise. Over-noise could need more advanced methods or technology such as AI-technology software to achieve the best outcome.
Q3. Does Higher Megapixel Mean Less Noise?
A3. Not necessarily. Higher megapixels translate to greater detail, but not necessarily decreased noise. Indeed, higher-megapixel cameras actually produce more noise, particularly under low light, as pixels smaller than before will struggle to accumulate enough light. More area on the sensor is more likely to create less noise than greater megapixels.
Conclusion
Photographic noise is a headache, but it is not something you must suffer with. By identifying the cause of noise and by following the right procedure while taking the shots, you can reduce its occurrence. Also, by taking the help of effective post-processing software like HitPaw FotorPea, you can eliminate noise. With AI-powered software and user-friendly interface, HitPaw FotorPea is among the top software to eliminate noise. Be you a professional or a newbie, the software helps you achieve cleaner, sharper images.



 HitPaw Univd (Video Converter)
 HitPaw VoicePea
  HitPaw VikPea (Video Enhancer)



Share this article:
Select the product rating:
Daniel Walker
Editor-in-Chief
This post was written by Editor Daniel Walker whose passion lies in bridging the gap between cutting-edge technology and everyday creativity. The content he created inspires the audience to embrace digital tools confidently.
View all ArticlesLeave a Comment
Create your review for HitPaw articles