


What is HDR Video: Everything You Need To Know
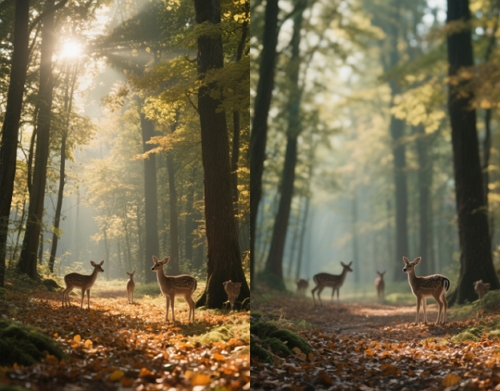
High Dynamic Range (HDR) video revolutionizes visual storytelling by expanding the brightness range and color gamut far beyond standard dynamic range (SDR) footage. By capturing and displaying deeper blacks and brighter highlights, HDR delivers a more vivid, lifelike experience that closely mimics human vision. From blockbuster films and AAA games to streaming services and home theaters, HDR has become the industry standard for immersive content. In this guide, you’ll learn what HDR video is, why it matters, the most common formats, how to convert SDR to HDR, and pro tips for optimizing your footage, whether you’re a professional editor or a hobbyist looking to upgrade your videos.
Part 1. What Is HDR?
High Dynamic Range (HDR) increases the image and video quality by enabling the capture and display of a more excellent range of luminosity than standard dynamic range (SDR). HDR achieves greets with more realistic vision thanks to its ability to mimic human eyes the way that they see light and color in the real world. This technology has since become the go-to way for modern filmmaking, gaming, and home entertainment systems and has elevated the viewing experience to new heights.

How HDR Works
- Expanded Brightness Range: Allows simultaneous display of very dark and very bright areas.
- Wider Color Gamut: Supports standards like Rec. 2020, delivering more saturated and accurate hues.
- Dynamic Tone Mapping: Adjusts each frame in real time to match display capabilities (e.g., HDR10, Dolby Vision).
Key Benefits of HDR
- Enhanced Contrast: Brighter highlights and deeper shadows for true-to-life visuals.
- Vibrant Colors: Supports billions of colors, making gradients smoother.
- Improved Detail: Retains texture in both underexposed and overexposed regions.
- Greater Immersion: Ideal for gaming, VR, and cinematic experiences.
- Future-Proof Content: HDR is rapidly becoming the standard across streaming platforms and devices.
Popular HDR Formats
| Format | Peak Brightness | Color Depth | Notes |
|---|---|---|---|
| HDR10 | 1,000 nits | 10‑bit | Open standard, widely supported |
| Dolby Vision | Up to 4,000 nits | 12‑bit | Dynamic metadata, premium studios use |
| HLG (Hybrid Log‑Gamma) | 1,000 nits | Broadcast‑friendly, no metadata needed | Here is Tony Teacher |
| HDR10+ | 4,000 nits | 10‑bit | Dynamic metadata, Samsung & Amazon adopt |
Part 2. Best Way to Convert Low-Res Videos to HDR With AI?
Converting low-resolution Standard Dynamic Range (SDR) videos into eye‑popping High Dynamic Range (HDR) content has never been easier, thanks to AI‑powered tools like HitPaw VikPea. By intelligently analyzing each frame, VikPea’s SDR to HDR model expands contrast, enriches colors, and restores fine details that were once lost in muted highlights or murky shadows. Whether you’re working with legacy footage, user‑generated clips, or low‑light recordings, this AI‑driven workflow elevates your video’s visual impact, delivering a more cinematic, richly textured viewing experience that rivals professionally shot HDR footage.
- Automatically enhances dynamic range for more vivid highlights and deeper shadows.
- Upscales low-resolution SDR footage to 4K or 8K with minimal artifacts.
- Improves color depth to deliver richer hues and more accurate color reproduction.
- Optimizes low-light scenes, restoring detail and reducing noise in dark areas.
- Balances overall exposure for consistent brightness throughout the entire video sequence.
- Preserves original metadata including timestamps and frame rates during the HDR conversion.
- Offers real-time preview comparisons to evaluate SDR vs HDR enhancements side-by-side.


Step 1.Download and install HitPaw VikPea on your computer. Once the installation is complete, launch VikPea, navigate to the AI Color tab, and select the SDR to HDR Model. Import your low‑resolution SDR videos by dragging them into the workspace.
Step 2.Use the Exposure Adjustment slider to fine‑tune brightness after the dynamic range expansion. Dragging the slider right increases mid‑tone luminance for a brighter look, while left reduces overexposed highlights, allowing precise control over the final image balance.
Step 3.Under Export Settings, pick your desired output resolution—VikPea supports upscaling up to 4K or 8K. Preview your adjustments with the built‑in side‑by‑side comparison view. When you’re satisfied with the results, click Export to render and save your newly enhanced HDR video to your computer.
Learn More about HitPaw VikPea
Part 3. Other Ways to Convert Video to HDR Manually?
High Dynamic Range (HDR) converts standard video to a visual that allows for richer colors and better contrast. Here are three popular tools for HDR conversion are given below by using relevant tips like color grading and tone mapping.
1. Adobe Premiere Pro
Adobe Premiere Pro is a video editing software that a professional uses.
- Adjust Color Grading: The Lumetri Color panel included in Premiere Pro offers all the tools for color grading you'll need. First, try changing the Exposure so your overall image is brighter or darker. In the second, you then refine the Contrast to add a bit of shade depth to shadows and add a bit of gloss to highlights, expanding the dynamic range. The Curves and Color Wheels can then be used to refine specific areas such that colors are solid and realistic.
- Apply Tone Mapping: Apply tone mapping effects so your hdr video displays the correct. If you're shooting in SDR, Premiere Pro gives you options like Lumetri Looks and custom LUTs (Look Up Tables) to bring your SDR footage into HDR. Adjust settings to keep details in highlights and shadows and your output to appear balanced on all displays.
2. DaVinci Resolve
If you want to do HDR conversion, Da Vinci Resolve is well known for its powerful color grading tools.
- Adjust Color Grading: Using the Color page, you can adjust your video's color levels and brightness. Using DaVinci's nodes you can tweak color adjustments down to the finest grain and achieve your HDR effect.
- Apply Tone Mapping: If you don't want to go that route, Resolve has advanced tone mapping options so you can convert your SDR footage to HDR without losing detail. Use the HDR palette to find the best image for you.
3. Final Cut Pro
It's a good option if you're a Mac user and you prefer Final Cut Pro because it's got an excellent interface and powerful features.
- Adjust Color Grading: The Color Inspector is your tool of choice to boost the color and brightness of your video. It's a straightforward tool to use; you can adjust shadows, midtones, and highlights separately for HDR conversion.
- Apply Tone Mapping: Built-in tone mapping options in Final Cut Pro will help you convert and optimize HDR content so that your video still has integrity.
Conclusion
The hdr video technology is incorporated to make your videos more visually appealing and intriguing. If you want to take your footage one step further, use HitPaw VikPea. Its AI-driven features make the enhancement process easy and give you stunning results with minimum effort. HitPaw VikPea can help you elevate your video quality and create marvelous-looking content in no time.

 HitPaw Univd (Video Converter)
 HitPaw VoicePea
  HitPaw FotorPea

Share this article:
Select the product rating:
Daniel Walker
Editor-in-Chief
This post was written by Editor Daniel Walker whose passion lies in bridging the gap between cutting-edge technology and everyday creativity. The content he created inspires the audience to embrace digital tools confidently.
View all ArticlesLeave a Comment
Create your review for HitPaw articles