Understanding Gaussian Noise: Origins, Effects, and Advanced Denoising Techniques
Grainy or fuzzy photos are more than just a visual nuisance; they can compromise professional results and ruin otherwise great shots. The biggest culprit behind this frustration is Gaussian Noise, an image distortion. It seems as random speckles or grain and often results from low-light conditions or limitations in camera sensors. This noise distracts from the visual appeal and interferes with post-processing tasks like sharpening.
For the solution of this hurdle, you must understand the term and how it distorts your images. This article explores the science behind this issue and what the traditional and modern denoising techniques are.
Video Tutorial to Enhance an photo with FotorPea:
Part 1. Understanding Gaussian Noise in Digital Imaging
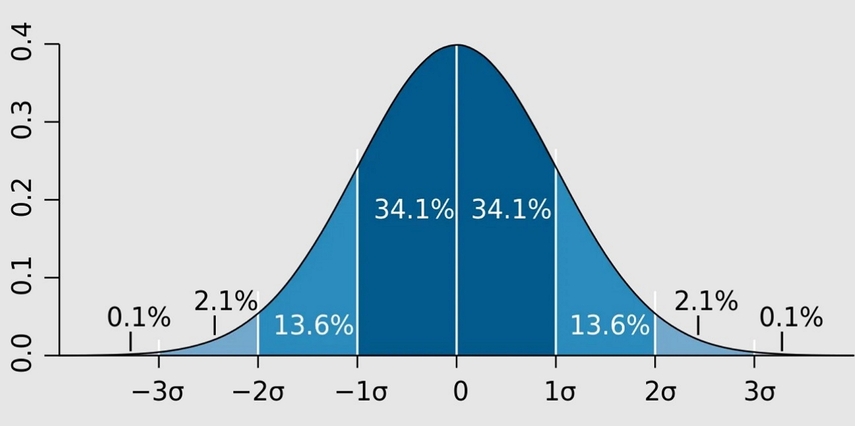
It is a type of unwanted grainy texture that randomly appears in digital photos. This distortion looks like tiny specks or fuzz and spreads across the entire image. The image noise follows a bell-shaped pattern, which means most of the random changes in brightness are small, with fewer extreme ones. This type usually shows up when you take photos in low light or use high ISO settings.
Statistical Properties
Gaussian Noise is characterized by its statistical properties and is defined by its mean and standard deviation.

The equation shows that the probability of a pixel noise value being near 0 is much higher than it being further away, which gives the classic bell curve shape. The distribution is defined by its mean (usually 0) and standard deviation, which determine how spread out the noise is. This predictable pattern helps identify and flatten Gaussian noise during image processing.
Part 2. Visual and Analytical Effects of Gaussian Noise
It introduces random speckles across digital images, giving a grainy appearance that diminishes visual clarity. The Additive White Gaussian Noise is particularly noticeable in uniform areas where it can obscure fine details and texture. This complicates image processing tasks such as edge detection, segmentation, and object recognition from a logical standpoint. The unpredictability of the noise can disrupt algorithms that depend on pixel intensity and gradient.

Furthermore, the existence of noise can impact the efficiency of compression algorithms, as it raises the volume of data that must be encoded. Thus, comprehending and reducing Gaussian noise is essential for both the visual quality and the efficiency of image analysis methods.
Part 3. Classical Methods for Gaussian Noise Removal
Now that you know what is Gaussian noise in image processing, there are 2 approaches to mitigate it in digital images effectively. Each one offers unique advantages and is chosen based on specific requirements.
Spatial Domain Techniques
By utilizing the relationship between neighboring pixel values to reduce noise, this technique operates directly on the pixels of an image and its common methods include:
1. Mean Filtering: It replaces each pixel's value with the average of its neighboring pixels.
2. Median Filtering: Against salt and pepper noise, this technique is particularly effective as it exchanges each pixel value with the median of the other ones.
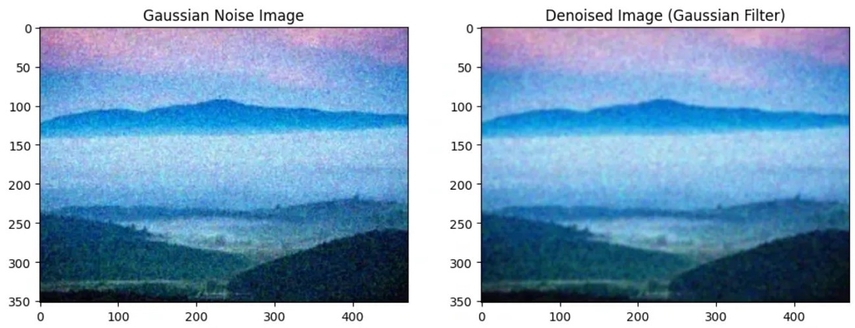
3. Gaussian Filtering: This strategy applies a Gaussian function to weigh other pixels, giving more importance to closer ones.
Frequency Domain Approaches
It uses mathematical tools like the Fourier Transform to improve the images. Once in this domain, noise can be more easily identified and attenuated by following these methods:
1. Low-Pass Filtering: You can use this method to help clean images by reducing the sharp and sudden edges while keeping the main part smoother.
2. Gaussian Low-Pass Filtering: It works like a soft blurring, but in the frequency domain, which enables you to remove grainy noise.
3. Butterworth Filtering: For a gentle way, this method gradually separates noise from image content and offers fine control over how sharp the transition between preserved and suppressed frequencies happens.
Limitations of Traditional Methods
These classical denoising algorithms have long been used for noise reduction in images, but they come with significant limitations. The techniques, like mean filters and Gaussian low-pass filters, often result in over-smoothing, which blurs edges and removes important image details. These methods are also non-adaptive, applying the same processing across the entire image, which can be inefficient for photos with varying noise levels.
Part 4. Advanced Gaussian Noise Removal with HitPaw FotorPea Denoising Model
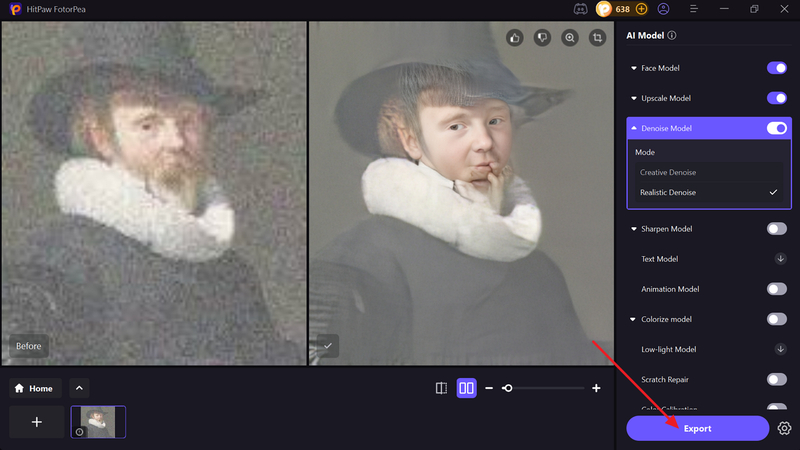
Traditional Gaussian noise removal approaches are no longer reliable when professionalism is considered, so users demand ease and advancement. For this, a solution is HitPaw FotorPea, a platform designed exclusively for Gaussian noise reduction in digital images. It excels in cleaning up images with the support of AI models, providing different dynamics for enhancement. Anyhow, its Denoise Model guarantees that even the subtlest textures are preserved upon picking the desired mode from 2 options.
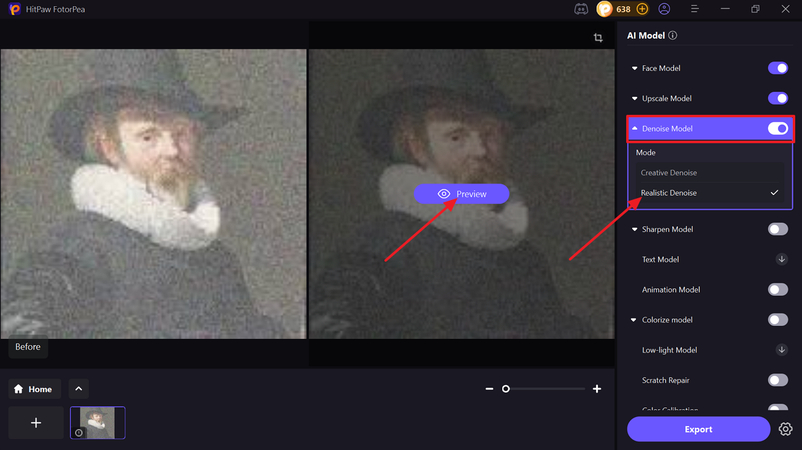
This feature is ideal for heavy, low-quality images to remove compression artifacts, blur, and unwanted gradients. Apart from this, you can use the Face Model, which is suitable for sharpening and repairing blurred faces. This model further provides 3 different modes, namely, soft, soft (V2), and sharp. For quick sharpening tasks, simply use its Upscale model, perfect for enlarging digital images. Before exporting, it provides a preview option for analyzing before-and-after results.
Key Features
1. Blur Repair Model: This model works best in fixing lens blur, motion blur, and compression artifacts.
2. Color Calibration Function: It enhances pictures that are underexposed and lack saturation, providing natural colors.
3. Low-Light Model: With this model, you can brighten up images taken in a low-light environment or lacking clarity.
Tutorial for Gaussian Noise Removal with HitPaw FotorPea
To get the most out of AI-powered Gaussian noise removal, follow the given stepwise tutorial for HitPaw FotorPea:
Step 1. Access the Tool and Choose AI EnhancerDownload the tool and press the “Enhance Photos Now” button from the main interface. Following this, you’ll be navigated to the platform’s enhancement interface.

Step 2. Add or Drop your Image to the Tool
After this, press the “Drag & Drop Files Here” button to import your file for removing noise. Afterwards, from the “AI Model” section, choose the “Denoise Model” to pick the “Realistic Denoise” mode for removing the Gaussian Noise interrupting your image. After this, navigate to the “Preview” button and analyze the before and after results.
Step 3. Toggle Denoising Model and Preview the Results
Once you are pleased with the results, press the “Export” button to save your image to the device.
Part 5. Best Practices for Handling Gaussian Noise
After learning the limitations of traditional Gaussian filters, it's crucial to follow best practices even when using advanced technology to handle this noise. Let’s examine several efficient methods to lessen its effect and preserve the quality of your images during the editing phase:
1. Capture in Better Lighting: To reduce the noise, you can ensure good lighting when you capture images. Low light conditions exacerbate interference, so bright and well-lit environments can help you reduce its appearance.
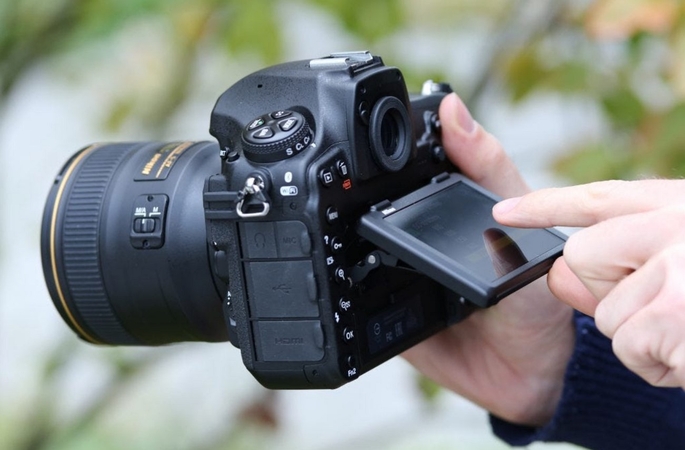
2. Quality Sensors: If you upgrade to a camera with a larger or more advanced sensor, you can drastically reduce distortion. A quality camera captures more light, resulting in cleaner images with less noise.
3. Lower ISO Settings: When you use a lower this setting, the values decrease the likelihood of grain. When it gets high, the values increase sensitivity and introduce more noise, especially in darker areas of the photo.
4. Post-Processing: Use software tools that employ advanced denoising algorithms to remove noise without compromising the details. AI-powered tools like HitPaw FotorPea offer superior results in preserving the picture quality.
5. Noise Reduction Filters: Apply static lowering filters during image editing to smooth out noisy areas. Be cautious with the settings, as overly aggressive filters blur fine details and textures.
Conclusion
This guide has instructed you on the impact of Gaussian noise on edge detection algorithms and how it can significantly affect image quality. By understanding its statistical properties, you can better appreciate the challenges it presents. While traditional methods offer noise reduction, they come with limitations. Therefore, we recommend that you use AI-powered tools like HitPaw FotorPea.


 HitPaw Edimakor
 HitPaw VikPea (Video Enhancer)
 HitPaw Univd (Video Converter)


Share this article:
Select the product rating:
Daniel Walker
Editor-in-Chief
This post was written by Editor Daniel Walker whose passion lies in bridging the gap between cutting-edge technology and everyday creativity. The content he created inspires the audience to embrace digital tools confidently.
View all ArticlesLeave a Comment
Create your review for HitPaw articles