


Full Tutorial Guide on Color Grading in Lightroom
Have you heard all the buzz about color grading with Lightroom but are unsure what is it and how to use it effectively in your videos? The perfect illustration of this is the movie Happy Together, in which you will see the masterful use of the color blue that takes viewers to a world of emotions.
This tutorial will explain the art of color grading in Lightroom and show you how it can enhance the visual narrative of your videos.
Part 1. Tips Before Color Grading with Lightroom
Before we move onto the actual process of color grading Lightroom, it is crucial to make some preliminary adjustments to ensure that your video is ready for the best possible outcome.
Tips 1. After importing your footage into Lightroom, you should go to the editing workflow in the Develop Panel and begin by adjusting the shadows and highlights in your video which will help to bring out the details in darker areas and prevent overexposure in brighter areas.
Tips 2. Next, focus on fine-tuning the contrast of your videos which involves finding the right balance between the dark and light areas and enhances the overall depth and dimension of footage.
Tips 3. Lightroom also provides various tools to adjust the white balance and exposure settings, which will allow you to correct any color casts and provide the optimal exposure level for your video.

Part 2. How to Use Color Grading in Lightroom
Since Lightroom is an advanced-level video editing program, you will first need to understand some fundamental elements and see how they contribute to making the most out of its color grading capabilities.
Midtones
In terms of videography, Midtones are the tones in the middle range of brightness, and getting a strong balance of Midtones is considered essential in color grading. Lightroom video color grading panel provides a dedicated wheel for Midtones, which allows you to change the hue, saturation, and luminance of the Midtone colors so that you can experiment with different adjustments to achieve the desired effect.
Shadows
Shadows play a crucial role in creating depth and adding drama to your videos, so you will get a separate wheel for the process of color grading on Lightroom. You can manipulate the shadows wheel to alter the color tones in the darker areas of your footage such as adding a blue tone to the shadows can create a moody atmosphere, while introducing warmer tones can evoke a sense of coziness.
Highlights
Highlights are the brightest areas in your video, which often represent the lightest parts of the scene. Lightroom color grading panel offers five small icons, a blending/balance slider, and three different color wheels to target these elements in your videos. Each wheel makes you able to independently adjust the color grading for a more detailed and nuanced approach, you can also use a global wheel that applies color grading to the entire image.
1. Access the Color Grading Panel
Once you have imported your footage and made the necessary adjustments as discussed in the previous section, head over to the Color Grading Tool located on the right side of the Develop Panel and click on it to display its settings.
2. Adjust the Color Wheels
If you prefer to go with the default view in Lightroom, it will allow you to use the three-way color wheels to work with Midtones (top wheel), shadows (left wheel), and highlights (right wheel). The color wheels come with an individual little circle in the middle as a handle that you can drag with your mouse to perform different actions for video color grading in Lightroom.
You can move the handle in circles to change the hue (color shade), while moving it from the center to the edge adjusts the saturation. The slider at the bottom of each color wheel controls the luminance, so it is recommended to experiment with these controls to achieve the desired color grading effects for each element.
3. Utilizing Blending and Balance Sliders
The next and final feature the first glance of Lightroom color grading panel is the Blending and Balance Sliders that you will find at the bottom of each color wheel. The Blending slider controls how much the three-color wheels overlap and allows you to create smooth blends or mix color tones. On the other hand, the Balance slider adjusts the relationship between highlights and shadows which enables you to emphasize one over the other.
4. Hue and Saturation Sliders
In addition to the 3-way view for color grading in Lightroom, there are two more sliders that are hidden by default and can be accessed by clicking on the little arrow beneath the eye icon. They are Hue and Saturation sliders are quite important which will be helpful in fine-tuning the adjustments especially when you’ve found a color you want to use but need to refine it.
Once you finish color grading your video with Lightroom, export it in your desired format to preserve the new color grading effects.
NOTE: Although basic color balance adjustments were made prior to the color grading with Lightroom, users may still experience significant color variations in the final picture that require the use of third-party color enhancement software to attain a balanced effect.
Part 3. Balance Your Color Grading Lightroom with HitPaw VikPea
As we have discussed, it becomes necessary in some cases to use specialized software after color grading to achieve a consistent or balanced color effect. HitPaw VikPea (formerly HitPaw Video Enhancer) can provide 100% accurate results regardless of the magnitude of color differences or flaws.
It is designed to simplify the process, which means all you have to do is import your video into this program and its AI model will colorize video and enhance color balance.
Salient Features
- Auto enhancement feature will instantly fix the color imbalance, saturation, contrast, etc,
- Supports powerful batch processing
- Comes with multiple dedicated AI models
- Effortlessly uplift low-quality videos up to 4K/8K resolution
- Without any watermarks or disturbing ads
Steps to Enhance Color Grading Lightroom
-
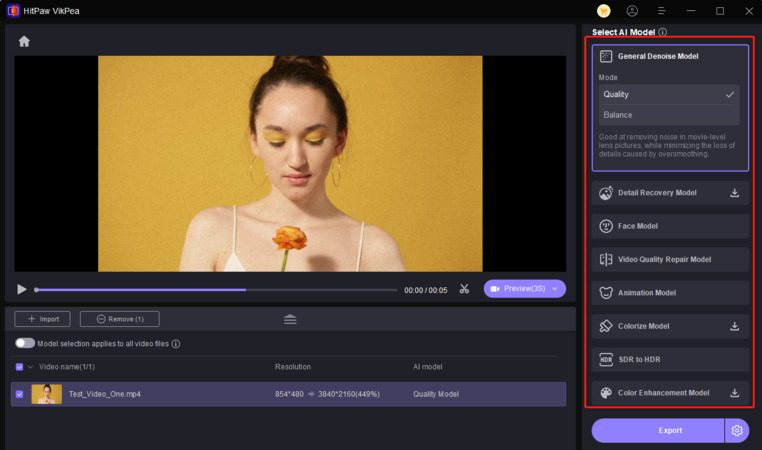
Step 1.Download and install the HitPaw VikPea on your computer.


-
Step 2.Upload the video you want to enhance the software.
-
Step 3.Simply choose “Colorize Model”, it will help you upscale black and white video to color.
-
Step 4.Click on Preview to process the video and wait for a few seconds. Once satisfied, click the Export button to save the video file to your computer.
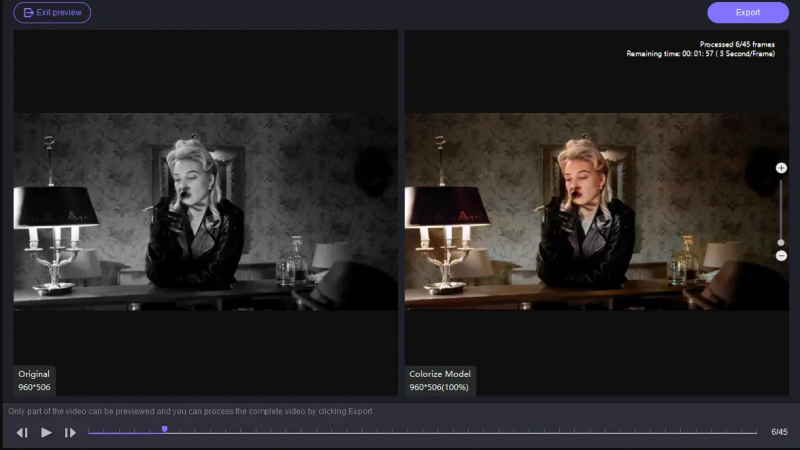


You give a modern and alluring touch to your favorite old videos with just a few clicks.
FAQs of Color Grading with Lightroom
Q1. How to make a vintage color grading video in Lightroom?
A1. Vintage color grading video consists of many different styles, according to the required style can adjust the cool and warm colors and contrast parameters.
Q2. How to make a cinematic color grading lightroom?
A2. As we know modern filmography often uses orange and teal color grades to provide a wonderfully cinematic feel, you can apply Color Grading Lightroom from the Develop module to add an orange and teal grading scheme.
The Final Verdict
We hope this guide has provided you with everything needed to effectively use color grading with Lightroom to enhance the videos and adjust the shadows and highlights.
While Lightroom offers intuitive color grading tools, specialized software like HitPaw VikPea can be a valuable addition that will help you achieve 100% accurate and balanced color results regardless of the initial color variations or flaws in your footage.

 HitPaw Video Object Remover
 HitPaw Univd (Video Converter)
  HitPaw VikPea (Video Enhancer)
![[2026] Full Tutorial of Wong Kar-wai Color Grading](https://images.hitpaw.com/topics/video-tips/wong-kar-wai.jpg?1708249409)
![[Step-by-step] Two Ways to Achieve Low Light Image Enhancement](https://images.hitpaw.com/topics/covers/low-light-image-enhancement-cover.jpg?w=347&h=450)

Share this article:
Select the product rating:
Daniel Walker
Editor-in-Chief
This post was written by Editor Daniel Walker whose passion lies in bridging the gap between cutting-edge technology and everyday creativity. The content he created inspires audience to embrace digital tools confidently.
View all ArticlesLeave a Comment
Create your review for HitPaw articles