


How to Pixelate a Photo in Seconds [Full Guide]
Want to make a picture pixelated for privacy, creative edits, or retro effects? Pixelating an image is easier than you think. Whether you want to blur faces, create an 8-bit aesthetic, or add a mosaic effect to photos, there are several quick ways to do it on PC, phone, or online. In this guide, you'll learn the easiest methods to pixelate an image step by step.

Part 1: What Does It Mean to Pixelate an Image
Pixelating an image means turning part or all of a picture into visible square blocks, often called a mosaic effect. People use pixelation for different reasons — from hiding faces or private information to creating retro gaming aesthetics and creative social media visuals. Depending on your goal, you can pixelate an entire image or only certain areas.
Part 2: How to Pixelate a Photo Online
Pixelation is used for privacy, censorship, or stylistic effects. If you want the fastest way to pixelate an image, online tools are usually the easiest option.
1. Try Canva Online
Canva is an easy-to-use online design tool that allows users to quickly apply pixelation-like effects through filters and image editing features. It is especially useful for social media visuals, posters, and quick creative edits.
- 1.Import the Design: On Canva's homepage, click "Create a Design" and then "Import File." Choose your image, and it will open in a new project window.
- 2.Pixelate the Image: Click on "Edit Image" at the top toolbar, find the Pixelate app, and choose a filter. Adjust pixel size using the settings icon—Increase horizontal and vertical pixels for smaller pixels. Click "Apply" to confirm changes. To pixelate part of the design, duplicate the image, center it over the original, apply pixelation and crop.
2. Try Fotor Online
Fotor is an AI-powered online photo editor that offers quick one-click pixelation for censoring or blurring parts of images, ideal for fast and simple photo edits. Its pixelation tool is typically a one-click feature that lets users quickly pixelate parts of an image without manual intervention.
- 1.Import the Design: Upload your image on Fotor. Adjust brush and pixel size as needed.
- 2.Add Mosaic Effect: Choose your photo, apply the Mosaic effect, and use the slider to set pixel size.
- 3.Save Your Work: After pixelating, save your work with your preferred format and size.Pixelation isn't just for hiding details; it can also be a creative tool for various projects, from retro looks to gaming stickers. So, whether you're teasing a product launch or creating mosaic art for social media, these online tools make image pixelated easily and with fun.
3. Try Lunapic Online
LunaPic is a free online image editor that lets users quickly pixelate images in the browser with no sign-up or installation required. It’s best suited for quick edits like hiding sensitive details or basic image adjustments.
- 1.Import your image into Fotor and upload the photo you want to edit. Adjust the brush or pixel size if needed.
- 2.Apply the Mosaic effect, then use the slider to control the level of pixelation.
- 3.Once satisfied, download the final pixelated image to your device.
4. Try Kapwing Online
Kapwing is a browser-based content creation tool that supports both image and video editing, including pixelation for faces, objects, or entire frames. It is especially useful for creating social media content, GIFs, and short videos with batch or timeline-based editing options. However, its free version has export limitations and may add watermarks on some outputs.
- 1.Upload your image or video to Kapwing in your browser.
- 2.Apply Pixelate effect from Edit → Effects and adjust intensity or area.
- 3.Export the file and download your pixelated image or video.
Part 3: How to Make Pictures Pixelated on PC
Pixelating images on your computer doesn't require fancy software – you can achieve it using the tools that come with your PC or Mac. If you are on a Mac, the built-in Photos app makes it a breeze.
1. Using Built-in Paint on Windows
On Windows, the trusty Paint program can do the job. Find Paint in Programs > Accessories on the Start menu—use the rectangular Select tool to pick the area you want to pixelate. Now, resist the urge to touch the image directly; instead, head to the Image menu and select Stretch/Skew (CTRL-W). Shrink the selected area by a percentage, ensuring the dimensions are multiples of 10. Repeat this process to reduce pixel density.
To revert to the original size, use Stretch/Skew again, but remember Paint's limit of 500% stretching. Fine-tune the pixelation by adjusting the selection size – larger if pixels are too big, smaller if they're too small. Keep an eye on the dimensions displayed at the lower right of the Paint window to maintain proportionality. Despite some quirks, like rounding issues, the pixelation effect will likely work well.
2. Using Photos App on Mac
For Mac users, locate the Photos app in your Applications folder or Launchpad. Open your image from the Library tab or import it via File > Import. Once your image is open, hit Edit in the top-right corner.
Although Photos lacks a specific pixelation tool, you can use the retouch tool for a similar effect. Adjust the touch slider, activate it, and apply the effect to the desired area. Preview the changes on the right, and if unsatisfied, choose Revert to Original or Done to save.
So, whether you're a Mac enthusiast or a Windows user, pixelating images is just a few clicks away with the tools you already have.
3. Using Photoshop
Adobe Photoshop is a professional desktop image editing tool that offers precise control over pixelation effects. Unlike online tools, it allows users to apply pixelation to specific areas, adjust block size accurately, and combine it with other advanced editing features. It is best suited for users who need high-quality or detailed image adjustments.
- 1.Launch Photoshop and import the image you want to edit.
- 2.Use the Marquee Tool or Lasso Tool to select the area you want to censor or modify.
- 3.Go to Filter → Pixelate → Mosaic, then adjust the cell size to control the level of pixelation.
- 4.Click OK, then export your image via File → Save As or Export.
Part 4: How to Make Pictures Pixelated on Mobile
1. Censor: Blur & Pixelate Photos for iOS
Blur & Pixelate Photos is a free iOS app designed to pixelate images easily. While it comes with ads, its functionality is reliable for quick pixelation needs.
Steps:- 1.Install Censor: Blur & Pixelate Photos from the App Store.
- 2.Launch the app and tap "Photo Album" to select the photo you want to pixelate.
- 3.In the menu, tap the "Pixelate" icon.
- 4.Choose the "Rectangle" tool for a specific area or use the "Draw Selection" tool for freehand pixelation.
- 5.Adjust the brush size and pixelation size using the settings icon.
- 6.Once satisfied, tap the "Share" icon and save the pixelated image to your camera roll.
Pros
- User-friendly interface.
- Offers both rectangle and freehand pixelation options.
Cons
- Contains ads.
- Limited advanced features compared to some paid alternatives.
2. Pixelator: Pixelate Blur Image for Android
Pixelate Blur Image is an Android app available on the Google Play Store, offering efficient pixelation with variable blur sizes.
Steps:- 1.Install Pixelator: Pixelate Blur Image from the Google Play Store.
- 2.Launch the app and choose a photo to pixelate.
- 3.Tap the "Rectangular" tool or select the "Circular" button for different shapes.
- 4.Drag out the area for pixelation, with real-time pixelation feedback.
- 5.Adjust pixelation size using the "Arrow" next to Blur Size.
- 6.Save your pixelated image through the menu.
Pros
- Real-time pixelation preview.
- Flexible blur size options.
Cons
- Ad-supported.
- May lack some advanced features found in premium apps.
Pixelation Tools Comparison: Online, Desktop & Mobile Options
| Tool | Best for | Strengths | Weaknesses |
|---|---|---|---|
| Adobe Photoshop |
|
|
|
| Fotor Pixelate Tool |
|
|
|
| LunaPic |
|
|
|
| Canva |
|
|
|
| Kapwing |
|
|
|
| Censor Pixelate |
|
|
|
| Pixelator |
|
|
|
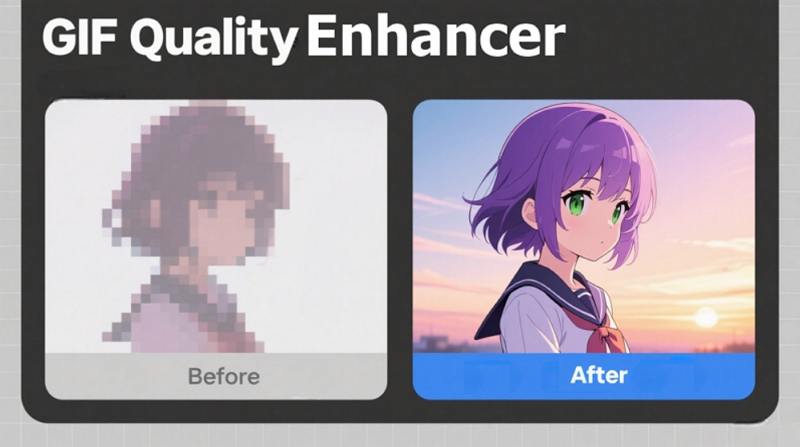
Extra Tip: Best Tool to Pixelate and Enhance Images wirh AI
If you often work with image editing—whether for privacy protection or improving image quality—having a versatile AI tool can significantly streamline your workflow.
HitPaw FotorPea is an AI-powered image editing tool that supports both image enhancement and restoration, including improving low-resolution, blurry, or pixelated images. It helps recover details, sharpen edges, and upscale images while maintaining natural-looking results.
Beyond enhancement, it can also support a flexible image workflow where users apply pixelation for privacy or creative effects, and later refine or restore images when higher quality output is needed.


- 1. AI Image Restoration (Beyond Sharpening):
Restores missing textures and details instead of simply sharpening blurry images. - 2. Generative Detail Reconstruction:
Uses AI models to intelligently rebuild lost or damaged visual information for more natural results. - 3. Low-Quality Image Recovery:
Enhances old, compressed, or low-resolution photos from screenshots and social media. - 4. Smart Facial Enhancement:
Improves facial details while keeping skin texture and features natural and realistic. - 5. Creative Image Workflow:
Supports a complete workflow for enhancing, restoring, and improving both real photos and AI-generated images. - 6. Batch AI Processing:
Enhances and depixelate multiple images at once with consistent AI quality output.
Step 1: Download and Install:
Begin by downloading and installing the HitPaw FotorPea tool.
Step 2. Upload the Original Image:
Click into AI Photo Editor and choose AI Canvas. Launch the tool and upload the pixelated or blurry image that you want to enhance.
Step 3. Write Your Needs:
Write your need into the chat box like "depixelate image of what I upload,other features not to change. " and click to generate.
Step 4. Preview and Export:
After processing, preview the enhanced effect. If satisfied, click the Export button to save the improved photo, completing the unpixelating process effortlessly.
FAQs about Pixelating and Enhancing Images
Q1. What is the tool for pixelating images?
A1. You can use tools like Photoshop, Fotor, LunaPic, Canva, or Kapwing to pixelate images. Online tools are best for quick edits, while desktop software like Photoshop offers more precise control over pixel size and selected areas.
Q2. What is the best software to depixelate images?
A2. AI-powered tools like HitPaw FotorPea can help enhance and restore pixelated or low-resolution images by reconstructing missing details and improving overall clarity.
Q3. How do I pixelate an image on my phone?
A3. You can use mobile apps like Censor Pixelate or Pixelator. Simply upload your image, select the area you want to blur or pixelate, and apply the effect before saving it.
Q4. Can I pixelate only part of an image?
A4. Yes, many tools such as Photoshop and Kapwing allow you to select a specific area of an image and apply pixelation only to that section, such as faces or sensitive information.
Q5. Can I pixelate multiple images at once?
A5. Yes, some tools like Kapwing and advanced desktop software support batch processing, allowing you to pixelate multiple images at the same time for better efficiency.
Q6. How do I enhance a pixelated photo?
A6. You can use AI image enhancement tools such as HitPaw FotorPea to restore details, upscale resolution, and improve clarity in pixelated or blurry photos.
Final Thoughts
Mastering the art make image pixelated across various platforms can significantly enhance your creative endeavors. Whether you're a designer, content creator, or simply looking to add a unique touch to your images, these three tips offer fast and effective solutions. Take your visual storytelling to the next level with HitPaw FotorPea (Formerly HitPaw Photo Enhancer).
This powerful tool not only simplifies pixelation but also excels in upscaling your pictures automatically, ensuring a seamless and professional touch to your visual creations. Elevate your images effortlessly and explore a world of enhanced possibilities with HitPaw FotorPea.

 HitPaw Edimakor
 HitPaw VikPea (Video Enhancer)


Share this article:
Select the product rating:
Daniel Walker
Editor-in-Chief
This post was written by Editor Daniel Walker whose passion lies in bridging the gap between cutting-edge technology and everyday creativity. The content he created inspires audience to embrace digital tools confidently.
View all ArticlesLeave a Comment
Create your review for HitPaw articles