How to Use Frame Interpolation on Davinci Resolve to Smooth Videos
Frame Interpolation is a brilliant way to smoothen a video, especially when it's jittery or feels disjointed. Action videos, sports videos, and shaky cam footage often have blurs, jitters, and shaky footage issues. Frame Interpolation smoothens video playback by adding new frames between the original frames. As a result, the motion in the video comes out smooth and pleasant, making it much more appealing to your audience. And, Davinci Resolve is one of the best tools for smoothening videos with frame interpolation. In this guide, we'll give you step-by-step instructions on how to use DaVinci Resolve frame interpolation to smoothen videos and present you with a superior alternative.
Part 1: Why Use Frame Interpolation to Smoothen Videos?
Frame interpolation becomes relevant in any context where you need to add more frames to a video. Jittery or choppy videos are common examples. Frame Interpolation tracks objects in motion in a video, predicts their paths, and creates new frames between the original video frames. So, the motion of these objects looks much smoother than before.
A number of other contexts also require frame interpolation. For instance, let's say you're trying to slow down a video without losing its quality. If the original video has a 30fps framerate, a 3x slower video will have only 10fps framerate, which is not desirable. If you'd like to smooth out the video playback, you need to increase the frame rate, which you can do with frame interpolation.
In a nutshell, if you need to increase the framerate of a video or its parts, you need frame interpolation to do it.
Part 2: How to Use Frame Interpolation in DaVinci Resolve
DaVinci Resolve is an outstanding video editing tool from Blackmagic Design. Unlike other full-fledged video editing tools, DaVinci Resolve excels at visual effects, motion graphics, and color grading. It also boasts one of the most capable frame interpolation features among video editors. However, what truly sets it apart from the rest is its high performance and exceptional output quality.
Whether you're using DaVinci frame interpolation to create slow-motion effects or smoothen out choppy videos, it delivers admirable results.
Guide to Smoothen Videos Using Frame Interpolation in DaVinci Resolve
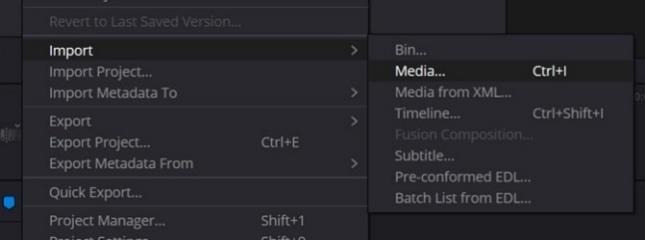
- Step 1: Import Video
- Step 2: Choose Frame Interpolation Technique
- Step 3: Choose Motion Estimation Mode
Launch DaVinci Resolve >> Create a 'New Project' or open an 'Existing Project' >> Go to 'File' >> Choose 'Import' >> Hit 'Media' >> Drag video into a new timeline >> Switch to the 'Edit' page.
Click on the 'Gear' (Settings) button at the bottom right >> In the next window, locate 'Frame Interpolation' under 'Master Settings' >> Click on the 'Retime process' dropdown menu >> Choose the option that best meets your needs.
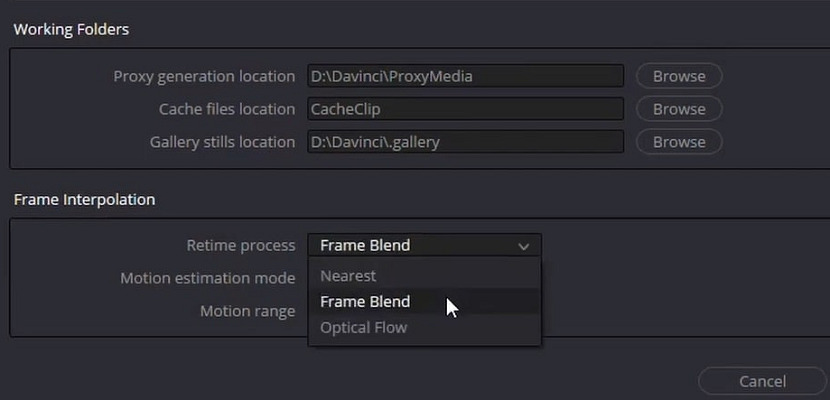
The 'Motion estimation mode' drop down menu gives you several options to handle different types of motion and frame rates. Experiment with different options until you achieve the desired results.

Pros and Cons of using Davinci Frame Interpolation
Pros:
- Offers multiple frame interpolation techniques - optical flow, nearest, and frame blending
- Produces the most natural-looking results
- Uses GPU acceleration to kick up processing speeds. DaVinci Resolve's hardware acceleration capabilities are legendary
- Free version available
Cons:
- Free version has limited features
- Frame interpolation is resource-intensive and can take time. Not a real-time solution
- Doesn't use AI-based frame interpolation
- Struggles with videos with lots of objects of complex motion
Part 3: Choose the Right Frame Interpolation Technique in Davinci Resolve

Davinci Resolve offers three frame interpolation techniques - Optical Flow, Frame Blending, and Nearest.
Out of these, Nearest is the most resource-efficient option. That's because it doesn't actually create artificial frames when you're trying to increase the framerate. It merely duplicates frames. Although the output has a higher framerate than the original, it's hardly smooth because there's no smooth transition between frames. However, it works perfectly for fast-motion sequences, since it drops many frames to reduce the frame rate.
Frame Blending is a slightly better option than Nearest, since it utilizes the Cross Dissolve feature in Davinci Resolve to combine the original frames and create a blended frame to fill the gap between them. Frame Blending works well for videos with blurs, as it smooths out the blurs and distortions to make them less noticeable.
Lastly, Optical Flow offers the best frame interpolation results. It analyzes the motion in videos to generate new frames based on the movement between existing ones. The artificially created frames deliver smooth transitions between original frames, offering viewers the best viewing experience. However, it's also the most resource-intensive option.
Part 4: The Best AI Video Frame Interpolation Tool - HitPaw VikPea
HitPaw VikPea offers the simplest, easiest, and highest-quality frame interpolation solution among video editors. Unlike DaVinci Resolve, VikPea offers AI-based frame interpolation, which drastically improves the quality of output and user experience. The AI makes all the fine-tune adjustments to ensure that the video comes out buttery-smooth and natural-looking.
Outstanding Features of HitPaw VikPea for Frame Interpolation
- Highly Trained AI: VikPea's AI is trained on countless hours of video footage to generate outstanding frames.
- Wide Format Support: With support for over 30 video formats, VikPea can interpolate frames on all videos.
- User-friendly Design: Unlike DaVinci Resolve, VikPea is so easy to use that anyone can use it without any editing skills.
- AI Video Stabilization: The AI automatically stabilizes shaky and jittery videos. Frame interpolation makes it only better.
- Advanced Detail Recovery: Dots, blurs, smudges, etc. ruining your video? VikPea's AI eliminates them and sharpens videos.
- Cloud Acceleration: Don't have enough resources on the desktop? Use cloud acceleration to speed up video editing.
How to Smooth Videos Using Frame Interpolation in HitPaw VikPea
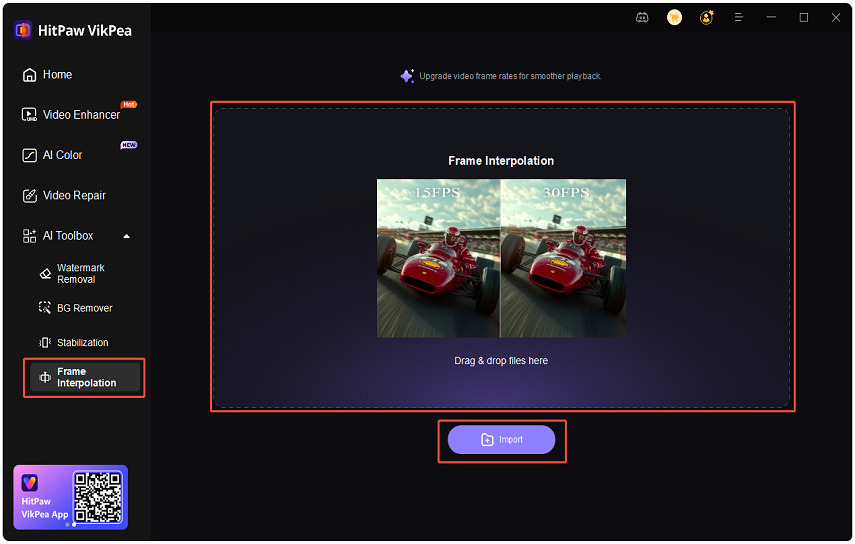
Step 1: Download and install HitPaw VikPea, and launch the app on your desktop. Click 'Choose File' to browse, select, and import the video.
Or, Open VikPea, from the left hand menu choose AI Toolbox - Frame Interpolation.
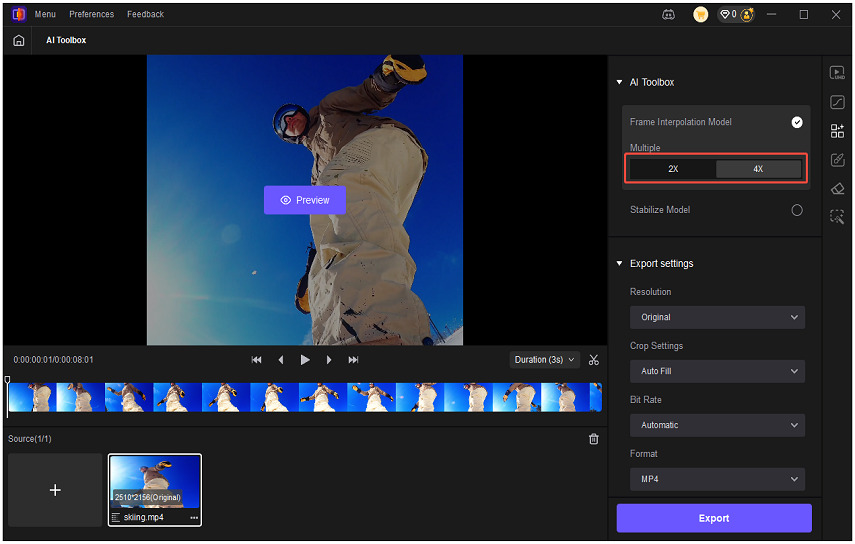
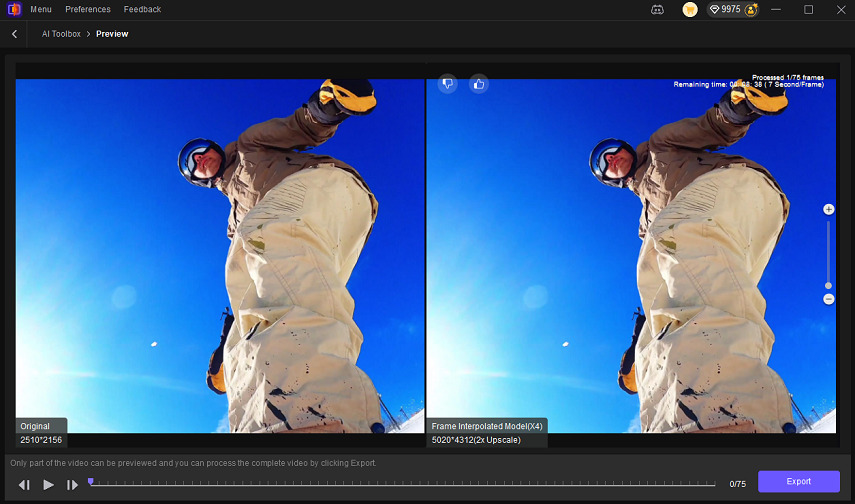
Step 2: From the AI models listed on the right, choose 'Frame Interpolation Model.' You can change the interpolation setting between 2X and 4X.

Step 3: Preview input video and output video quality in split-screen view >> Hit 'Export'.

FAQs on Frame Interpolation on Davinci Resolve
Q1. Is frame interpolation available in the free version of Resolve?
A1. Yes. Frame interpolation is available in the free version of Resolve. However, some of the options are available only in the paid version.
Q2. Can I use frame interpolation on Davinci Resolve for speed ramping?
A2. Yes, you can use frame interpolation for speed ramping in Davinci Resolve.
Q3. What is the best Optical Flow setting in Davinci Resolve Studio?
A3. The best Optical Flow setting in DaVinci Resolve Studio is Optical Flow (Retime Process), Enhanced Better (Motion Estimation), and Higher (Smoothing). The Motion Range can be large (if there is a lot of movement) or Small (if the movement is subtle).
Conclusion
Frame interpolation is one of the most effective ways to smoothen out video motion, especially when dealing with jittery, shaky, or slow-motion footage. DaVinci Resolve frame interpolation works really well if you follow the steps in this guide. However, if you would like to use a more user-friendly tool with superior performance, HitPaw VikPea is the right choice. It offers smoother results with less effort and more automation, thanks to a powerful AI. Give VikPea's frame interpolation a trial today!



 HitPaw Univd (Video Converter)
 HitPaw VoicePea
  HitPaw FotorPea


Share this article:
Select the product rating:
Daniel Walker
Editor-in-Chief
This post was written by Editor Daniel Walker whose passion lies in bridging the gap between cutting-edge technology and everyday creativity. The content he created inspires the audience to embrace digital tools confidently.
View all ArticlesLeave a Comment
Create your review for HitPaw articles