How To Perform Photoshop Face Editing to Perfection [2026 Updated]
The latest 2025 updates guarantee that achieving flawless results with Photoshop face editing is much easier. From smoothing out skin texture and removing blemishes to enhancing facial symmetry, Photoshop’s advanced capabilities have got you sorted. In this guide, we’ll be learning how to perform skin-face retouching in Photoshop to elevate your expertise.
Part 1. How to Edit Face on Photoshop Using Face Retouching?
Before, Photoshop for face retouching requires a blend of precision and creativity to achieve that professionalism. To help you with this, below are some of the most effective tools and techniques offered by the platform:
Use the “Spot Healing Brush Tool” to Edit Face on Photoshop
The “Spot-Healing Brush” tool works to remove small imperfections by sampling a source point and applying that sample to another area. Moreover, it allows users to adjust the brush size and hardness according to their editing needs. Adhere to the guide and perform face retouching in Photoshop to achieve natural-looking results:
Step 1. Launch Photoshop and add your image to the platform. Now, choose the “Healing Brush” tool from the left panel and adjust the brush size.
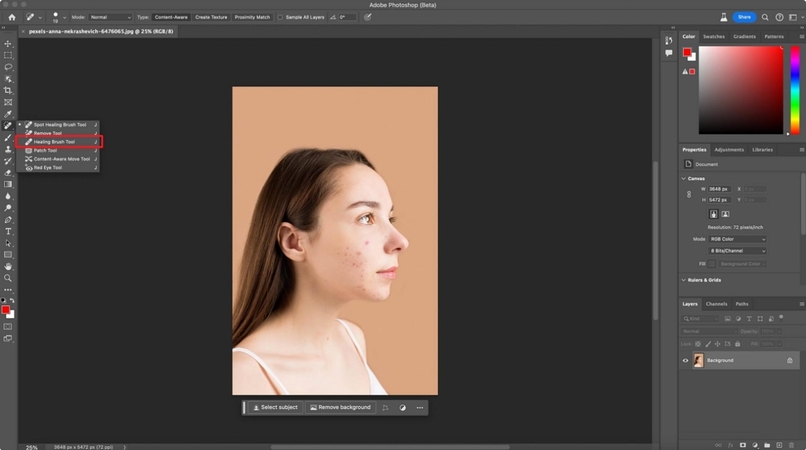
Step 2. Afterward, zoom in and then press “Option Key” to set a source point. Now, release it and then click to adjust the sample pixels in the revealing window.
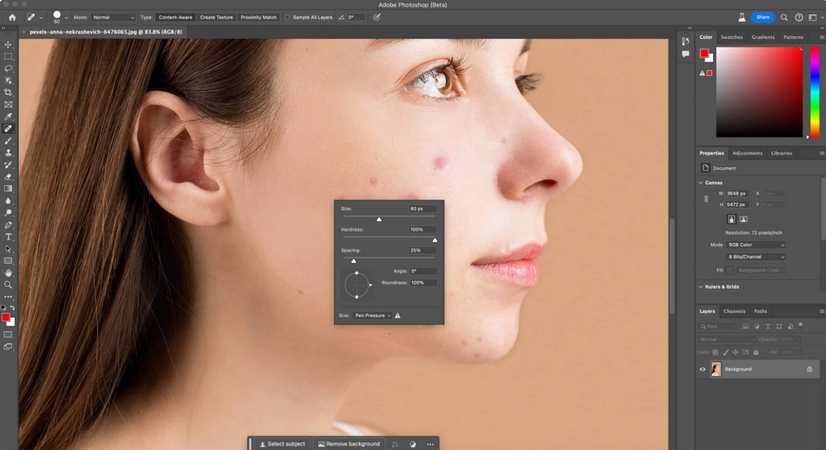
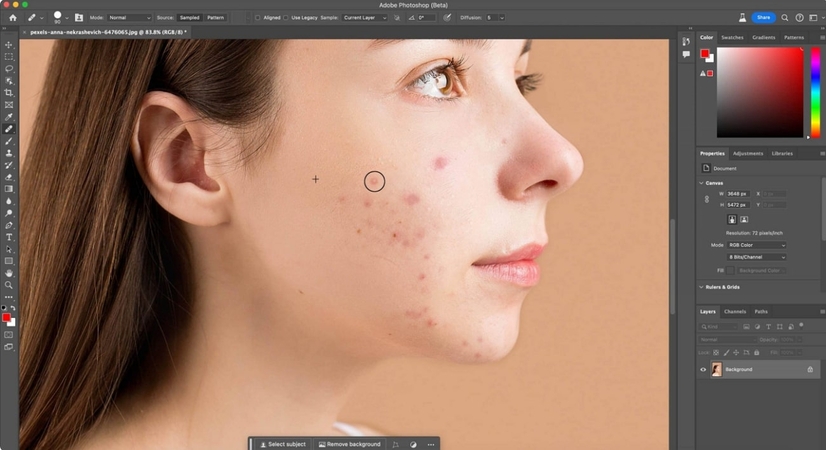
Step 3. Once you have the source, click on any imperfections. Repeat this step until you’re convinced with how the skin looks, and then save the image.
Use the “Mixer Brush Tool” or “Blur Tool” for Smoothening Skin
When you edit face on Photoshop with a “Mixer Brush Tool,” it enables you to modify the brush’s wetness, load, and mix settings. Alternatively, the Brush Tool can handle skin texturing or wrinkles for a softening and smoother look. Explore the tutorial provided and apply these tools subtly to maintain a realistic finish:
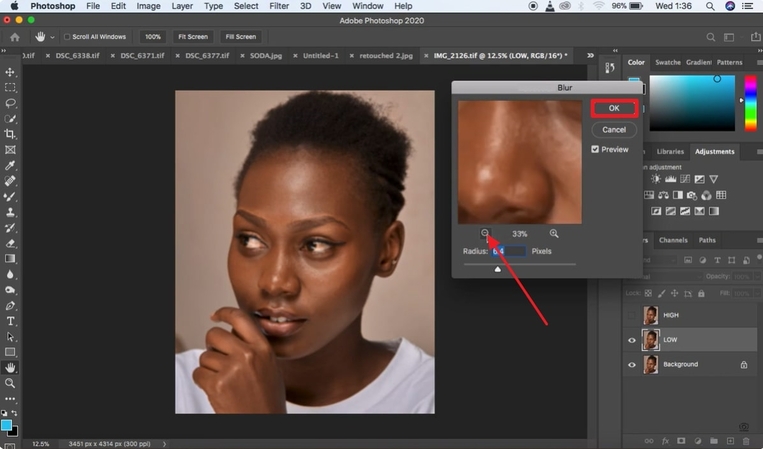
Step 1. Commence Photoshop and then add your image to the tool. Now, navigate to the "Filter" tab at the top toolbar and extend the "Blur" option from the drop-down menu. After this, press the "Blur" option from the revealing menu for blur.
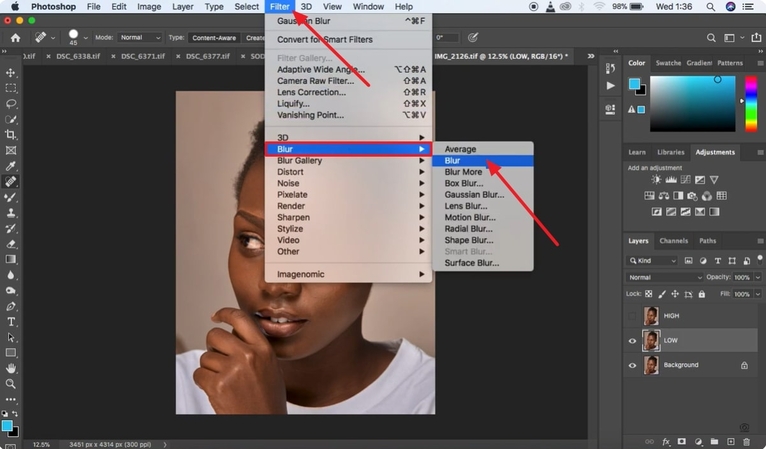
Step 2. In the “Blur” window, adjust the blurring effect by pressing the “Minus” and “Plus” icon. Once done, hit the “OK” button and apply the effect on the selected areas.
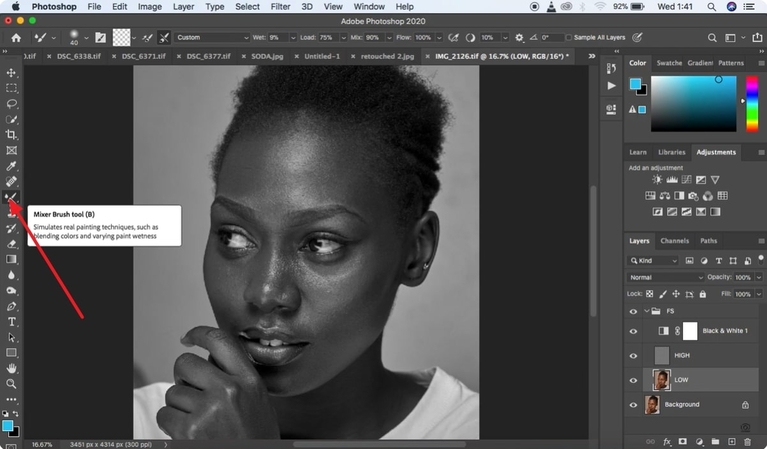
Step 3. Now, access the “Mixer Brush Tool” from the left toolkit and start retouching on added image.
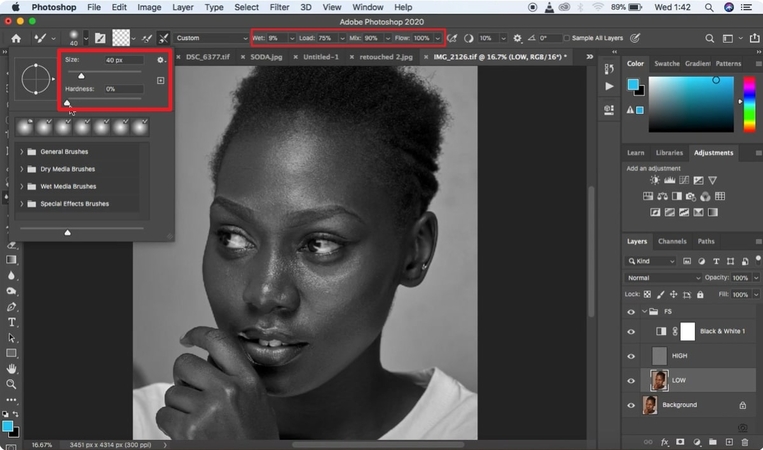
Step 4. Afterward, extend the menu beside “Brush” to set the “Size” and “Hardness” as per requirement. Next, from the top toolkit, adjust the options for “Wet,” “Load,” “Mix,” and “Flow” for precise editing.
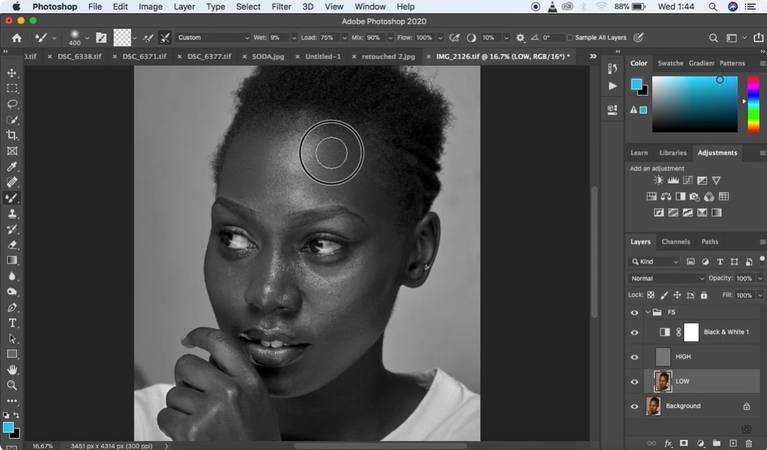
Step 5. Finally, spot the areas for imperfection and start smoothening the texture by moving the brush through the cursor.
Use “Face-Aware Liquify Tool” for Facial Reshaping on Photoshop
“Face-Aware Liquify Tool” is another feature used in Photoshop AI face editing that automates face symmetry without distorting natural proportions. This helps to modify the width of the jawline, adjust eye size, and refine nose shape with minimal adjustments. Follow the given stepwise guide and enhance facial features without over-exaggerating:
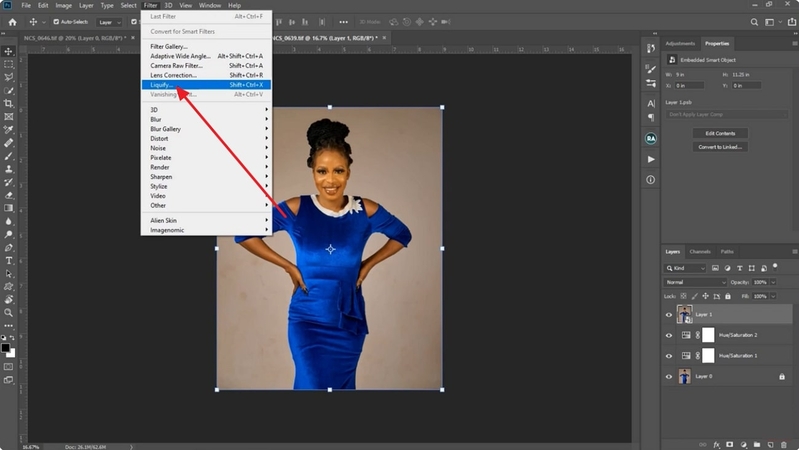
Step 1. Download Photoshop and open the image you want to edit after launching the platform. Now, head to the "Filter" tab at the top and press "Liquify" from the drop-down menu.
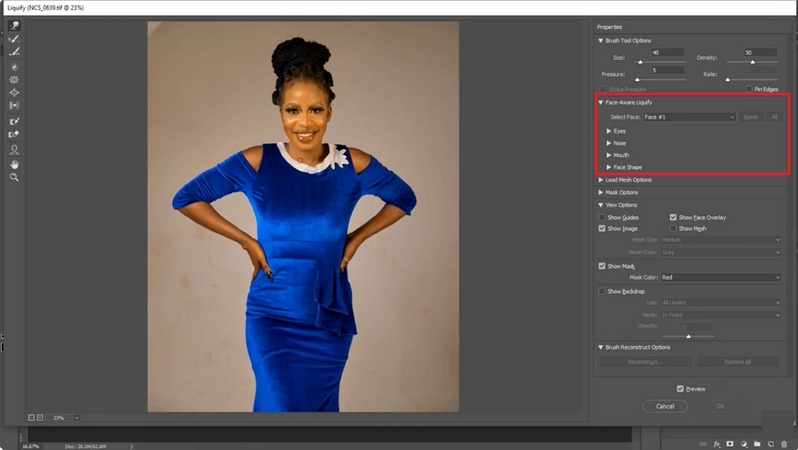
Step 2. Move ahead and extend the list for “Select Face” under the “Face-Aware Liquify section” from the right panel. In the end, press the “OK” button at the bottom to modify selected feature for the picture.
Part 2. Use The Right Tools Face For Retouching in Photoshop
Once you’ve reshaped facial features, the next important step is refining the details to create that polished look. Therefore, a few face-retouching Photoshop tools are mentioned in this section:
Using Lasso Tools For Specific Yellowness Removing
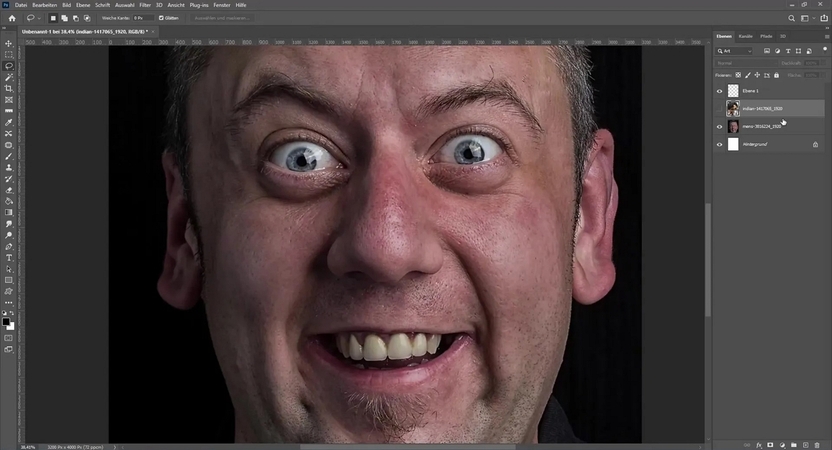
The "Lasso" tool works for precise selections while allowing you to isolate specific areas of your face, such as teeth. Once selected, they can be edited independently on a new layer with color corrections without affecting the surroundings. The "Hue\Saturation" tool is ideal for whitening teeth by reducing the yellow tones and enhancing the brightness.
Sharpen and Diffuse Layer to Improve Skin
Photoshop-enhance face features include sharpening and diffusing techniques that improve skin texture while maintaining softness. The sharpening process brings fine details, including texture of skin and facial features. At the same time, the diffusion effect reduces harshness and smooths out uneven tones to create a balanced look altogether.
Final Touches with “Camera Raw Filter” and “High Pass Filter”
In Photoshop, the "Camera Raw Filter" offers a powerful way to enhance the overall tone, contrast, and color balance of the face. It facilitates users with precise adjustment to clarity, texture, and lighting to bring out the best in skin features. On the other hand, a "High Pass Filter" is used to provide that crisp definition to the edges and details of the face without noise.
Part 3. Effortlessly Enhance Your Face Photo With HitPaw FotorPea
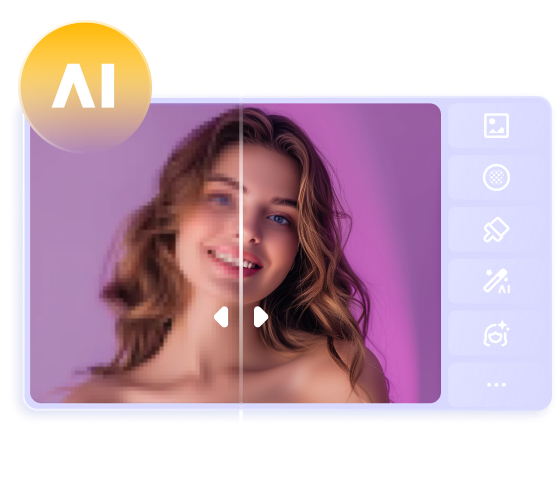
While manual Photoshop editing often leaves facial photos with unnatural 'plastic' textures, time-consuming layer adjustments, and inconsistent lighting effects, HitPaw FotorPea provides the perfect solution. This tool features powerful, diverse AI models that help improve image quality and restore blemished photos. Furthermore, it’s extremely easy to use—one click is all it takes to generate high-resolution 4K/8K images.
Key Features
- Remove facial scratches with one click and restore lossless pictures.
- Intelligently deblur facial images to restore high-definition facial details.
- Denoise model automatically reduces noise from high-ISO and low lightning images.
- Batch processing feature helps to improve multiple photos at once
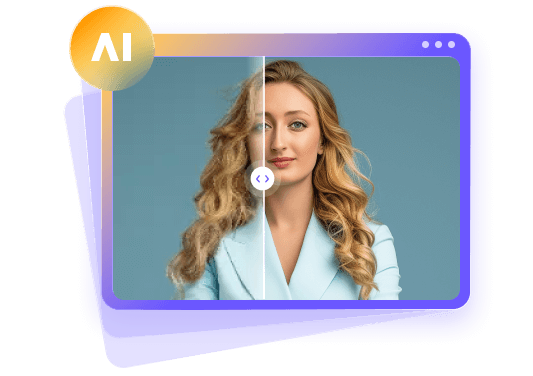
- Preview feature allows viewing the difference between the original and the generated one.
Comprehensive Guide to Enhance Face with HitPaw FotorPea
Users can learn how to edit their faces by using the following steps to enhance the look:
Step 1. Open the HitPaw FotorPea and access the AI EnhancerOpen the HitPaw FotorPea, hit the “Enhance Photos Now” then click the “+” to drag the file.

Step 2. Toggle the Model and Preview
Next, on the right panel, toggle the “Face Model” section; after that, press the “Preview” button to start the process.

Step 3. Download the Enhanced Video
When the image is enhanced, hit the “Export” button to save it on your device.

Part 4. FAQs of Change Face on Photoshop
Q1. Can I edit a face in Photoshop online for free?
A1. Yes, you can edit your face in Photoshop online for free. Also, you can adjust your face and enhance the facial features of the face.
Q2. How can I remove flyaway hair strands in Photoshop?
A2. Launch Photoshop > pick the healing brush tool >adjust the size of the brush and click or paint over the flyaway hairs.
Q3. How to swap faces in Photoshop?
A3. Open the images > press CTRL+C > CTRL+V after resizing the corner, use a layer mask to blend the edges, then save the file.
Q4. How to use Photoshop to retouch facial photos?
A4. Access the picture > select the spot healing brush > move the healing brush on the face. Then, go to Filter > Blur > Gaussian Blur > adjust the radius >use the layer mask and save the changes.
Conclusion
Photoshop remains the gold standard for professional face retouching—its Mixer Brush smooths skin seamlessly, and the Face-Aware Liquify tool lets you sculpt and refine features with pixel-perfect precision. However, HitPaw FotorPea can further enhance facial images through artificial intelligence models to make your portrait photos perfect!




 HitPaw Edimakor
 HitPaw VikPea (Video Enhancer)
 HitPaw Univd (Video Converter)
Share this article:
Select the product rating:
Daniel Walker
Editor-in-Chief
This post was written by Editor Daniel Walker whose passion lies in bridging the gap between cutting-edge technology and everyday creativity. The content he created inspires the audience to embrace digital tools confidently.
View all ArticlesLeave a Comment
Create your review for HitPaw articles