[Full Tutorial] Effective Ways to Normalize Volume in VLC
Variations in the volume of a media file can be very bothersome, especially when watching a movie or listening to a playlist with varying sound settings. Fortunately, a workaround is available in the volume normalization option included in the well-known and versatile VLC Media Player. In this guide, you will learn how to VLC normalize volume on the VLC media player. The HitPaw Univd will also give you an additional and more convenient method to achieve the same effect for flawless audio control.
Part 1. What Is Volume Normalization in VLC
Volume normalization in VLC Media Player balances audio levels dynamically during playback. It prevents abrupt volume changes between tracks or scenes, ensuring a smoother listening experience. By analyzing audio peaks and troughs, VLC adjusts loudness automatically, ideal for movies with quiet dialogues and loud action sequences.
Part 2. How to Normalize Volume in VLC?
Normalizing volume in VLC is straightforward and can significantly enhance your audio experience. This process is especially beneficial for users experiencing drastic volume changes between different media files or within a single playback session.
1. Launch VLC Media PlayerTo begin, ensure your digital device can run VLC Media Player.
2. Access Preferences:After clicking on Tools in the menu bar, select Preferences from the drop-down menu, which will appear immediately after. A different option is to use the keyboard shortcut {Ctrl+P}.
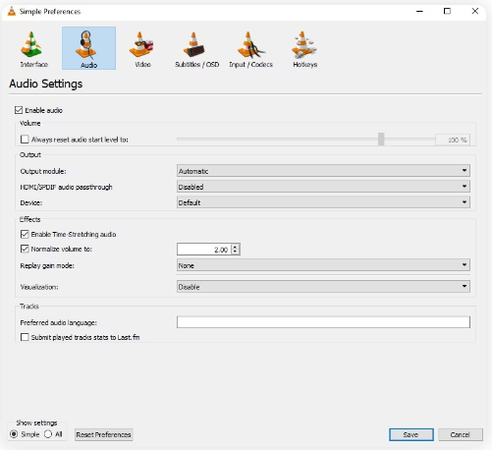
3. Navigate to the Audio Settings:Click the {Audio} tab in the Preferences box to access the audio settings.

4. Enable Volume Normalization:Check the box adjacent to the Normalise volume option to enable VLC volume normalization. The suitable normalization value, which may be 0.8, must be determined. This configuration defines the volume level that is meant to be used for your media files.

5. Save Settings:Please click the `Save` button to save your changes. Restarting VLC will ensure that the changes are correctly implemented.

6. Play Your Media:Launch your media files in VLC and enjoy delight in the sound at a consistent level.
After following these instructions, you will have no trouble with VLC volume normalization in your VLC Media Player, ensuring a constant listening experience.
Part 3. How to Normalize Audio Volume to A Same Volume Level?
While VLC handles real-time normalization, HitPaw Univd offers precise, permanent adjustments for files. Imagine editing a podcast with uneven guest volumes or fixing a movie where background music overpowers dialogues. HitPaw Univd ensures all audio plays at the same level across devices. It is an ideal volume normalizer designed to help users achieve a uniform audio experience across all media types. This tool is especially useful for professionals like podcast creators and video editors who require consistent volume levels throughout their projects.
- Precise volume adjustment ensuring consistent audio output across various file formats.
- User-friendly interface designed for effortless volume normalization and audio enhancement.
- Real-time preview allows immediate feedback on audio changes and adjustments.
- Batch processing feature to normalize multiple audio files with one click.
- Advanced customizable settings for fine-tuning overall audio quality without compromising clarity.
- Supports a wide range of audio and video formats for flexible editing.
Steps to Normalize Audio File's Volume in HitPaw Univd
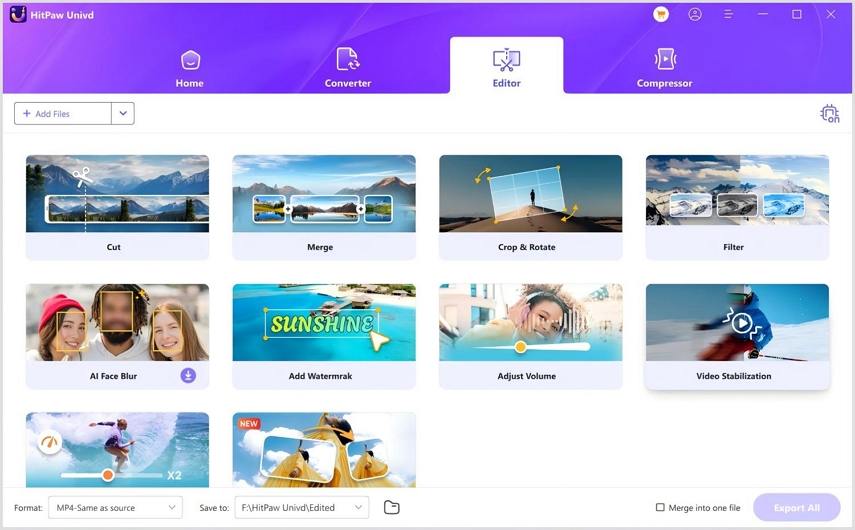
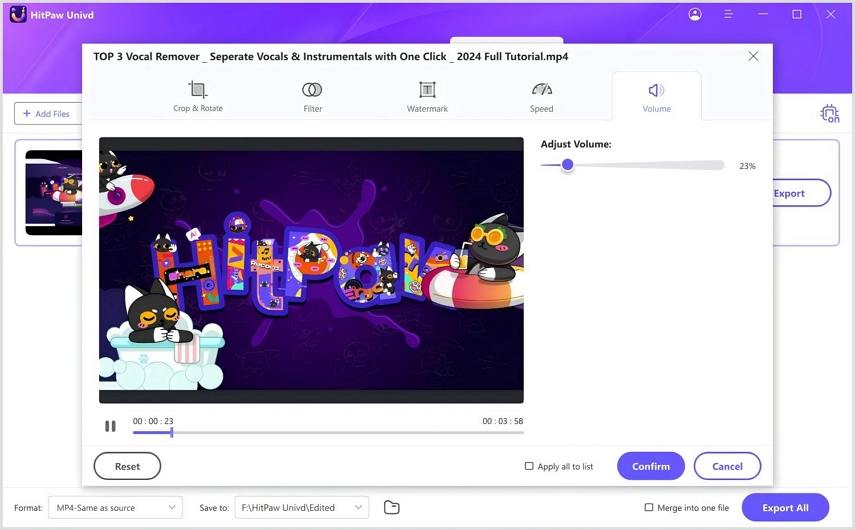
Step 1:Install HitPaw Univd on your computer. On the main interface of the Editor section, choose the Adjust Volume feature and add the source audio/video.

Step 2:Select "Convert all" from the bottom menu. In the video section, choose your preferred resolution and format, such as MKV or MP4.
By checking the “Apply all to list” option, you can apply the same settings to all files in the list that you imported.

Step 3:Click the Export button to export a single file or Export All to export all files with your normalized audio.
FAQ on Volume Normalization in VLC
Q1. What is volume normalization?
A1. Volume normalization is the process of adjusting audio levels so that the playback volume remains consistent across a media file or multiple files, reducing the differences between quiet and loud passages.
Q2. To what extent can VLC adjust the loudness automatically?
A2. VLC can automatically adjust the audio levels to a certain degree by using its built-in normalization feature. While it is effective for most casual users, extreme variations in audio levels might still require additional adjustments.
Q3. Can you normalize the volume of many files at once?
A3. VLC primarily focuses on single file playback settings; batch normalization is not natively supported. For bulk processing, third-party tools like HitPaw Univd offer efficient batch processing features.
Q4. Does the process of normalization have any impact on the quality of the audio?
A4. When performed correctly, normalization does not degrade audio quality. It merely balances the volume levels, ensuring a consistent listening experience without altering the fundamental sound properties.
The Bottom Line
Achieving consistent audio levels can significantly enhance your viewing or listening experience. Whether you use VLC Normalize Volume for quick adjustments or turn to HitPaw Univd for more advanced volume normalization and batch processing, both solutions offer reliable ways to balance your audio playback. By following the detailed steps provided in this guide, you can ensure that your media always plays at an optimal volume, eliminating unexpected loudness variations and improving overall audio quality.



 HitPaw VikPea (Video Enhancer)
 HitPaw Watermark Remover


Share this article:
Select the product rating:
Daniel Walker
Editor-in-Chief
This post was written by Editor Daniel Walker whose passion lies in bridging the gap between cutting-edge technology and everyday creativity. The content he created inspires audience to embrace digital tools confidently.
View all ArticlesLeave a Comment
Create your review for HitPaw articles