






How to Fix Grainy Video with Detailed Steps in 2026
Grainy or noisy videos are a common issue caused by low light, high ISO settings, or heavy compression. These problems can make your footage look unprofessional and unclear.
In this comprehensive guide, we will walk you through the most effective methods to remove grain from video—ranging from fully automated AI video upscalers to advanced native workflows in Adobe Premiere Pro and After Effects. Let's dive in!
Part 1. Quick Comparison of Ways to Fix Grainy Videos
| Denoising Method | Best For | Learning Curve | Processing Speed | Output Quality | Cost |
|---|---|---|---|---|---|
| AI Video Upscaler | Beginners & Pros wanting studio-grade results instantly. | 1-Click AI | Super Fast | Up to 8K | Free Trial / Premium |
| Online Video Tools | Quick edits and short clips | Easy | Medium | Fair | Free with watermarks |
| Third-Party Plugins | Advanced filmmakers requiring granular control | Steep | Slow | Great | Paid Premium |
| Adobe Premiere Pro Remove Grain | Users already working in Premiere Pro | Medium to High | Very Slow | Good | Included in Adobe |
| Reduce Playback Window Size | Temporary viewing improvement only | None | Instant | Poor | Free |
Part 2. The Best & Most Efficient Way to Fix Grainy Videos with AI
If your footage looks grainy due to low-light recording, high ISO settings, or video compression, an AI-powered video enhancer can often deliver better results than traditional noise reduction tools.Unlike manual editing methods that require extensive adjustments, AI-powered video denoiser HitPaw VikPea can automatically analyze each frame, remove unwanted noise, and restore lost details while preserving the natural look of the video.
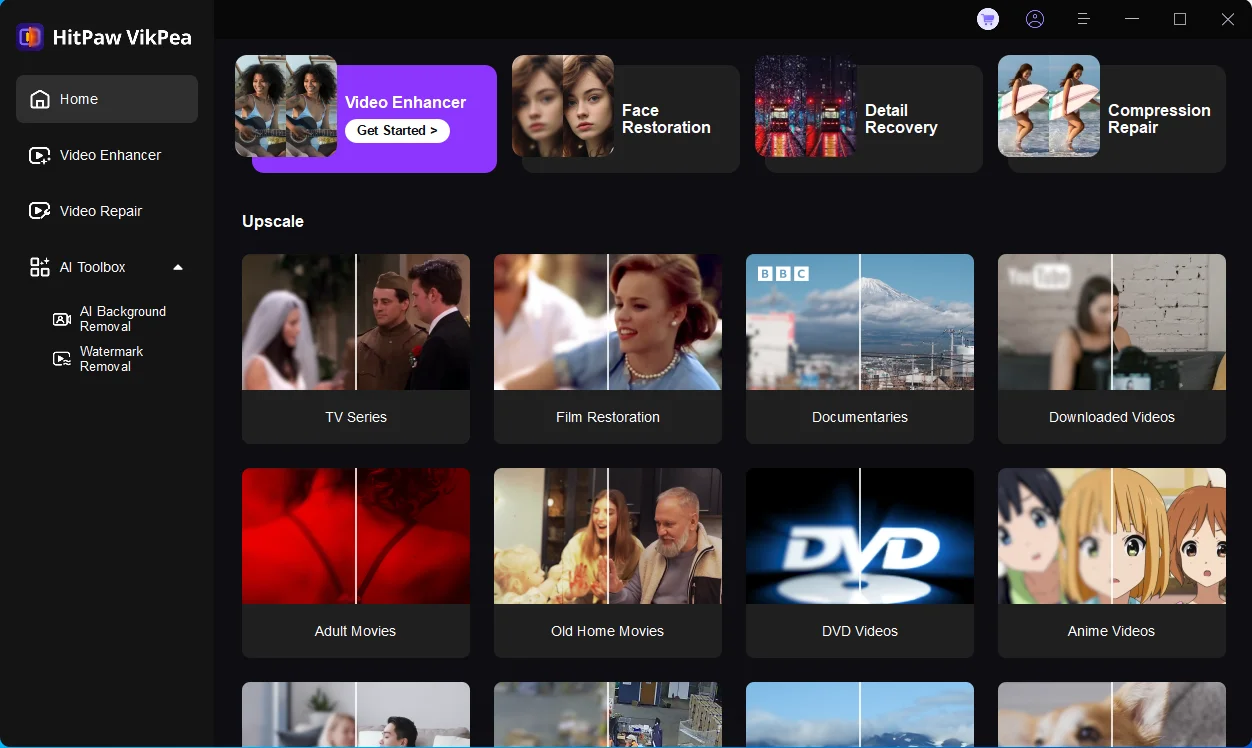
The Outstanding features of HitPaw VikPea
- AI-powered denoising that removes grain while preserving details
- Specialized AI models for low-light, portrait, animation, and general videos
- Upscale videos to 4K with improved sharpness and clarity
- Enhance compressed, blurry, and low-resolution footage
- Real-time preview before exporting
- Batch process multiple videos at once
- Beginner-friendly interface with one-click enhancement
Step-by-Step: How to Remove Video Grain with HitPaw VikPea
-
Step 1. Download and InstallFirst, get the HitPaw VikPea from the official website and install it on your PC or Mac.




-
Step 2. Import Your Footage Launch the program, navigate to the Video Enhancer module, and drag-and-drop your grainy video into the workspace.

-
Step 3. Select Denoise Model For standard video noise, choose the Denoise Model from the right panel. For extreme low-light or nighttime artifacts, select specialized models to reduce digital grain without losing contrast.

-
Step 4.Preview and Fine-Tune Click the Preview button to generate a real-time, side-by-side comparison frame. Under Export settings, customize your desired resolution, bitrate, and frame rate.
-
Step 5. Export in High Quality Click the Export button to start processing the entire video. Within minutes, you will get a pristine, noise-free masterpiece.
Part 3. Remove Grain from Video Online Free Try
If you are on a tight schedule or editing on a Chromebook, using an online video denoiser is a solid alternative. VEED.IO is an excellent web-based platform that allows quick, browser-based noise adjustments without requiring software installation.
-
Step 1.Go to VEED.IO's home page to check out the platform's primary user interface. To start enhancing the video, please choose it by clicking the corresponding button.
-
Step 2.You just need to wait a second for the website to finish loading so that you can start the video upload process in a different tab. Choose the video you want to enhance.
-
Step 3.The tool's preview function will now display your video. In order to view the video's customization options, please click on it. Find Noise in the list of editing tools, and set the slider to zero.
-
Step 4.When you're done making changes, choose Export and then Export Video to complete the procedure.
Part 4. Fix Grainy Video with Noise Reduction Video Plugins
For professional cinematographers, utilizing specialized, industry-standard plugins within your NLE (Non-Linear Editor) remains a highly powerful method for removing heavy noise, compression artifacts, or pixelation.
Popular third-party plugins like Neat Video, Red Giant Magic Bullet Denoiser, and Digital Anarchy offer granular control over spatial and temporal noise profiles.
How to Use Neat Video in After Effects:
-
Step 1.Navigate to Effect > VideoFilters > Neat Video v5.
-
Step 2.Now, drag and drop the filter in the timeline.
-
Step 3.Next, select the frame from noise analysis. You can use a timeline to select the frame.
-
Step 4.Adjust the noise level as necessary and export the video.
Part 5. Quick Bypass: Reduce Playback Window Size
Playback Window size reduction is another option. It helps in the reduction of grain and the enhancement of video quality. Nevertheless, this approach can only be used for grainy videos that can only be seen online and cannot be corrected or stored.
-
Step 1.To reduce the size of the Playback Window, simply exit the full-screen mode.
-
Step 2.Now, adjust the screen size to the point where the video quality improves.
-
Step 3.In the case of a downloaded video, you can use a third-party app to reduce the frame of the video, but that is a lengthy process.
Part 6. How to Fix Grainy Video in Premiere Pro After Effects
In After Effects, you may use a variety of tools to suppress annoying background noise in your videos. To begin, there is a built-in option in Premiere Pro grain reduction that will let you repair your videos without having to shell out any more cash on third-party plugins.
Learn how to fix grainy video in Premiere Pro:
-
Step 1.In order to de-noise a clip, launch your project and locate it on the timeline.
-
Step 2.Select "Noise and Grain" from the "Effect" menu, and then use the "Remove Grain" option.
-
Step 3.Adjust the size of the preview zone to see a preview of the finished picture once the effect has been applied in Premiere Pro remove grain.
-
Step 4.Adjust your noise canceling settings until you achieve an acceptable level of reduction. This is how you can reduce grain in Premiere Pro.
Part 7. FAQs of Removing Grain from Video
Q1. Why are my videos grainy?
A1. Grainy videos are usually caused by low-light conditions, high ISO settings, small camera sensors, or excessive video compression. When a camera struggles to capture enough light, it introduces digital noise that appears as grain. This issue is especially common in smartphone videos, old footage, and videos recorded at night.
Q2. Is there a way to remove grain from video?
A2. Yes. You can remove grain from videos using AI video enhancers, noise reduction plugins, online video editors, or professional software like Premiere Pro. AI-powered tools are often the easiest option because they automatically reduce video noise, restore details, and improve overall video quality without requiring complex manual adjustments.
Q3. What is the difference between film grain and digital noise?
A3. Film grain is a natural, organic texture found in physical celluloid film, often prized for its cinematic aesthetic. Digital noise, on the other hand, consists of erratic, blocky, and multi-colored pixels produced by digital sensors struggling in low-light or high-ISO conditions. It generally degrades video quality.
Q4. Does changing resolution fix grainy videos?
A4. Simply changing the export resolution (e.g., exporting a grainy 1080p video as 4K) will not fix the issue; it will only upscale the noise. You must apply a denoiser or an AI reconstruction model prior to or during the upscaling process to genuinely eliminate the grain.
Part 7. Conclusion
Grainy, pixelated, or choppy videos are common hurdles caused by suboptimal camera hardware or challenging lighting conditions. While reducing the playback window size offers a quick visual escape and Adobe suites provide traditional native filters, they either fail to permanently fix the file or require painful rendering times.
For a streamlined, highly effective, and automated solution that restores micro-details seamlessly without editing experience, download HitPaw VikPea today and give your footage a studio-grade upgrade!

 HitPaw Univd (Video Converter)
  HitPaw Watermark Remover
  HitPaw VikPea (Video Enhancer)



Share this article:
Select the product rating:
Daniel Walker
Editor-in-Chief
This post was written by Editor Daniel Walker whose passion lies in bridging the gap between cutting-edge technology and everyday creativity. The content he created inspires audience to embrace digital tools confidently.
View all ArticlesLeave a Comment
Create your review for HitPaw articles