How to Change Resolution of Video in Final Cut Pro?
The resolution, also known as the aspect ratio, is the frame size occupied by a video when being played. Or, in simple words, the height and width of the video. You can select several aspect ratios in Final Cut Pro. However, it may not be uncommon to have trouble figuring out how to do so.
This article will explain things your should know about video resolution and how to change video resolution on Final Cut Pro.
Part 1: What Is Final Cut Pro?
Final Cut Pro is one of the most professional but user-friendly video editing software out there. Aside from being a professional video editing program, Final Cut pro’s relatively friendly user interference allows starters to work on their project without facing any major hindrance. Introduced by Apple in 2011 as Final Cut Pro X, no doubt Final Cut Pro has gained major popularity in the field of cinematography and professional video editing and is currently one the most used professional video editing software out there, especially for newbies.
Part 2: Guide of How to Change Resolution of Video in Final Cut Pro
There we will list detailed steps to change video resolution Final Cut Pro.
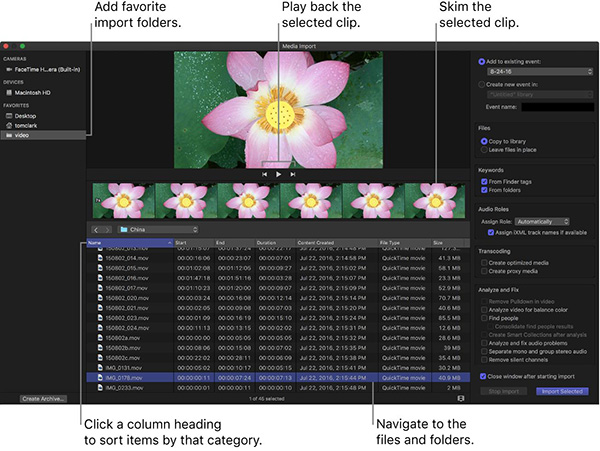
STEP 1: Import the video
Launch the Final Cut Pro and import the video you want to change the resolution of by clicking the import media button and selecting the file, then clicking import file, or by simply dropping it on the timeline.

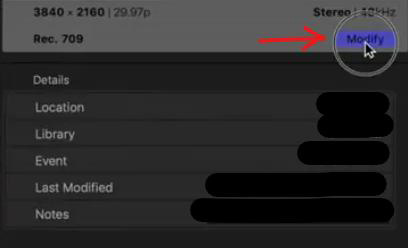
STEP 2: Modify the video
After the video is imported, on the top right corner of your application window, you’ll see a “Modify” button. Navigate towards it and click on the Modify button. You’ll see a menu box that will appear regarding your imported video. Change the video format by selecting the custom option.

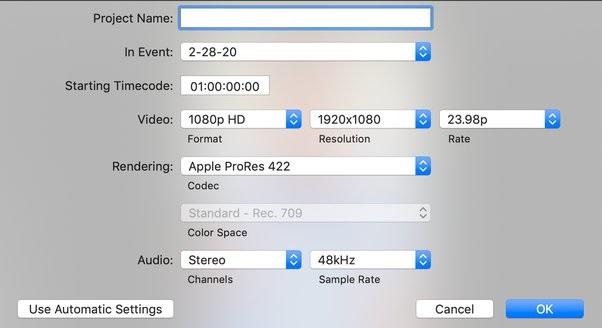
STEP 3: Change the aspect ratio
In order to change and customize the resolution of the video, click on the box in front of “Video” to see the options available. A dropdown list will appear. You can select your desired aspect ratio other than that of 16:9 or whichever is set by default.

STEP 4: Saving changes
After changing the aspect ratio, don’t forget to save the changes. Now that you have chosen to save, your video will be saved in your desired ratio. You have successfully changed the resolution to your desired ratio and saved your video.
Part 3: Best Video Resolution Enhancer You Should Know
Even if you change resolution in Final Cut Pro, videos maybe still blurry. HitPaw VikPea (formerly HitPaw Video Enhancer) is your best assistant to upscale video quality while you can still change video resolution as well.
This AI tool provides multiple AI models to enhance video. Just free try now!
The noteworthy features of HitPaw VikPea:
- Enhances your video’s resolution using a powerful, trained AI
- Can fix low-resolution videos and increase the aspect ratio up to 8K
- Can also use noise reduction to remove excessive background noise
- Specially designed AI to perfect anime and actual human faces in the video
Steps to Enhance Video
Step 01 Download the HitPaw VikPea app by clicking on the Download option. After the application is installed, you’ll need to import your video. You can import the file by clicking on the “Choose File” option or by dragging and dropping the video into the given box.

Step 02 You’ll be given multiple AI models to use. Select your desired resolution from the dropdown list of aspect ratios. The selected resolution will be given to your imported and now enhanced video.

Step 03 You can preview the video enhanced by the HitPaw AI by clicking the Preview Effect option. Now, wait a few minutes, and your preview video will be visible on the screen.

Step 04 Your video has now been enhanced, and the resolution has been changed. Just click on the export button to export your edited video.
Conclusion
Final Cut Pro is a professional but relatively easy-to-use video editing software. And even though changing the aspect ratio or resolution of your video in Final Cut Pro can be quite hectic, it’s a relatively easy task after you have gone through the article. But if you need a higher-quality video, HitPaw VikPea is always the best choice. Try it now!
FAQs about Changing Resolution of Video in Final Cut Pro
1. How do you change 4k to 1080p in Final Cut Pro?
When you create a project, you decide on the resolution. Consequently, start a 1080P project and just drop the 4K footage to the timeline. There it is—1080P. If you want the clips to accommodate the full frame, you might need to lower the size of it. You may also try setting the 4K Project's Inspector resolution to 1080P. Before attempting this, don’t forget to save a snapshot of your 4K project.
2. How do you upscale 1080p to 4k in Final Cut Pro?
The 1080P clip should be imported into a 4K project using the same codec, Scaled Up to suit, and given a Sharpening effect. The codec that was chosen and how effectively the footage was filmed will determine the final quality. HitPaw VikPea is yet another outstanding choice. It's a fantastic tool. Look into it.


 HitPaw VikPea (Video Enhancer)
 HitPaw FotorPea


Share this article:
Select the product rating:
Daniel Walker
Editor-in-Chief
This post was written by Editor Daniel Walker whose passion lies in bridging the gap between cutting-edge technology and everyday creativity. The content he created inspires audience to embrace digital tools confidently.
View all ArticlesLeave a Comment
Create your review for HitPaw articles