Ultimate Guide on Color Grading in Final Cut Pro for Stunning Visuals
Color grading transforms your raw footage into a polished, cinematic masterpiece. With Final Cut Pro color grading tools, producers and editors can manipulate hue, saturation, and exposure to achieve a cohesive look across every shot. Whether you're just starting out with Final Cut color grading or you're fine-tuning advanced colour grading in FCPX, this guide covers everything from basic terminology to pro-level workflows. You'll learn how to apply color correction Final Cut Pro features, leverage scopes for accuracy, and even supercharge your process with AI enhancements.
Part 1. What is Video Color Grading?
Video color grading is the art of adjusting and enhancing the color palette of footage to evoke mood, maintain consistency, and highlight narrative themes. Beyond simple color correction Final Cut Pro provides, true color grading for Final Cut Pro involves creative decisions that turn ordinary video into visually compelling stories. By balancing tonal ranges, refining color balance, and emphasizing key hues, you ensure every scene feels intentional and professional.
Goals of Video Color Grading
- Balance exposure and contrast for natural look
- Correct color casts and white balance issues
- Enhance mood through selective color choices
- Maintain visual consistency across multiple clips
- Highlight subjects with targeted color adjustments
- Create stylized looks that support storytelling
- Optimize footage for different display formats
Part 2. How to Color Grade in Final Cut Pro?
Color grading on Final Cut Pro combines powerful correction tools with intuitive controls to let you shape your footage exactly how you envision it. From basic adjustments on the Color Board to precision tweaks with Hue/Saturation curves, Final Cut Pro colour grading tools accommodate every editor's style. Follow these steps to master colour grading FCPX workflows and achieve professional results.
Step 1: Import Video
1.Open Final Cut Pro and create (or open) your project timeline.
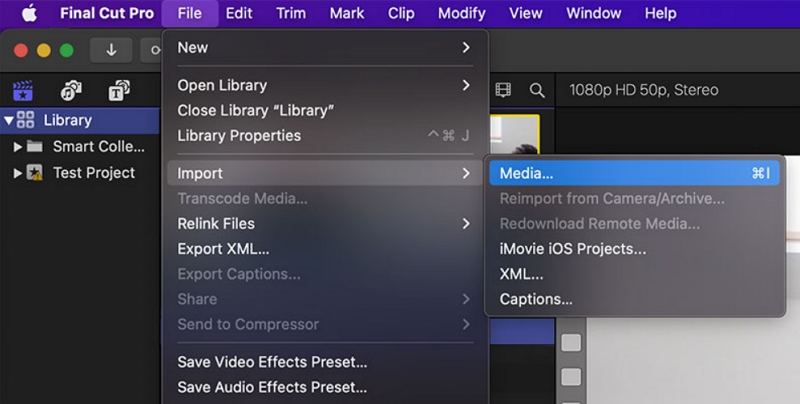
2.Use File > Import > Media (or ⌘I) to bring your video clips into the browser.
3.Drag selected clips onto your timeline and complete any basic editing cuts before color grading begins.
Step 2: Color Grading Tools
1.The color correction and color grading tools in Final Cut Pro are in the Color Inspector. Select a clip in the timeline.
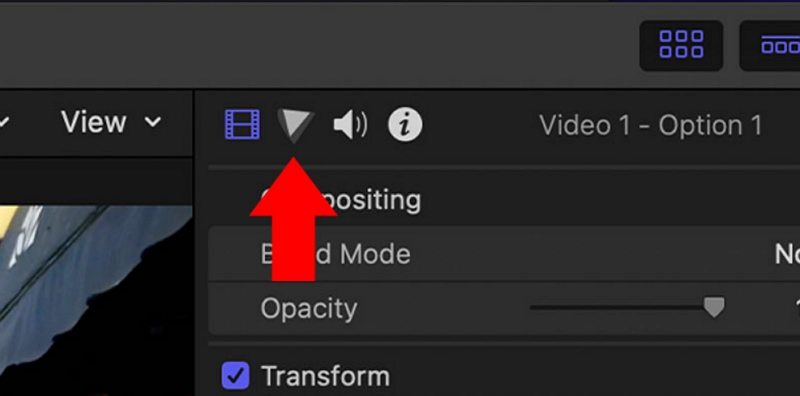
2.Reveal the Color Inspector by clicking its icon in the top‑right Inspector panel-or choose Window > Go To > Color Inspector (Command + 6).

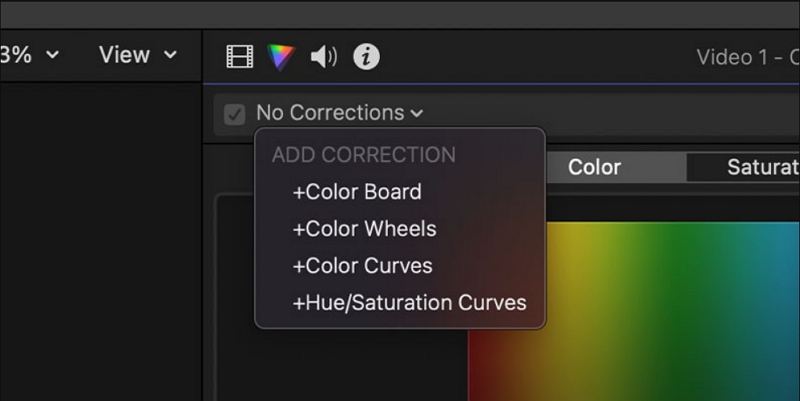
3.At the top of the Color Inspector, click the dropdown menu to see all available grading and correction tools.
- Color Board
- Color Wheels
- Color Curves
- Hue/Saturation Curves

You can add one or more of these tools to create unique looks. In the Color Inspector, choose the color correction tool and apply it to the clip. Its settings will appear in the Color Inspector.
Step 3: Use the Color Board for Quick Balancing
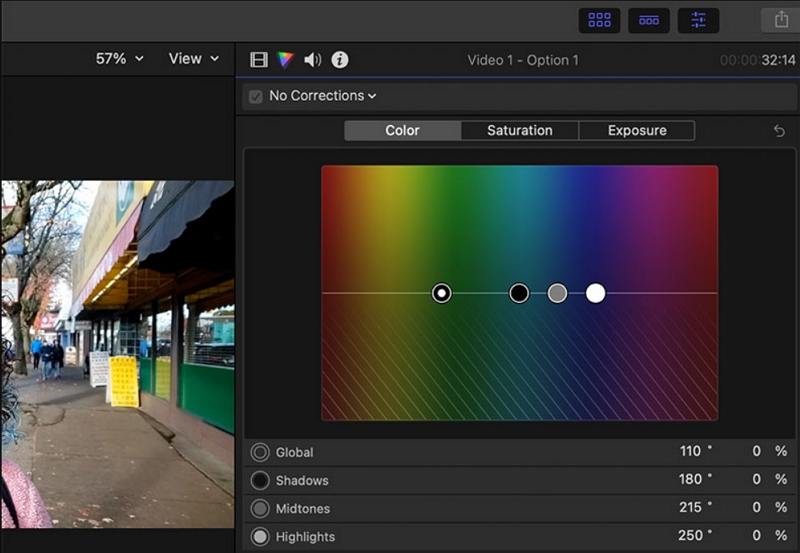
1.In the Color Board, switch among Color, Saturation, and Exposure tabs.
2.Drag the central control (global) or the individual shadow, midtone, and highlight circles to adjust tint, chroma, and luma.

3.Fine‑tune with the value slider at the bottom for subtle adjustments.
Step 4: Refine with Color Wheels
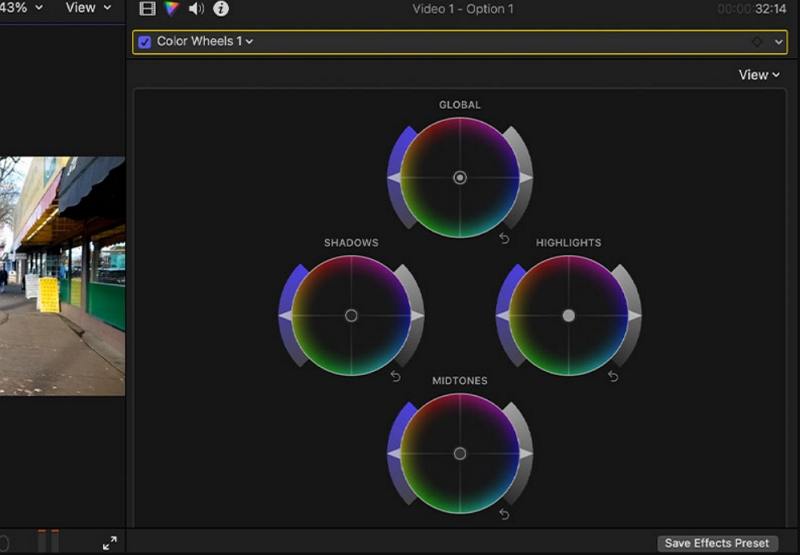
1.In the Color Wheels panel, use the global, shadows, midtones, and highlights wheels.
2.Drag each wheel's center point toward a hue, then adjust the adjacent slider for saturation and brightness.

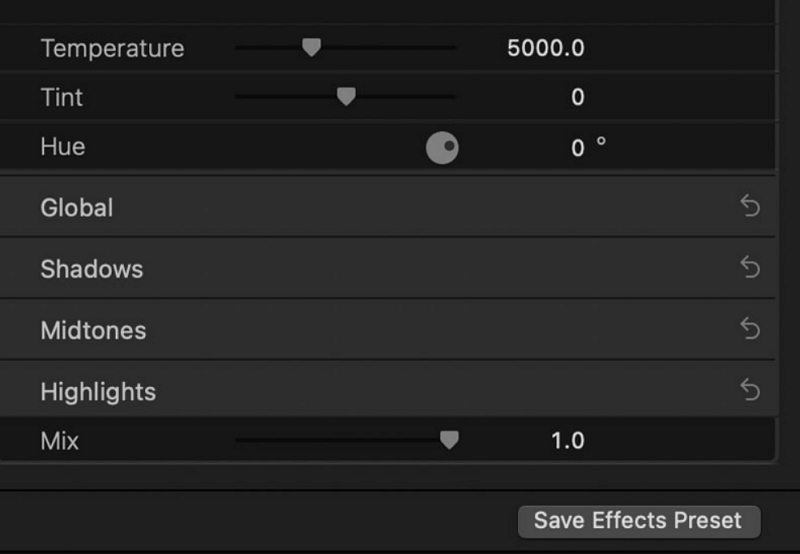
3.Optionally expose numeric fields by clicking the disclosure triangle to enter exact values.

4.Save your configuration as a preset via Save Effects Preset at the bottom.
Step 5: Enhance with Color Curves
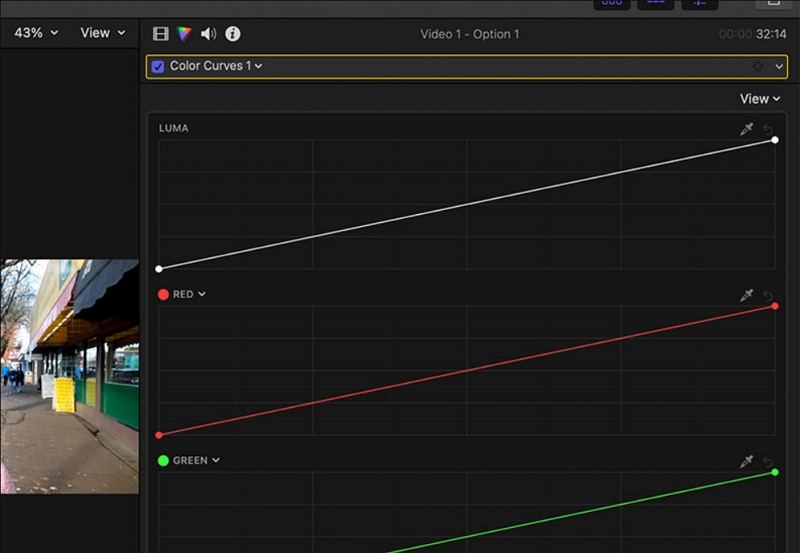
1.Open the Color Curves tool to see separate RGB channels and the master luma curve.
2.Click on a curve line to create control points.
3.Drag each point up or down to boost or reduce that tonal range in shadows, midtones, or highlights.
Step 6: Polish with Hue/Saturation Curves
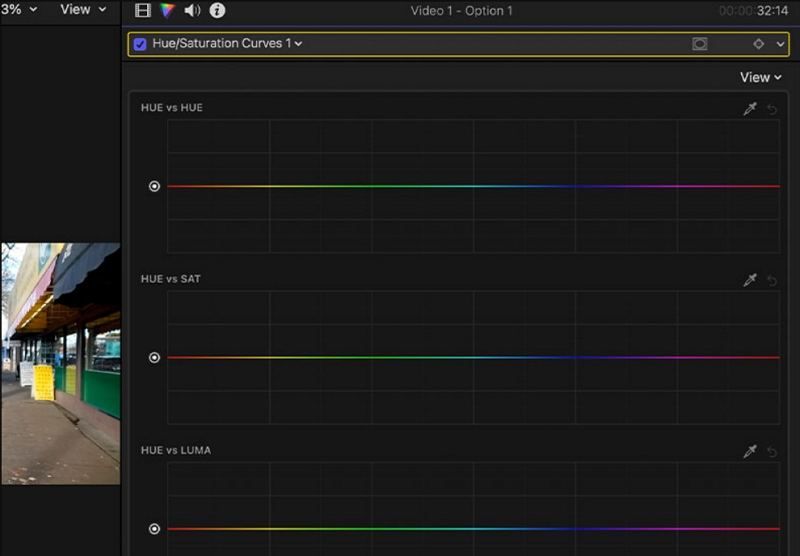
1.Choose Hue vs Hue, Hue vs Sat, Hue vs Luma, Luma vs Sat, Sat vs Sat, or Orange vs Sat.
2.Use the eyedropper to sample a color directly from your frame.
3.Click the curve to drop a point at that hue, then drag vertically (saturation/luma) or horizontally (hue) to fine‑tune.
Step 7: Use Scopes for Reliable Color Grading
1.Enable scopes via View > Show in Viewer > Video Scopes (Command + 7).
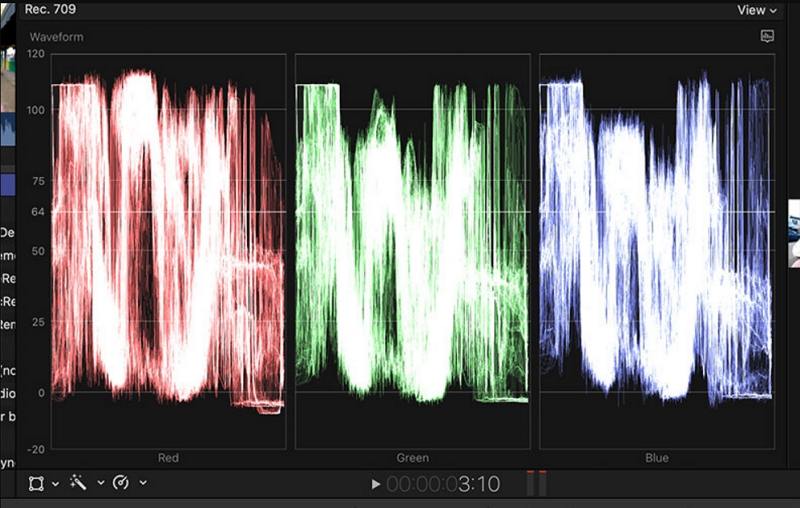
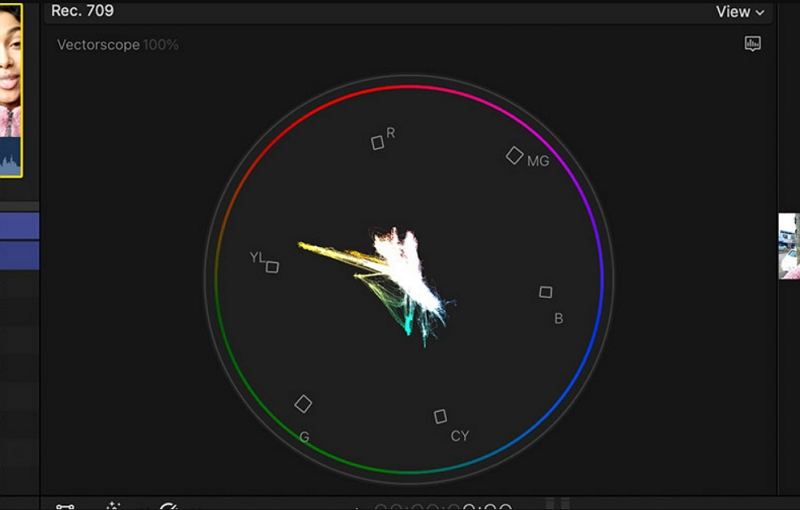
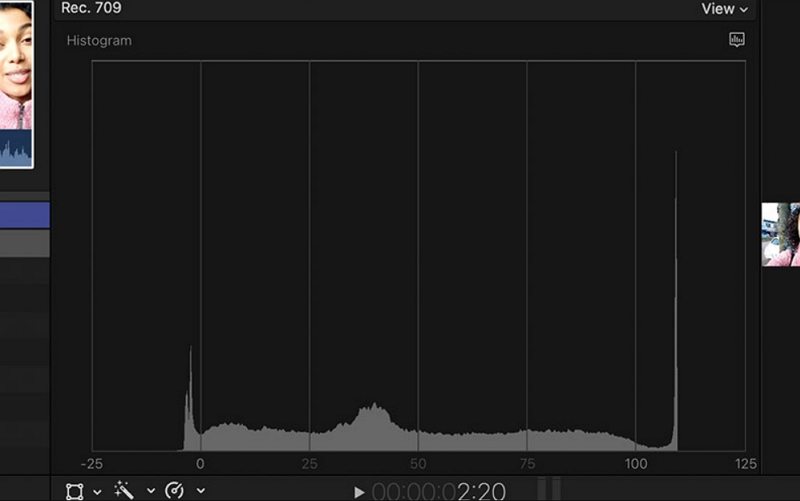
2.Select among Waveform, Vectorscope, and Histogram for precise measurement of exposure, color balance, and saturation.
- Waveform: Displays luma, chroma, RGB, and luminance levels.

- Vectorscope: Shows hue and saturation on a circle with a skin-tone indicator.

- Histogram: Graphs pixel count per luma or color percentage.

- Waveform: Displays luma, chroma, RGB, and luminance levels.
3.Adjust your tools until your scopes indicate balanced levels and accurate skin‑tone placement.
Part 3. Pros and Cons of Final Cut Pro Color Grading
Final Cut Pro colour grading delivers professional tools in a streamlined interface, making it a favorite among Mac editors. From basic Final Cut color correction to advanced colour grading FCPX techniques, the app offers comprehensive features. Yet, like any software, it has strengths and limitations. Understanding these pros and cons will help you decide if Final Cut Pro colour grading fits your workflow.
Pros
- Intuitive interface simplifies complex grading tasks
- Real-time playback of adjustments with minimal lag
- Seamless integration with Apple ecosystem workflows
- Powerful scopes for accurate color and exposure analysis
- Customizable presets speed up repetitive grading tasks
- Multiple grading tools offer creative flexibility
- GPU acceleration boosts rendering performance
Cons
- Mac-only software limits cross-platform collaboration
- Fewer third-party plugin options than competitors
- Steep learning curve for advanced grading tools
- Limited batch grading features for large projects
- Occasional performance slowdowns on older hardware
Part 4. The Best Way to Enhance Video Color with AI
While Final Cut Pro color grading is powerful, AI-powered enhancement can take your footage to the next level. HitPaw VikPea leverages cutting-edge machine learning to automate color enhancement, transform SDR into HDR, and revive low-light shots. Whether you need colorize video tools or intelligent color correction FCPX alternatives, VikPea streamlines the process. In just a few clicks, you can boost vibrancy, restore old black-and-white clips, and improve overall video quality without hours of manual tweaking.
- Transforms standard dynamic range footage into HDR quality visuals.
- Automatically adds realistic colors to monochrome or black-and-white videos.
- Balances saturation, contrast, and luminance for natural vibrancy.
- Reduces noise and corrects color casts in dark scenes.
- Apply AI color enhancements to multiple clips at once.
- Save AI adjustments as LUTs for use in Final Cut Pro.
- Ensures accurate skin tones across different lighting conditions.
- Optimizes dynamic range for online platforms and TV displays.
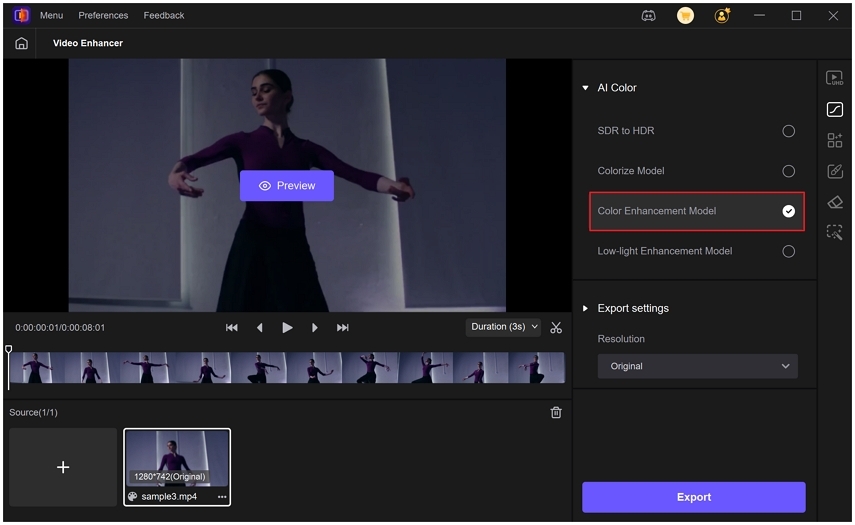
Step 1.Download and install HitPaw VikPea on your computer. Run VikPea after installing, click on AI Color, and choose between B & W Colorization, SDR to HDR Model, Color Enhancement Model, or Low-light Enhancement Model based on your needs.

Step 2.Import the file you want to correct color. Choose your best-fitting AI model like "Color Enhancement" to boost overall vibrancy.

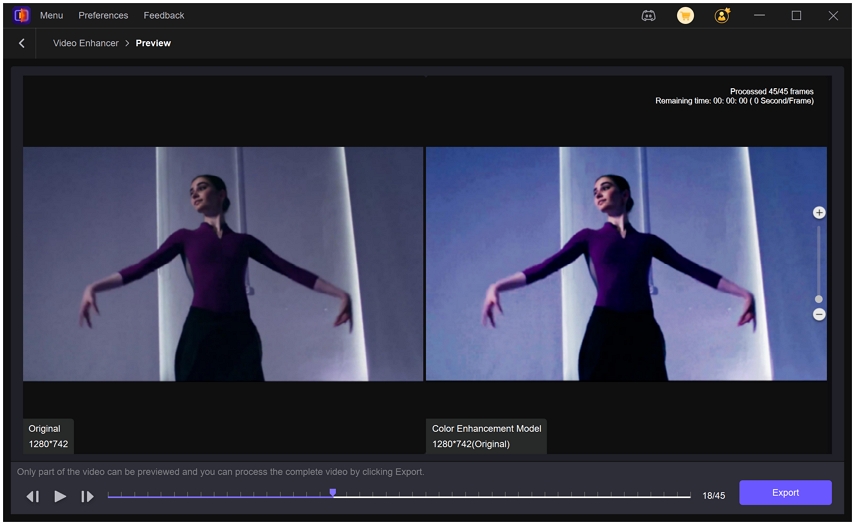
Step 3.Preview the changes to see how your improved colors look in your video. Once satisfied, click "Export" to save your color-balanced video to your computer.

Frequently Asked Questions on Final Cut Color Grading
Q1. Can Final Cut Pro do color grading?
A1. Yes, Final Cut Pro offers comprehensive color grading tools such as Color Board, Wheels, and Curves for professional results.
Q2. Can you use LUTs in Final Cut Pro?
A2. Yes, open the Effects browser, select Color > Custom LUT, and double-click to apply a LUT to the selected clip.
Q3. Does Final Cut Pro reduce quality?
A3. No, Final Cut Pro uses high-quality rendering and retains original resolution and bitrate when exporting.
Conclusion
Mastering Final Cut Pro colour grading unlocks the true potential of your footage. From basic Final Cut color correction to advanced color grading for Final Cut Pro techniques, you now have the knowledge to create consistent, cinematic visuals. For even faster, AI-driven enhancements, HitPaw VikPea offers powerful models that streamline colorize video workflows and boost image quality. Combine both tools to achieve unparalleled results and make your projects stand out.





 HitPaw Univd (Video Converter)
 HitPaw VoicePea
  HitPaw FotorPea


Share this article:
Select the product rating:
Daniel Walker
Editor-in-Chief
This post was written by Editor Daniel Walker whose passion lies in bridging the gap between cutting-edge technology and everyday creativity. The content he created inspires the audience to embrace digital tools confidently.
View all ArticlesLeave a Comment
Create your review for HitPaw articles