Browse & Discover The Best Video Quality Changer For You
In the realm of digital content, video quality is a crucial element that can determine whether a video becomes a smashing success or falls flat.
It doesn't matter if you're a content creator, a seasoned videographer, or an avid viewer who appreciates top-quality videos − improving the video's quality enhances its overall worth and impact.
Yet, with countless options for video resolution changer software across various platforms, it can be overwhelming to select one. This article aims to explore the finest software for changing video resolution.
Part 1. Basic Info of Video Quality Changer
1. What is Video Quality?
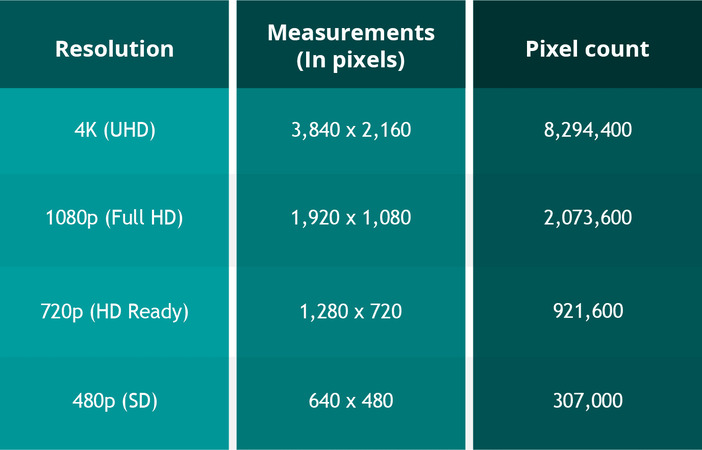
Video resolution pertains to the number of pixels displayed in a specific frame rate. The quantity of pixels per frame increases with higher resolutions.
Digital videos are characterized by fixed dimensions based on their pixel count, indicating width and height measurements. Consequently, a movie having 3840 x 2160 pixels has a width of 3840 and a height of 2160.
Increased resolution leads to better clarity and more intricate detail in videos, as is apparent.
2. When Will We Need A Video Quality Changer?
In case you come across a video with inadequate resolution or subpar quality, then a video quality changer becomes necessary to enhance and refine it.
Such a tool proves beneficial for both personal and professional objectives alike- upgrading home videos or enhancing the quality of marketing or promotional materials.
Furthermore, using a movie quality changer aids in retaining the original product's quality while simultaneously reducing the file size to an adequate level.
Ultimately, if you aspire to elevate your videos' visual experience, resorting to a movie quality changer is your best bet.
Part 2. How To Decrease Video Quality Using Video Quality Changer?
There exist various ways to reduce the quality of videos, which vary based on the operating system you employ. The following is a concise rundown of each method:
1. For Windows: Decrease video quality by Zipping it
Zipping your videos is a simple method to reduce their size on Windows 10. Follow these steps:
- 1. If you have several videos, put them in one folder.
- 2. Access the folder with your videos and choose the ones you want to compress.
- 3. Right-click on any selected video and click "Send to > Compressed (zipped) folder."
- 4. Your new archive will appear in the same directory as your original files.
- 5. The compressed archive of your videos will be significantly smaller than its source file size, including popular formats like MP4.
For compressing a single video, begin at step 2 mentioned above and select only that particular file. Zipping saves space so that sharing or uploading large video files won't encounter issues related to size constraints.
2. For Mac: Make a video smaller using QuickTime Player
If you're having trouble sharing your large video files, try lowering the video quality to reduce its size. QuickTime Player can help you do this, even though it's primarily a media player app. Here's how:
- 1. Launch QuickTime Player and open your video.
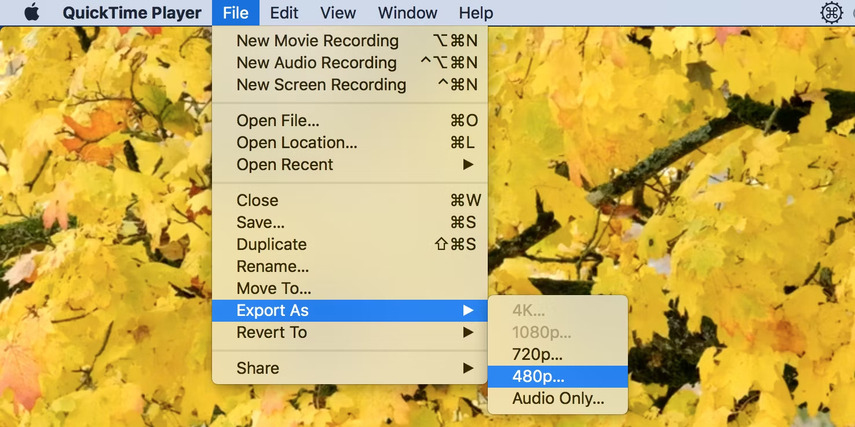
- 2. From the top menu, click "File" and choose "Export As."
- 3. Opt for a lower resolution than the original video.
- 4. Select a folder to save the modified file and click on "Save."
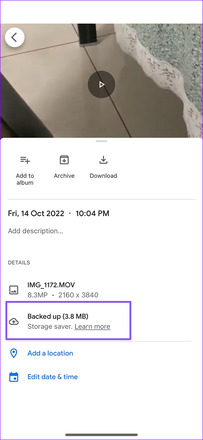
3. For iOS: Reduce a video file using Google Photos
If you want to compress video files and modify upload quality settings, Google Photos offers a hassle-free solution. Refer to the following instructions for guidance:
- 1. Go to the App Store, download Google Photos and sign in using your Google account.
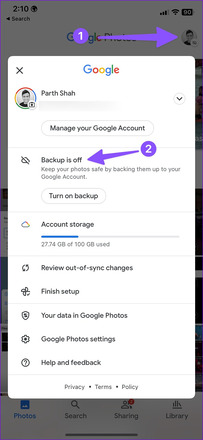
- 2. Click on the profile icon located at the top right corner of the screen. Then, choose ‘Backup is off’ from the options list.
- 3. From there, select "Back up & sync settings" listed under the menu.
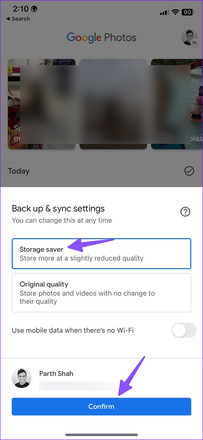
- 4. Opt for "Storage saver," and then press "Confirm."
- 5. Google Photos will initiate media uploading through Wi-Fi (or mobile data if you've enabled permission).
- 6. Once finished, you can effortlessly access all compressed video files on any device associated with your Google Photos account.
4. For Android: How to compress a video on an Android
It's not as difficult as you may believe to compress a video file on your Android device. simply follow these steps:
- Go to "Application Menu" on your Android phone.
- Select the camera icon from the available options.
- Tap on "Resolution" from the list.
- Pick the new recording format that fits your needs best.
Part 3. How To Increase Video Quality Using Video Quality Changer?
1. For Windows & Mac: Most-Recommended Video Quality Changer
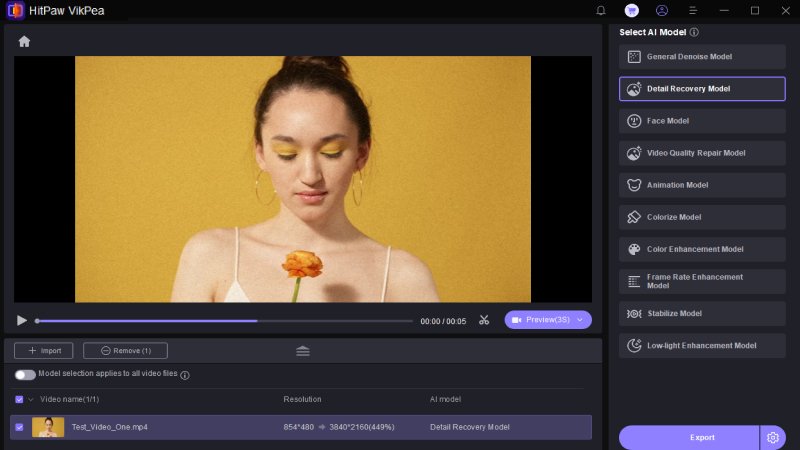
If you want to increase the quality of your videos, using a quality changer video can be a great option. You can use HitPaw VikPea (formerly HitPaw Video Enhancer), the most-recommended tool for Windows & Mac.
HitPaw VikPea utilizes advanced AI algorithms to enhance video quality to an unprecedented level. Here are some of its features:
- Upscale videos up to 8K resolution
- Advanced AI technology
- A simple and clean interface
- Preview without watermarks
With these features, HitPaw VikPea is the most-recommended video quality changer out there. Here is how to use HitPaw VikPea and video quality changer:
-
Step 1. Go to the HitPaw website and download the latest version of HitPaw VikPea. Install it on your PC.
-
Step 2. Use the "choose file" button to upload the video you want to enhance.

-
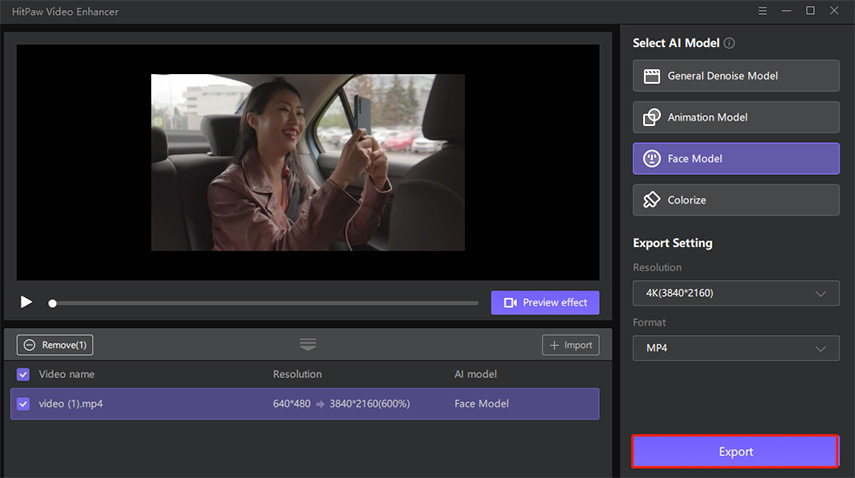
Step 3. Select an AI model that best fits your requirements.

-
Step 4. You can preview the effect of the enhanced video by selecting the "preview effect" option.

-
Step 5. Once you're satisfied with the result, select the "export" button to download the enhanced video.

2. HitPaw Online Video Enhancer--Online Video Resolution Changer
If you want to enhance the quality of your videos but don't want to download any software, then HitPaw Online Video Enhancer is the perfect solution. Here's how you can use online video resolution changer:
- Go to the HitPaw website and select "Online Video Enhancer".
- Click or drag to upload the video that you want to enhance.
- Choose one of the AI models that best suits your video.
- Wait for your video to be processed. Once done, download the upscaled video.
- Check your email to access the enhanced video.
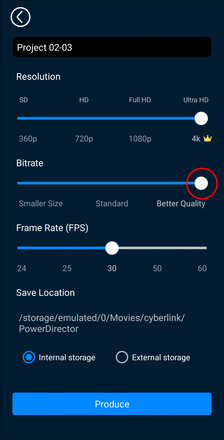
3. For iOS: How To Enhance Videos with PowerDirector
PowerDirector is a free app that offers a wide range of video editing and making features, including the ability to improve your video quality. Here's how you can do it:
- 1. Open the video you want to edit in PowerDirector.
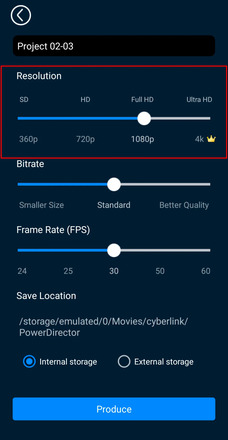
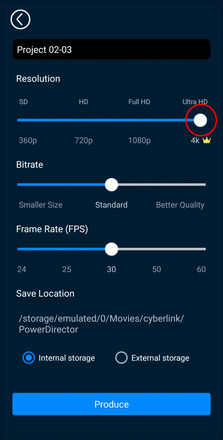
- 2. From the editing page, select the "Resolution" tab.
- 3. Change the settings from "SD" to "Ultra HD."
- 4. Go to the "Settings" tab.
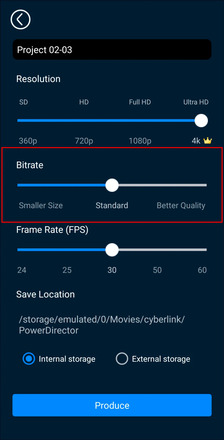
- 5. Press "Bitrate."
- 6. Choose the "Better Quality" option.
4. For Android: Try with video resolution changer app Udemy
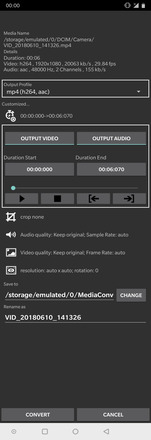
If you want to compress video files on your Android device, you can try using the Media Converter app. Here's how you can use this resolution changer video:
- 1. Download the Media Converter app from the Google Play store.
- 2. Choose the video file or files that you want to compress. You can even choose multiple files and compress them in batches.
- 3. Once you have selected the files, click on "Expert mode" on the following screen.
- 4. Choose the mp4(h264,aac) preset. This tells the app to encode the video using the H.264 codec and AAC audio codec and put these together in the MP4 video container.
- 5. Now you may adjust the bitrate, change location, and download.
Part 4: FAQs of Video Quality Changer
1. How does resolution affect video quality?
Resolution impacts video quality by determining the number of pixels displayed on a screen. Higher resolution leads to clearer and sharper images, while lower resolution results in pixelated or blurry videos. Higher resolutions capture more detail, with 4K having four times as many pixels as HD 1080p, resulting in better quality and clarity.
2. Does video quality degrade over time?
Old VHS tapes from the '80s and '90s degrade over time due to the videotape deteriorating and the tape's magnetization decreasing with each playback. Digital media doesn't degrade in the same way since it's either on or off, meaning that the video should still appear the same and function correctly many years from now as long as the files remain in great shape. Despite analog video appearing to blur or freeze, it may still be seen.
Part 5. Conclusion
Finding the best video quality changer is essential to enhancing your videos for a more professional and polished look.
We have shared some of the top options available on the market today that are capable of improving video quality in different ways.
However, if you're looking for an all-in-one solution that is easy to use and produces excellent results, we highly recommend trying out HitPaw VikPea.




 HitPaw Edimakor
 HitPaw Screen Recorder
 HitPaw VikPea (Video Enhancer)

Share this article:
Select the product rating:
Daniel Walker
Editor-in-Chief
This post was written by Editor Daniel Walker whose passion lies in bridging the gap between cutting-edge technology and everyday creativity. The content he created inspires audience to embrace digital tools confidently.
View all ArticlesLeave a Comment
Create your review for HitPaw articles