Practical Guide on How to Make a Video Low Quality for Creators
Sometimes you need to intentionally make videos look lower quality: for stylistic choices, retro effects, mockups, or to reduce file size for quick previews. This guide explains what affects image fidelity, step-by-step methods to make videos worse on purpose, and how to recover or improve them later if you change your mind. You will learn practical, repeatable techniques to make video low quality while keeping control over the result.
Part 1. What Will Affect Video Quality?
Video quality depends on multiple technical and creative factors. Understanding these elements helps you deliberately make video quality worse while avoiding accidental corruption. Below are the main factors that control visual fidelity and playback smoothness.
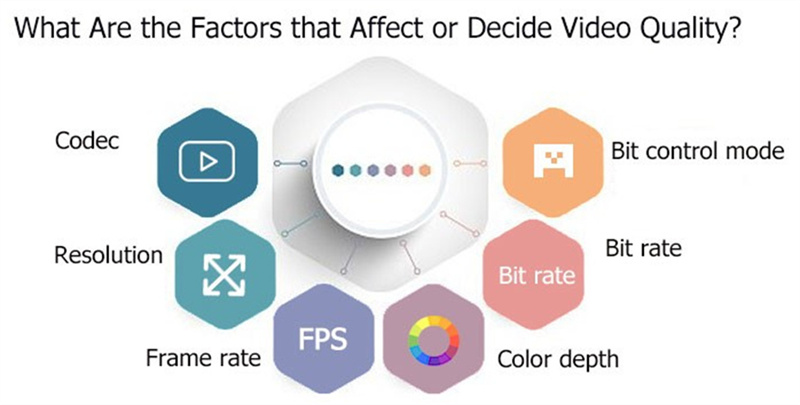
- Resolution: The pixel dimensions of the video; lower resolution means less detail.
- Bitrate: The amount of data per second used to encode the video; lower bitrate reduces detail and introduces compression artifacts.
- Frame rate: Frames per second; lower frame rates make motion choppy and reduce perceived smoothness.
- Codec: The encoder/decoder used; some codecs compress more aggressively and can introduce blockiness.
- Color depth and chroma subsampling: Fewer bits per channel and stronger chroma subsampling reduce color accuracy and create banding.
- Encoding passes and settings: Single-pass, aggressive presets, or high compression settings produce poorer visual quality.
- Multiple re-encodes: Repeatedly encoding the same file compounds artifacts and degrades quality over time.
- Noise and blur: Adding visual noise or blur hides fine detail and lowers perceived quality.
- Lighting and capture quality: Poor original capture (low light, wrong exposure) limits final quality regardless of encoding.
Part 2. How to Make a Video Low Quality on Purpose?
If your goal is to make videos bad quality for effect or utility, use controlled, reversible methods. Below are practical methods ranked by how much control they give you. Each method includes a short explanation and steps.
Method 1. 1 Click to Compress the Video for Lower Quality
Compressing a file with a dedicated compressor is a fast, reliable way to make video quality worse while dramatically shrinking file size. A compressor targets bitrate, resolution, and encoder settings in one pass, producing visible artifacting and softer details. This method is ideal when you want to make video low quality for previews, uploads, or stylistic effect without manually changing many settings. Always work on a copy so you can keep the original safe and reversible if needed.
-
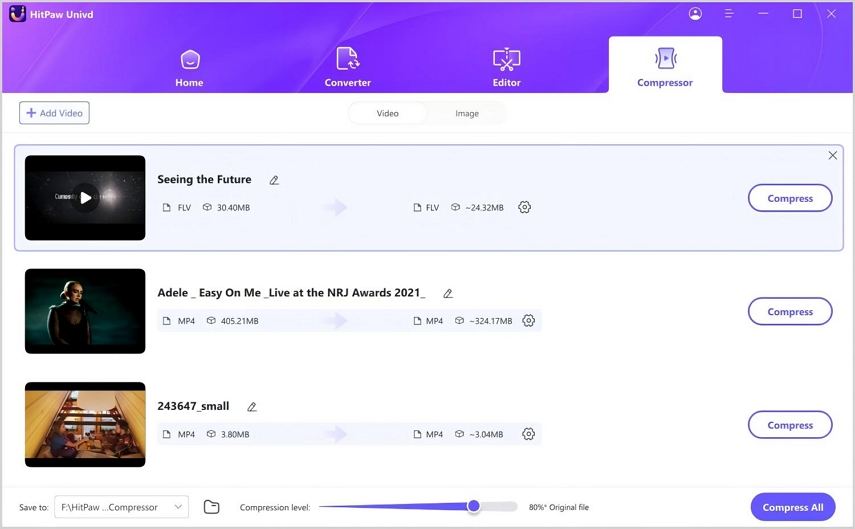
1.Free download and install HitPaw Univd to your computer, then open the app and go to the Compressor section.

-
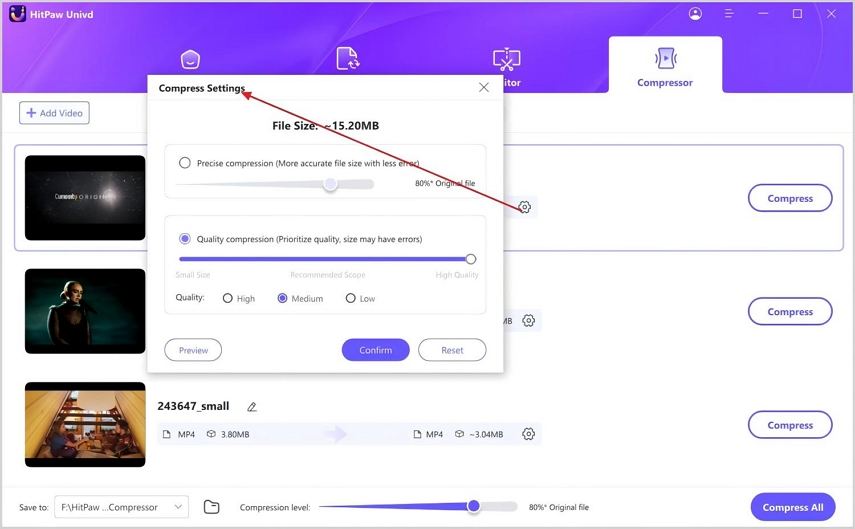
2.Click Add Video to import your files. After the file loads, click the gear icon to open compression options and choose Quality Compression. Select Low quality to intentionally make video worse quality.

-
3.Click Compress or Compress All to start reducing file size. The tool will apply the chosen low-quality profile and produce a smaller, lower-fidelity file ready for sharing or use.
Method 2. Lower the Resolution
Dropping resolution is the simplest way to make video low quality while preserving compatibility. Reducing pixel dimensions removes fine detail and softens edges, producing a blockier, more pixelated look that suits retro or lo-fi aesthetics. This method is predictable, easy to reverse by keeping the original, and works on any device.
-
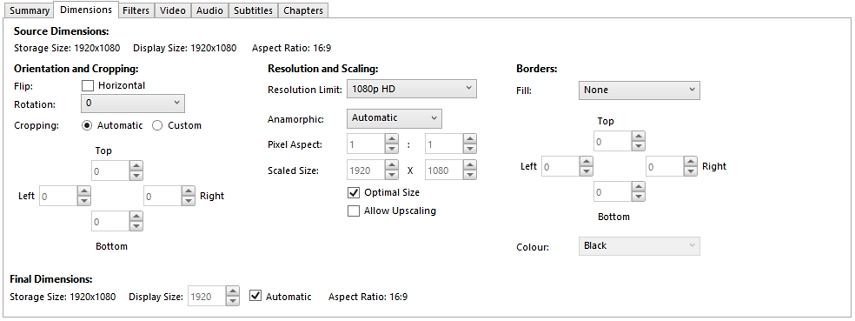
1.Open your video editor or converter for example HandBrake.
-
2.To adjust the resolution, either select a preset from the Preset drop-down menu or manually input the width and height under the Dimensions tab.

-
3.Click the Start Encode button to begin the conversion. Once finished, export with the new resolution and check how detail is reduced.
Method 3. Reduce the Bitrate
Bitrate controls how much data is used per second to describe the image. Lowering bitrate introduces visible compression artifacts like macroblocking and banding, and it removes subtle textures. This is an efficient way to make video quality worse while also shrinking file size, especially useful for quick previews or deliberately degraded uploads.
-
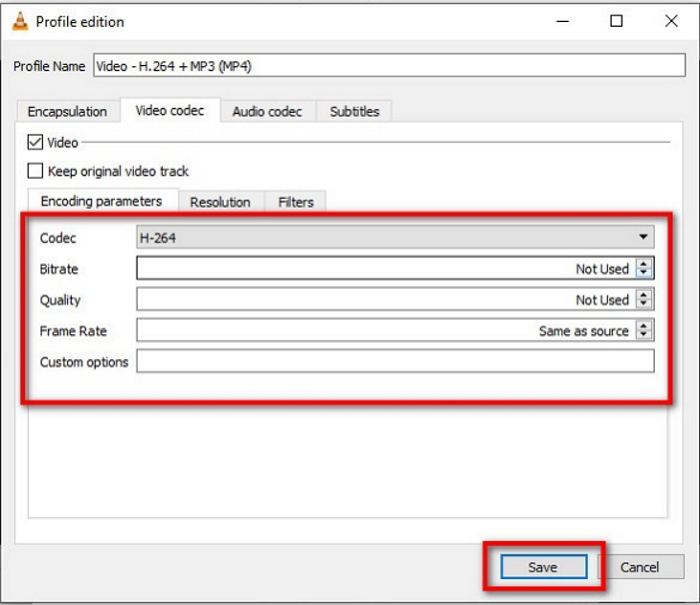
1.Take VLC for example, go to the Media menu, and select Convert / Save. In the dialog box, click Add to locate and select your video file. Confirm by clicking Convert / Save.
-
2.Choose a preset from the Profile menu, such as Video - H.264 + MP3 (MP4). And go to the Video Codec tab, and set a low target bitrate (for web previews try 300-800 kbps).

-
3.Press Start to begin the conversion and wait until the process is complete.
Method 4. Add Visual Noise, Blur, or Color Degradation
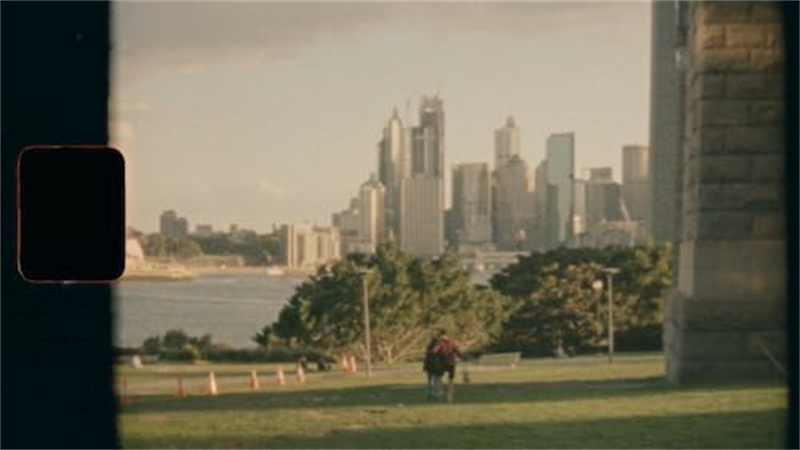
For stylistic low quality, add film grain, blur, posterization, or desaturation to hide detail while keeping structure intact. These effects mimic analog damage or poor capture, and they are highly controllable and non-destructive if applied on a duplicate layer. Combine with lowered resolution for a stronger lo-fi look.
Part 3: How to Make a Low Quality Video Look Better?
If you intentionally made a video low quality and later decide you want to restore or improve it, HitPaw VikPea is a dedicated tool that can upscale and repair footage quickly. The software uses AI-driven models to reconstruct details, reduce noise, and upscale resolution with surprisingly natural results. It is useful for creators who want to reverse earlier damage, rescue old footage, or improve preview clips back to acceptable viewing quality.
- AI video upscaler that increases resolution up to 4K or 8K with natural detail.
- Noise reduction driven by AI to remove grain without losing edges.
- Sharpen model to restore perceived detail and edge clarity in footage.
- Portrait enhancement model that preserves facial details and skin tones.
- Video quality repair model to fix compression artifacts and blockiness.
- Batch processing support for improving many clips efficiently.
- Side-by-side preview so you can compare before and after results.
- Export options with customizable resolution and format settings.
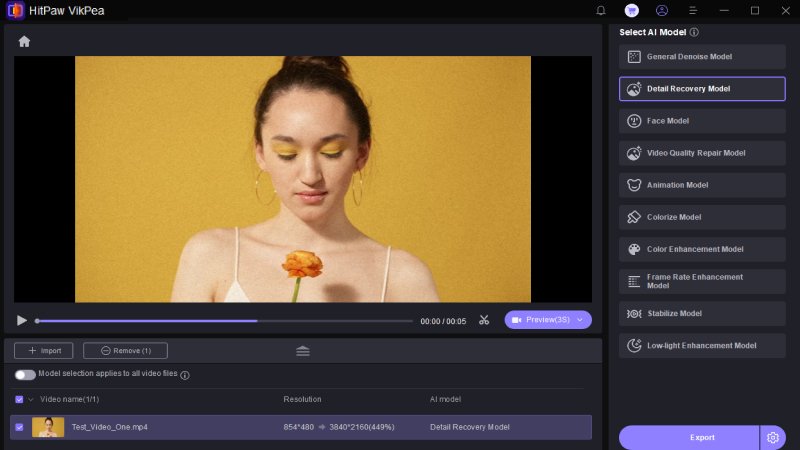
Step 1:Download and launch HitPaw VikPea on your computer. Open Video Enhancer on the main interface and import your video, or drag the file into the Video Enhancer workspace from the Home tab.

Step 2:After that, select an AI model from the options provided that best fits the sort of video you want to improve. The available options are General Model, Sharpen Model, Portrait Model, Video Quality Repair Mode and more.

Step 3:To see the results of applying the selected AI model to your movie, click the Preview button. If everything seems good, you may now export the finished video.

FAQs about Making Video Quality Worse
Q1. What’s the best way to make a video terrible quality?
A1. Compressing video is best way to make it terrible quality: re-encode at lower resolution and bitrate with aggressive presets or repeated low-quality passes to produce blockiness, banding and detail loss.
Q2. Will reducing MB affect video quality?
A2. Yes. Reducing file size typically requires lowering bitrate or resolution, which removes detail and increases compression artifacts. Smaller MB almost always means lower visible quality.
Q3. Can I deliberately degrade a video but keep it reversible?
A3. Yes. Work on a copy and use non-destructive filters or keep the original file. Lowering bitrate or resolution on a duplicate keeps the source intact for later recovery.
Q4. Does adding noise or blur count as making video bad quality?
A4. Absolutely. Noise, blur, and color reduction hide fine detail and create a low-quality aesthetic without corrupting file structure, making the effect easy to control.
Bottom Line
Deliberately making video quality worse is a useful creative and practical tool when done intentionally and on copies. You can lower resolution, reduce bitrate, drop frame rate, re-encode aggressively, or add visual noise to achieve a low-quality look. If you later want to restore the footage, tools like HitPaw VikPea Video Enhancer AI offer powerful upscaling and repair features to improve damaged or compressed clips. Use these techniques thoughtfully so you keep maximum control over both the degraded result and your original source files.







 HitPaw Edimakor
 HitPaw Univd (Video Converter)
  HitPaw VikPea (Video Enhancer)
![[Tutorial]How to Denoise Footage in DaVinci Resolve](https://images.hitpaw.com/topics/covers/background-noise-removal-from-video.jpg?w=720&h=480)


Share this article:
Select the product rating:
Daniel Walker
Editor-in-Chief
This post was written by Editor Daniel Walker whose passion lies in bridging the gap between cutting-edge technology and everyday creativity. The content he created inspires audience to embrace digital tools confidently.
View all ArticlesLeave a Comment
Create your review for HitPaw articles