


[2026 Updated!] How to Use Lightroom Noise Reduction
Are you tired of grainy and noisy photos? One such solution is Lightroom's Noise Reduction feature. In this article, we'll explore the ins and outs of remove noise from Photo Lightroom tool and how to use it effectively.
By the end of this article, you'll have a solid understanding of how to use Lightroom's noise reduction to take your photography to the next level.
Part 1. What is Noise and What can Noise Reduction do?
Noise, in photography, is the unwanted visual distortion that appears in an image, typically caused by low light conditions or a high ISO setting. This visual noise can appear as grainy or speckled areas within an image, which can take away from the overall sharpness and clarity of the photo.
Daily situations that generate noise in photography include low-light environments such as indoor photography or nighttime photography. Additionally, using a high ISO setting on your camera can also cause noise in your images. Other factors, such as underexposed images or aggressive editing, can increase the amount of noise in your photos.
Here is a list of daily situations that generate noise in photography:
- Low-light environments such as indoor photography or nighttime photography
- High ISO settings on your camera
- Underexposed images
- Aggressive editing, such as increasing the exposure or sharpening an image
Part 2. How to Use Lightroom Noise Reduction?
1. Luminance Noise Reduction
Nothing is more frustrating than capturing a beautiful image only to discover that it's ruined by luminance noise.
This type of noise is similar to grain and can be distracting, reducing the overall quality of the photo. Here, we'll walk you through the steps to fix luminance noise l Lightroom noise reduction.
Step 1. Start by accessing the first three sliders in the noise reduction section. These sliders will allow you to remove luminance noise from your image. The first slider, Luminance, determines how much noise reduction is applied to the image. When using Lightroom, it's important to start with smaller adjustments and see what effect they have on your image before adding more as needed. Remember, moderation is key when making any adjustments in Lightroom.

Step 2. The next slider, Detail, allows you to keep some of the detail that you may lose by increasing the noise reduction effect. However, pushing this slider too high can remove some of the noise reduction that you applied earlier. Therefore, it's essential to keep an eye on how much detail you're removing to achieve a balanced result.
Step 3. The last slider you'll adjust here is the Contrast control. This slider replaces some of the lost contrast that occurs when reducing noise.
2. Colour Noise Reduction
Color noise appears as off-colored flecks in your photos and can be distracting and reduce the overall quality of your image.
Step 1. To reduce color noise in Lightroom, start by accessing the Color slider controls. These sliders determine the amount of noise reduction you apply to the image. This adjustment works by targeting the off-colored flecks in your images caused by color noise. As with every adjustment, start with smaller adjustments and add more as needed.
Step 2. Similar to luminance noise adjustments, the Detail slider adjusts how much detail you can recover after applying noise reduction. This slider works exactly like the luminance noise controls. Be careful not to push this slider too high, as it may remove some of the Lightroom noise reduction that you applied earlier.
Step 3. The color noise reduction tools also provide a Smoothness slider. This slider allows you to increase or decrease the appearance of smoothness in the image.
Part 3. Best Alternative: Remove Unwanted Elements in Photos with HitPaw Photo Object Remover
While noise reduction and removing unwanted elements in photos are two different processes, they both involve altering the appearance of an image by removing distracting elements.
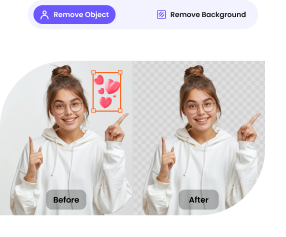
If you're looking for a powerful tool that can help you remove unwanted elements in your photos, you might want to consider HitPaw Photo Object Remover. Like denoise in Lightroom feature, HitPaw Photo Object Remover uses AI algorithms to help remove unwanted objects and people from your photos in a blink. It's fast, intuitive, and easy to use.


- Remove unwanted objects from photos easily and quickly
- AI-powered technology to help remove unwanted objects and people in a blink
- Retouch photos by removing humans, clutter, and shadows
- Remove facial blemishes such as wrinkles, acne, freckles, and defects
- Get free preview after processing
Features:
- Step 1. Download HitPaw Photo Object Remover
- Step 2. Import Photo
- Step 3. Locate the Box Selection Tool or Brush Tool
- Step 4. Paint the object out or frame it
- Step 5. Modify Your Selection
- Step 6. Preview and Export the Photo
On your Windows computer, download HitPaw Photo Object Remover.
To add the picture you want to remove things from, click the picture box in the center. Alternatively, you could just put the picture into the edit box.
The program's bottom has the Brush or Box Selection tool.
The object that needs to be removed from your photo can be painted out or framed.
After choosing a frame, the chosen area will be highlighted. The remove area, add, and reduce selection can be changed as needed. By using the "Undo" button, you can reselect the object if you're not happy with the current selection zoom.
Additionally, by moving the size bar, you can change the Brush Size.
To remove an object from the photo, click "Preview". The last photo(s) will then be saved to your computer once you click "Export All" and browse the route for saving.
Part 4. FAQs of Lightroom ai Noise Reduction
1. Why Lightroom remove noise is not working for me?
There are many reasons why remove noise Lightroom tool may not be working for you. It's possible that the photo you're trying to edit doesn't have any noise, or the noise is too severe for Lightroom's tool to handle.
Additionally, if you're using an older or outdated version of Lightroom, the noise reduction tool may not perform as well as in newer versions.
2. How much noise reduction for Lightroom?
Lightroom applies color noise reduction automatically during the import process for RAW images. The default settings for the Color slider is 25, with Detail and Smoothness set to 50. The Luminance slider is set to 0, with Detail set to 50, and Contrast set to 0.
Final Words
Adobe Lightroom noise reduction feature can be a helpful tool for reducing unwanted color and luminance noise in RAW images.
However, for those looking for an alternative, HitPaw Photo Object Remover offers a user-friendly and efficient solution for removing unwanted objects and background noise in photos.
 HitPaw Video Object Remover
 HitPaw Univd (Video Converter)
  HitPaw VikPea (Video Enhancer)
![[Solved] How to Remove a Person from a Photo on iPhone](https://images.hitpaw.com/topics/photo-tips/remove-people-from-photos-on-iphone-with-snapseed-cover.jpg?w=855&h=1280)

Share this article:
Select the product rating:
Daniel Walker
Editor-in-Chief
This post was written by Editor Daniel Walker whose passion lies in bridging the gap between cutting-edge technology and everyday creativity. The content he created inspires audience to embrace digital tools confidently.
View all ArticlesLeave a Comment
Create your review for HitPaw articles