Comprehensive Guide to Gaussian Noise in Image Processing
When working with digital images, it's common to notice some unwanted grainy or speckled patterns that weren't in the original scene. It happens due to a specific type of interference called Gaussian Noise in Image Processing. While it may sound technical, the concept is simple to understand with the right explanation. Gaussian noise appears when random variations in brightness or color affect an image, caused by sensor limitations or poor lighting.
These changes follow a pattern that looks like a bell curve, which is why it's called "Gaussian." This deep dive will explore how you can eliminate this noise from your photos. Keep reading to find out the best way to enhance your favorite pictures.
Video Tutorial to Enhance an photo with FotorPea:
Part 1. Origins and Characteristics of Gaussian Noise in Image Processing
In a lot of digital images taken in low light or with basic sensors, a soft graininess appears that isn’t part of the actual scene. It is what is usually referred to as Gaussian Noise. You might be wondering why it happens, some of the most common causes of this image noise include:
1. Sensor Limitations: Image sensors naturally create small electrical signals. These signals can slightly vary in low-light conditions, leading to random pixel brightness changes.
2. Thermal Noise: Heat inside the camera can affect the electronics, causing unpredictable pixel values. It is more common in long exposure shots or in older hardware.
3. Transmission Errors: When transmitted images, slight data losses or disturbances can introduce Gaussian noise.
4. Analog-to-Digital Conversion: During the process of converting real-world light into digital values, rounding and voltage variations are present. These can introduce small fluctuations to create this noise.
When wondering what exactly makes this noise “Gaussian,” there are some unique characteristics that sets Gaussian noise apart from other types:
1. Follows a Bell Curve: Most pixel values are slightly changed, while significant changes are rare. It creates a smooth curve when you plot the frequency of changes.
2. Equal Effect Across the Image: The noise doesn’t target any particular part of the image. It spreads randomly but evenly, affecting every pixel subtly.
3. Adds to Pixel Intensity: Gaussian noise usually adds or subtracts small values to the brightness of each pixel.
Part 2. Traditional Techniques for Gaussian Noise in Image Processing Reduction
After understanding how it appears in images, the next step is learning to reduce it without harming important details. Traditional noise reduction techniques focus on smoothing the image or replacing affected pixel values using surrounding information. Let’s break down the techniques to remove Gaussian noise from images:
1. Mean Filter (Averaging Filter)
The most basic method used to reduce Gaussian noise, the mean filter is great for all minor issues.

What it does:
It looks at a small neighbourhood of pixels, usually a square, like 3×3 or 5×5. This filter calculates the average brightness value and replaces the center pixel with that average.
Why it helps & Limitations:
Since Gaussian noise involves random small fluctuations, averaging helps cancel them out by smoothing the variations. While it reduces noise, it also blurs edges to make images look soft or out of focus.
2. Gaussian Blur Filter
This method builds on the mean filter but applies a smarter type of averaging.
What it does:
Instead of giving equal importance to all neighbouring pixels, it gives more weight to those closer to the center using a Gaussian function.
Why it helps & Limitations:
It’s tailored for Gaussian noise because the noise itself follows a bell-curve (Gaussian) pattern. It still causes some blurring at edges, but less than the plain mean filter.
3. Median Filter
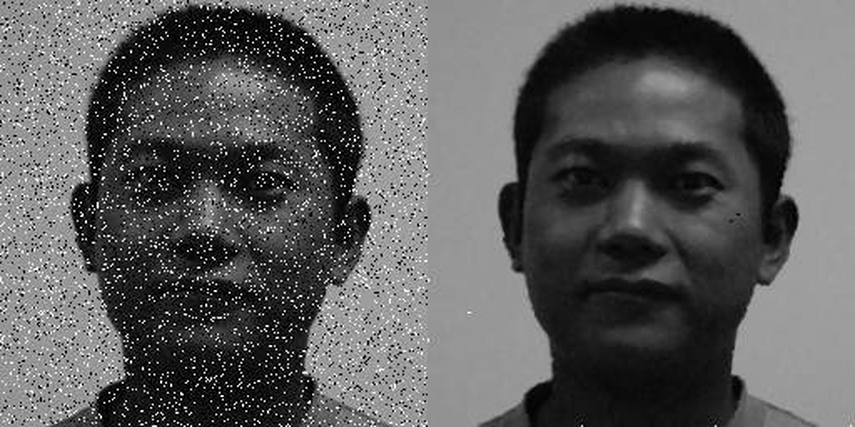
Originally designed for salt-and-pepper noise, this filter also handles low to moderate Gaussian noise.
What it does:
It finds the middle value from neighbouring pixels and replaces the center pixel with that value.
Why it helps & Limitations:
Median values ignore extreme highs or lows caused by noise, preserving edges better than mean or Gaussian filters. It’s not ideal for strong Gaussian noise, since the averaging effect is limited.
4. Bilateral Filter
Considered to be the most advanced traditional filter, it offers a balance between smoothing and detail preservation.
What it does:
It averages nearby pixels only if they are similar in both location and brightness. So, it avoids mixing unrelated pixels.
Why it helps & Limitations:
The filter removes noise from flat areas while keeping edges and textures sharp. This technique is computationally heavy, meaning it takes more time to apply.
Part 3. Online Tools for Gaussian Noise Removal
As we move beyond traditional methods, many prefer quick web options to enhance their images. Due to the rise of AI, these platforms often apply advanced algorithms to give fast and clear results. Detailed below are the top five such online tools for Gaussian noise reduction:
1. AI Ease
Providing a comprehensive approach, this web tool improves image quality by removing noise and artifacts. AI Ease Photo Enhancer operates automatically to deliver results, enhancing photos taken in low-light conditions.

Key Features
1. Quickly eliminates noise and grain from images, enhancing clarity and detail.
2. Effectively reduces compression artifacts in JPEG images, restoring image quality.
3. Targets and removes noise in vignette areas of photos, improving overall image uniformity.
Best For: To reduce noise and artifacts in images captured under low-light conditions.
2. Picsart
This online tool enhances image quality by reducing noise and grain. Picsart AI Image Denoiser utilizes AI technology to automatically process photos, making them clearer and more polished.

Key Features
1. Increases image resolution, allowing for better quality prints and enlargements.
2. Enables users to enhance multiple images simultaneously, saving time and effort.
3. Improves image sharpness and detail, making photos appear more defined and crisp.
Best For: When dealing with images with noise that need to be upscaled.
3. Fotor
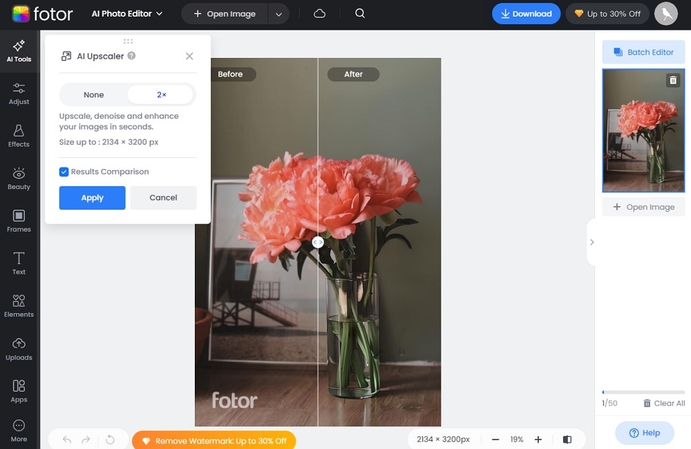
Working effectively on compressed images and low-light pictures, this web tool is favored by many users. Fotor AI Image Denoiser employs the latest AI algorithms to automatically process photos to make them free of the Gaussian noise.
Key Features
1. Provides a slider to control the intensity of noise reduction, allowing for customized results.
2. Not only removes noise but also sharpens and restores details, improving overall image quality.
3. Automatically eliminates noise and grain from photos, enhancing clarity and detail.
Best For: Images captured under challenging lighting conditions or those affected by compression.
4. Pixelcut
An advanced choice to clean up image noise, it enhances clarity in pictures while maintaining key details. Pixelcut uses sophisticated artificial intelligence to analyze and reduce noise, making them look more polished and professional.

Key Features
1. Automatically detects noise, reducing it while keeping the natural details of your image intact.
2. Allows the preview of the results of the noise reduction instantly, accelerating the process.
3. Supports simultaneous noise reduction on multiple images, saving time for users.
Best For: When dealing with low-light or high-ISO photos that have excessive grain or noise.
5. Pix Fix
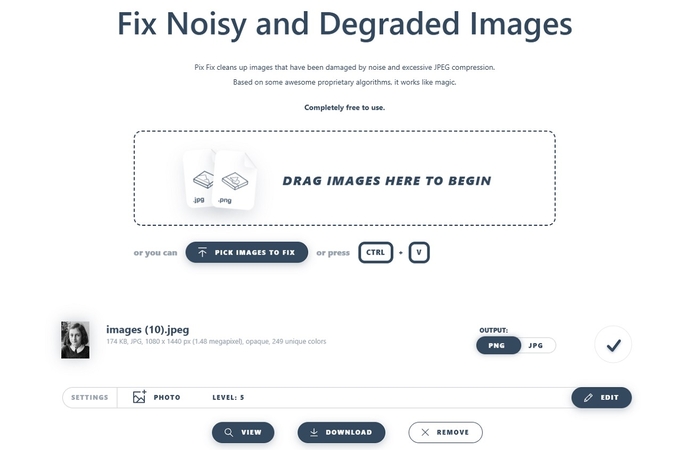
Known to remove JPEG compression artifacts and grainy scans, Pix Fix preserves sharp edges and important details. It utilizes advanced AI algorithms to clean up images affected by noise without the need for complex software.
Key Features
1. Tailored for images that are rasterized, vector art, or scans of similarly styled drawings or prints.
2. Removes JPEG blocking noise, scan artifacts, and other distortions without any quality loss.
3. Pix Fix is completely free to use and does not display any advertisements.
Best For: Photographs that have been degraded by excessive JPEG compression.
Part 4. Advanced Removal of Gaussian Noise in Image Processing with HitPaw FotorPea
As noise reduction becomes increasingly important, the demand for more advanced tools rises. One such tool that offers significant improvements is HitPaw FotorPea. With its specialized denoise model, it is designed to preserve even the most intricate details in an image from Gaussian Noise. Its 2 modes, Creative and Realistic ensures that images are enhanced without losing essential textures.
Its Denoise Model can handle heavy noise, such as compression artifacts, blur, and unwanted gradients. That makes it ideal for restoring images that may have been degraded due to low-quality captures or compression.
Key Features of HitPaw FotorPea
1. Colorize Model: Breathes life into black-and-white photos by adding realistic colors.
2. Scratch Repair: Restores old photos by removing scratches and imperfections, securing your cherished memories.
3. General Model: Enhances various types of images, like landscapes and architecture, to improve overall clarity and detail.
Quick Guide on Advanced Removal of Gaussian Noise in Image Processing
Opt for the following detailed steps to remove any sort of noise damage from your photos with ease:
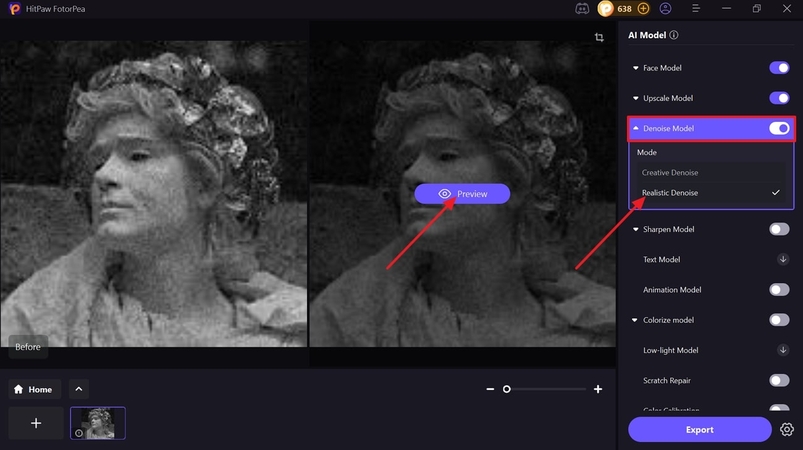
Step 1. Launch the Tool and Select AI EnhancerRun HitPaw FotorPea and opt for the “Enhance Photos Now” button at the top of the main screen. Subsequently, you will be redirected to the platform's enhancement section.

Step 2. Upload Your Image and Select the Model
Next, click the “Drag & Drop Files Here” button to easily import the image with unwanted noise. In the “AI Model” section, toggle on the “Denoise Model” to choose the “Realistic Denoise” mode. When done, opt for the “Preview” button to check out the result of the advanced AI models.
Step 3. Let the Program Process the Image and View the Results
Finally, click “Export” to save your enhanced image to your device if satisfied.

Conclusion
In summary, addressing Gaussian Noise in Image Processing is crucial for ensuring image clarity and detail. From understanding its origins to exploring traditional techniques, it's clear that efficient noise reduction is a must. Advanced tools like HitPaw FotorPea take noise removal a step further with AI-powered models. They offer users sophisticated methods to enhance image quality.


 HitPaw Edimakor
 HitPaw VikPea (Video Enhancer)
 HitPaw Univd (Video Converter)


Share this article:
Select the product rating:
Daniel Walker
Editor-in-Chief
This post was written by Editor Daniel Walker whose passion lies in bridging the gap between cutting-edge technology and everyday creativity. The content he created inspires the audience to embrace digital tools confidently.
View all ArticlesLeave a Comment
Create your review for HitPaw articles