What Is Loudness Equalization on Windows
You might have encountered a situation where watching the video or listening to the audio prompted the change in volume percentage.
The volume sometimes becomes too low, and some scenes prompt the volume to get higher at various stages.
If you're aiming to enjoy the movie, you won't like it to continue to increase or decrease the volume for good. That's where the use of the loudness equalization Windows 11 comes into play, and this guide will introduce all the relevant information regarding enabling or disabling the loudness equalization on your PC.
Part 1: What Is Loudness Equalization
Loudness equalization MW2 is a brilliant audio enhancing technology that tends to balance the sounds. It assists you to work by assessing the dynamic range of audio signals allowing you to adjust the signals to appropriately consistent output level. The best thing about the loudness equalization is that it prevents you from increasing or decreasing the volume regularly.
Although the loudness equalization feature can eradicate the headache of increasing or decreasing the volume regularly, the Enhancement Tab being missed could end up making the loudness equalization feature disappear.
This isn't the most pleasing thing to have up in the sleeves, and it can prevent you from using the features of the computer appropriately.
Part 2: How to Enable and Disable Loudness Equalization on Windows 11/10
Since the benefits of the loudness equalization Windows 10 are immense, everyone is using this feature for a good cause. Fortunately, enabling the loudness equalization feature on Windows 10 is fair, as you'll only need to act upon a few simple steps to put things in order.
However, if you don't like the feature at some stages, you can also disable it from there, as it requires little to no effort in this regard.
Here's the step by step guide to learn how to enable and disable the loudness equalization Windows 11/10.
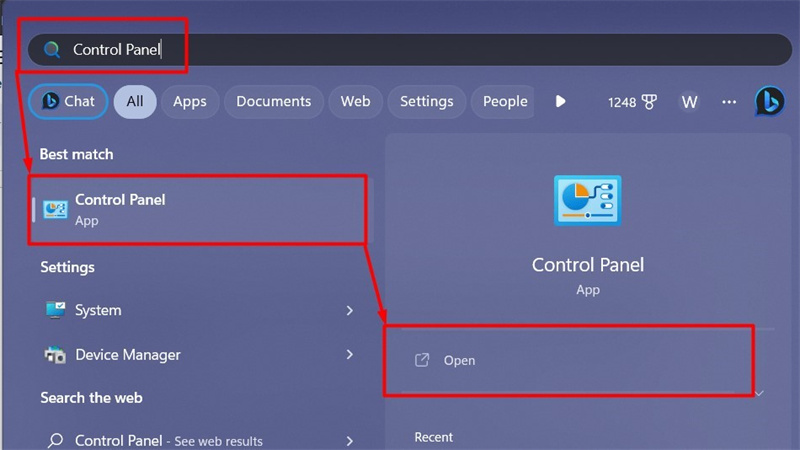
Step 1:Since enabling the loudness equalization is only possible from the sound settings, you'll need to visit the sound settings to start the president.
The ''Sound'' settings tend to hold all the configurations that are being done with the Windows' sounds. Hence, you'll need to enter the ''Control Panel'' after pressing the ''Windows key''.
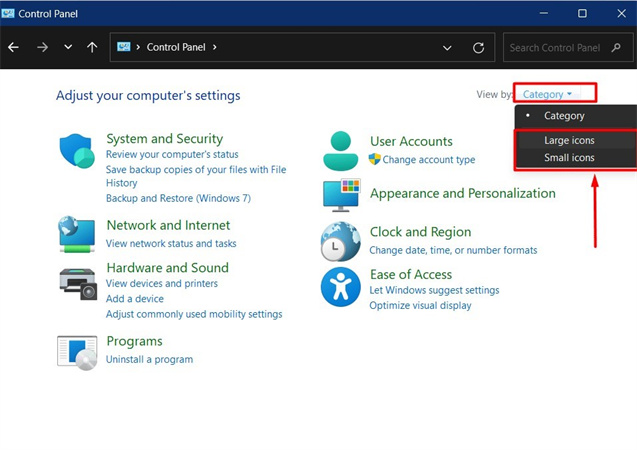
Step 2:After visiting the Control Panel, you'll need to alter the ''View By'' to either the ''Small icons'' or ''Large icons'' as given.

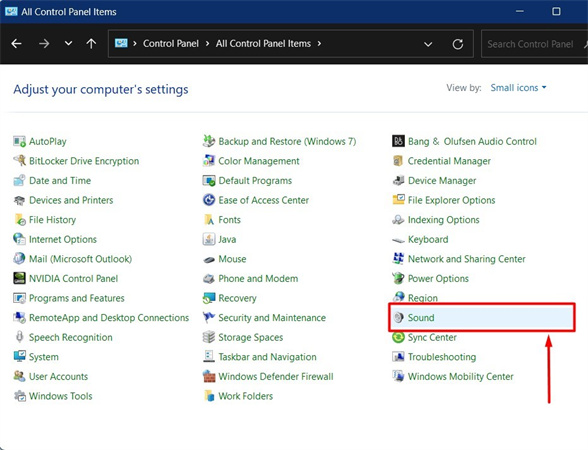
Step 3:Now, you'll need to begin searching for the ''Sound'' by looking at the options highlighted below.

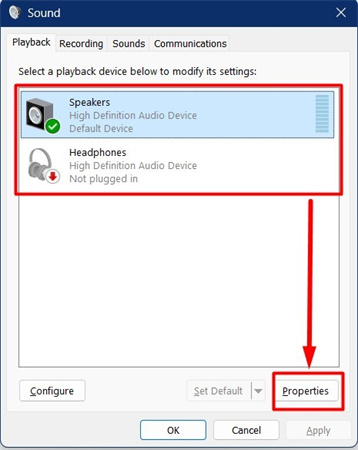
Step 4:Navigate to the Sound setting and select your playback device, including the Headphones or Speakers. Tap on the Properties button to begin the proceedings.

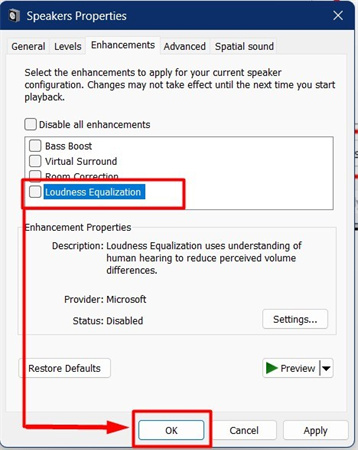
Step 5:After entering the properties, you'll need to choose the ''Enhancements'' icon before marking the Loudness Equalization option. You can check the Loudness Equalization option to enable it in the first place, and then you can uncheck it again to disable it.|
Once you're done putting all the things in order, click on the ''OK'' button to get the things done.You can also begin configuring the ''Loudness Equalization'' by entering into the Settings button. Testing the Loudness Equalization is possible by tapping the ''Preview'' button.
Note:It might have happened that you don't see the loudness equalization option there, which could end up creating unwanted chaos there. Fortunately, you can fix the issue of the Enhancements tab going missing.
To begin with, you'll need to ensure that the Loudness Equalization option is checked in the control panel, as sometimes you forget to disable this tab and end up facing the issues you're currently experiencing.
Part 3: How to Remove Background Noise on Windows
No one will like to listen to the annoying Podcast, and you'll end up regretting your decision to record the podcast this way. The arrival of the HitPaw Online Audio Enhancer has made things look simple, allowing you to rip apart the unnecessary noise from the audio.
With the HitPaw Online Audio Enhancer, you don't have to put in any extra effort as it relies upon AI-powered technology to eliminate the noise from the audio. On top of that, HitPaw Online Audio Enhancer doesn't compromise the sound quality, maintaining the original sound quality.
Features- Enables you to eliminate the hiss or noise from the audio
- It helps you make the audio sound clearer with minimal effort
- Offers an effortless user interface
- It doesn't mess up the sound quality
- Comes up with the outstanding auto background noise remover
- Allows you to enhance the volume by adjusting it
- Lets you reduce the echo to make the audio sound worth listening
- Lets you reduce the echo to make the audio sound worth listening
- Offers remarkable customer support
Here's the detailed guide below to learn how to remove the noise from the audio through HitPaw Online Audio Enhancer.
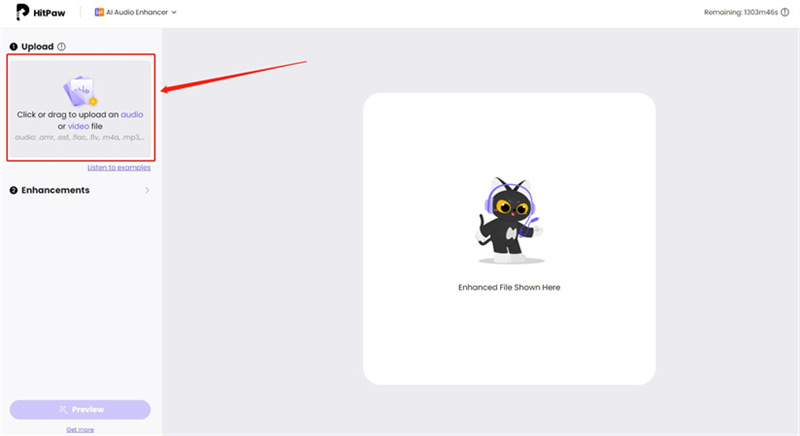
Step 1:Firstly, you'll need to jump into the official webpage of the HitPaw Online Audio Enhancer by using any web browser.
After entering the official website, you'll need to upload the audio or video file you'd like to eliminate the noise from. You can also drop and drag the audio files into the timeline of the HitPaw Online Audio Enhancer. Since HitPaw Online Audio Enhancer supports multiple audio formats, it enables you to import the audio in as many audio formats as possible.
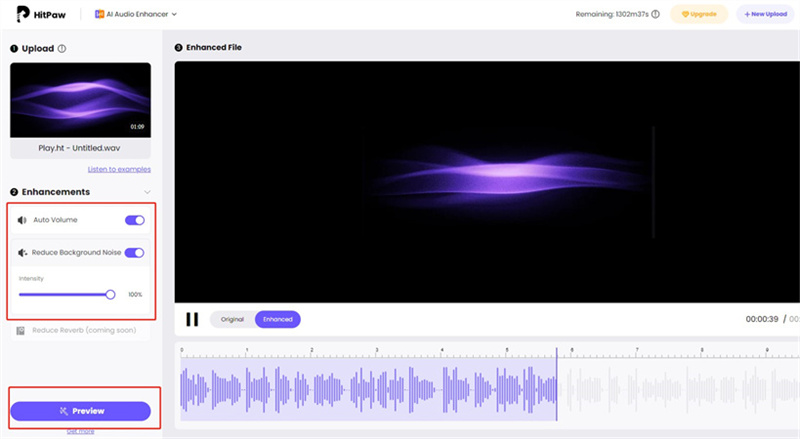
Step 2:Once you've uploaded the audio into the main interface of the HitPaw Online Audio Enhancer, it starts detecting unwanted noise and will rip this apart in a few moments. After getting done with eliminating the annoying noise from the audio, you'll need to review the changes you've made.
If you aren't satisfied with the outcome of the audio, you can begin editing the audio from scratch and get the most preferred results afterward.
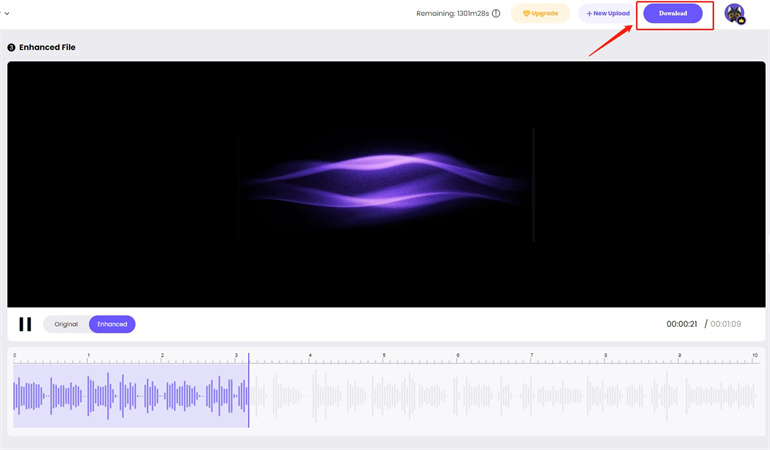
Step 3:You can download the edited audio after reviewing it by hitting the Download button. This way, you'll be able to save the audio into the preferred location on the folders.

Final Thoughts
This post has introduced all the relevant details about the loudness equalizer, which empowers you to keep the volume of audio or video file in the balance. This way, you've got the luxury to continue watching or listening to the desired video or audio content without any interruptions. HitPaw Online Audio Enhancer
is the most recommended option when it comes to eliminating unwanted noise from audio files.
Enhance Now!



 HitPaw Watermark Remover
  HitPaw VikPea (Video Enhancer)


Share this article:
Select the product rating:
Daniel Walker
Editor-in-Chief
This post was written by Editor Daniel Walker whose passion lies in bridging the gap between cutting-edge technology and everyday creativity. The content he created inspires audience to embrace digital tools confidently.
View all ArticlesLeave a Comment
Create your review for HitPaw articles