How to Use OBS Studio Virtual Camera
Many people use webcams to make the meeting or live streaming experience better. Without any surprise, OBS virtual camera is on the first list of people's preferences as it helps them to get what they want.
Unfortunately, using the OBS virtual camera asks for some prior knowledge. We will tell you about using OBS virtual camera and making the webcam look better for you.
Part 1: What is OBS Virtual Camera?
OBS Studio is a broadcasting tool that helps you broadcast anything you want. However, it has released a new update and has introduced a built-in feature, Virtual Camera. You can export the virtual camera to other apps, and the virtual camera of OBS studio can act as a webcam for different apps.
Initially, a plugin, OBS Virtual cam, enabled you to use a webcam on different applications. But now, you don't need to download any plugin as you can explore the built-in tool of OBS studio.
Using the OBS Virtual webcam as the source has many benefits as the virtual camera offers mind-blowing features, including chroma key, picture-in-picture, etc.
Moreover, you can use the OBS Virtual Camera to transfer the OBS video to several platforms, including Webex, Skype, and Zoom.
Part 2: How to Use OBS Studio Virtual Camera
Using the OBS virtual camera is fairly straightforward, and you don't need too much to enjoy the best experience. You can use the OBS Virtual Camera during Zoom, Discord, or Google Meet streaming.
Here's the step by step guide to using OSB virtual webcam
Step 01Install the OBS Studio on your Windows or Mac and launch the software without wasting time. Next up, you'll need to hit '' Start Virtual Camera'' after launching OBS Studio and adding sources to it.
Step 02 Now, you'll need to start a stream or meeting. Suppose you're conducting a Zoom meeting. You'll need to visit Zoom meeting and tap the'' Settings'' icon. Next up, you'll need to select 'OBS Virtual Camera'' after hitting the'' video'' icon. Now, you'll be able to see OBS mirrored in your meeting.
Step 03You can also adjust the camera settings for a better experience in this phase—select Properties after hitting the'' Sources'' icon. In this way, you'll be able to adjust your settings.
Part 3: How to Make Your Webcam Look Better in OBS Studio
Setting up and using the OBS virtual camera is fairly easy, but you need to do other things. Opting for DSLR can make the webcam look flawless, but you can also try getting the webcam with your existing setup.
Here's how to do it
Step 01When you tend to add the video source, you'll need to make sure that you're setting it to the highest resolution. The minimum resolution you set should be about 1080p and set the resolution option to Custom.
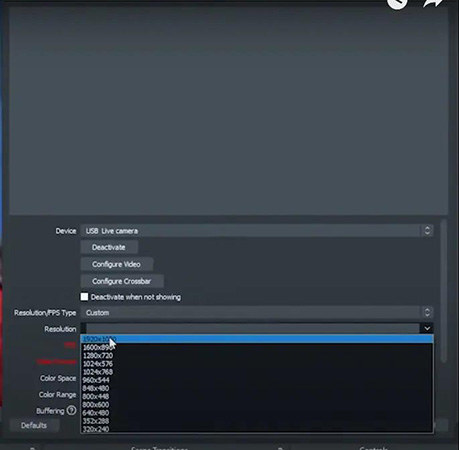
Step 02 Now, you'll need to set up your audio input. Luckily, you can opt for an external microphone to enjoy the better audio.
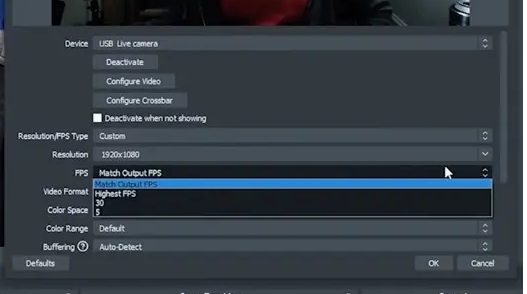
Moreover, you'll also need to set your FPS menu to 30FPS. In addition, you've also got the task of setting your video format option along with range and colour space in your hands.
Step 03If your webcam captures a wider frame, press the Alt button and crop it according to your liking.
You might face an autofocus issue when using a webcam.
Here are the guidelines that can help you fix the issues:
1. Select the Properties icon after right-clicking on your video source. Next up, all you need to do is select "Configure Video Button" when the dialogue box makes its presence felt.
2. You'll get to find multiple sliders in the light themes dialogue box to adjust your output. However, it would help if you didn't tweak anything there but turning off the virtual cam OBS by hitting the Camera Control tab might help your cause.
3. After unchecking the auto button, you'll need to set the focus where you'd wish to be and then apply the settings afterwards.
Part 4: The Best Virtual Camera Software - HitPaw Screen Recorder
OBS virtual camera is a great thing, and many people admire it. However, several people found the OBS virtual camera pretty hard to understand. Hence, looking for an alternative makes sense. Surprisingly, HitPaw Screen Recorder can be the appropriate alternative to OBS virtual camera. Although HitPaw Screen Recorder is a screen recorder that allows you to record the screen with audio, it also comes with a virtual camera.
Using the virtual camera of HitPaw Screen Recorder, you can stream on various platforms. Thus, Whether you're looking for "OBS Virtual camera Google Meet" or "OBS Virtual Camera Zoom", HitPaw Screen Recorder provides you with the best opportunity to serve your purpose.
Key Features of HitPaw Screen Recorder:
How to use HitPaw Screen Recorder virtual camera:
Step 01Install HitPaw Screen Recorder
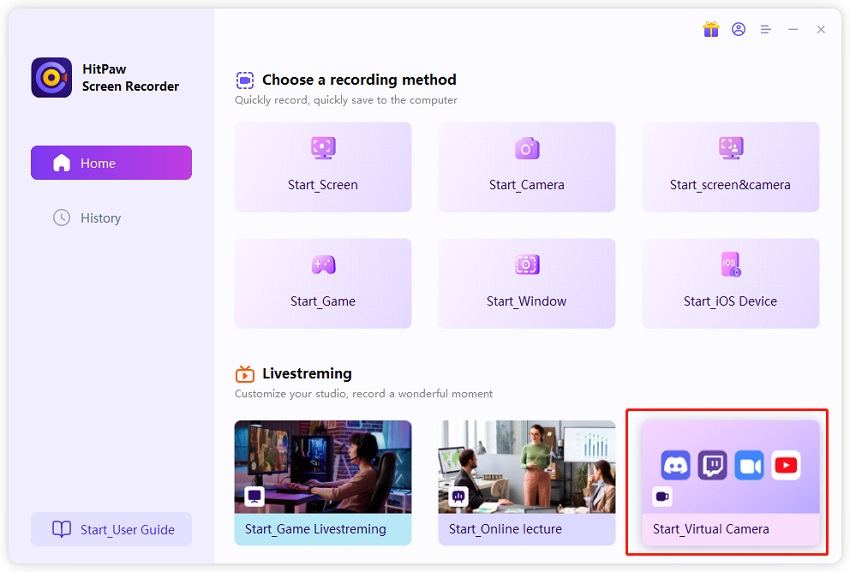
Step 02Click Virtual Camera in the main interface.
You'll need to hit Live and then click on the'' Virtual Camera'' icon in this phase.
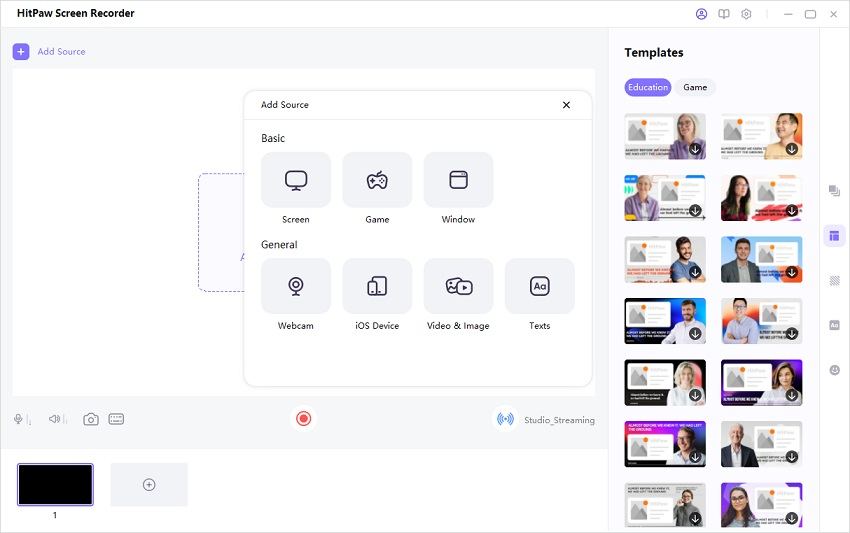
Step 03Hit Add Source.
HitPaw Screen Recorder offers you the brilliant opportunity to select the favourable temples and colors for your live streaming. After getting done with Templates, you'll need to hit '' Add Source'' and choose the webcam as your source. Add sources that you want to show, including Screen, Game, Webcam, Image and Texts, etc.
Step 04 Select a platform.
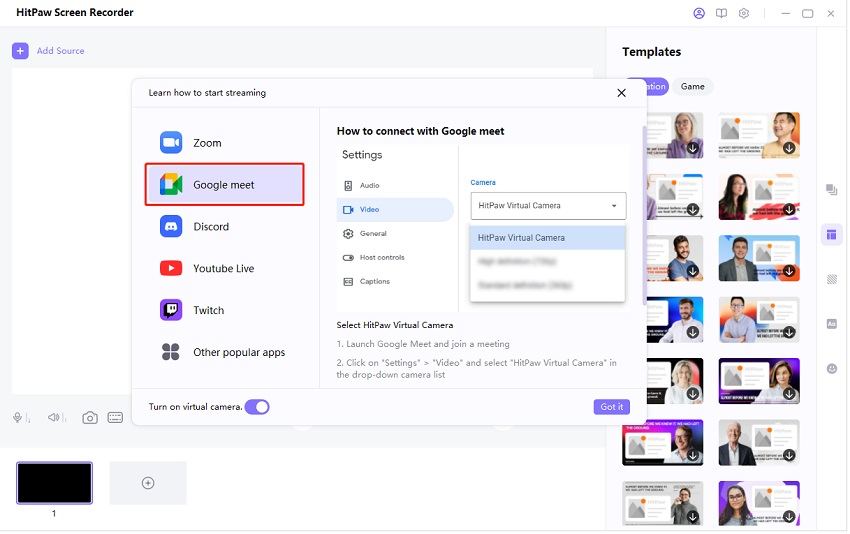
You'll need to click on the icon next to '' recording'' and select the platform you'd like to use the virtual camera. You've got the chance to select Google Meet, Discord, Zoom, etc. You can select an option and start steaming on that platform. Open the video conferencing software and select "HitPaw Camera" in the camera source.
On Zoom
1. Launch Zoom and join a meeting.
2. Choose "HitPaw Camera" from the camera list.

On Discord
1. Launch Discord and join a video call
2. Choose "HitPaw Virtual Camera" from the camera list.

On Google Meet
1. Launch Google Meet and join a meeting
2. Click on Settings, under "Video", choose "HitPaw Virtual Camera" from the camera list.
Step 05Start the recording.
You can also record the live streaming by tapping the'' Recording'' icon. Once the recording process ends, you can export the recorded file to your favourite destination.
Conclusion
Interesting things happen nowadays, and OBS virtual camera is one of the most fascinating things you'll ever encounter.
We were fairly keen to provide you with proper insight into using the OBS webcam and what arrangements you can make to make it even big. On top of that, we've also revealed the HitPaw Screen Recorder, the best alternative to OBS Virtual Camera that can help you enjoy live streaming to its full potential.


 HitPaw Watermark Remover
  HitPaw Univd (Video Converter)

Share this article:
Select the product rating:
Daniel Walker
Editor-in-Chief
This post was written by Editor Daniel Walker whose passion lies in bridging the gap between cutting-edge technology and everyday creativity. The content he created inspires audience to embrace digital tools confidently.
View all ArticlesLeave a Comment
Create your review for HitPaw articles