How to Add Subtitles in iMovie on Mac/iPhone/iPad
The videographers add subtitles in their movies for many reasons. Some want to make their work more understandable, some want to enhance the quality of their film, and while some just need to add closing credits. iMovie is the perfect video editor for every Apple user but how to add subtitles in iMovie is the real question. Don’t worry, just follow this guide and add stylish captions to your videos easily.
Part 1: Can You Add Subtitles in iMovie?
Since there is no specific subtitles or caption feature available in iMovie so you must be wondering if it’s possible to add subtitles in this software. The answer is yes, you can do this by using the “titles” option. However, from a technical point of view, these subtitles are not the usual standard subtitles files. Instead, it is basically a layer of text on your movie which is why your audience can’t turn them off. Nevertheless, these subtitles give a very genuine effect and don’t let you compromise on the quality of your video. Your viewers will not be able to distinguish them from the actual standard subtitles.
Part 2: How to Add Subtitles in iMovie 10 on Mac?
How do you add subtitles in iMovie varies from version to version. The iMovie 10 has a different operating interface from iMovie 11/9/8. Please make sure to follow these specific steps if you are using iMovie 10 on your Mac devices.
- 1. Launch the iMovie app on your device and open your iMovie project. Click on “files” and then select “New Project”. Now the drag the clip down to the timeline
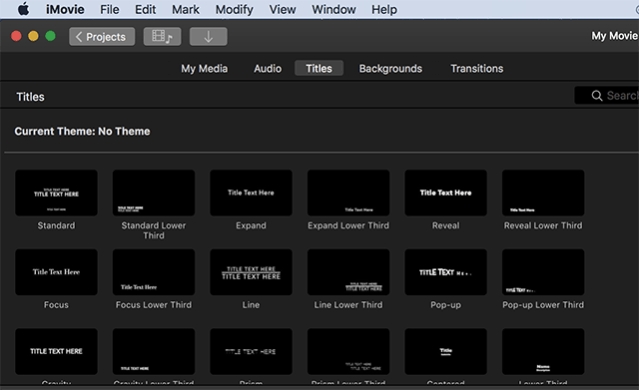
- 2. Click on “title” menu item in the browser at the top
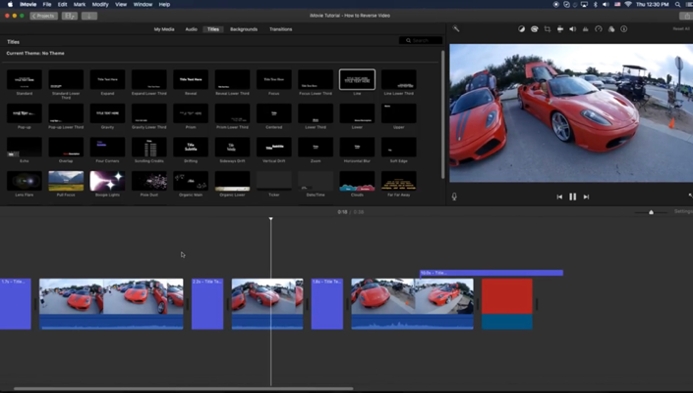
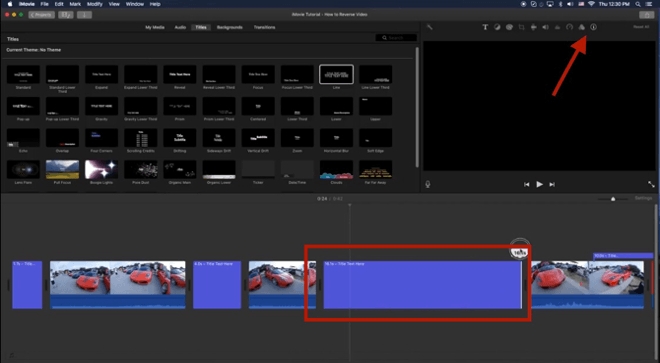
- 3. All the titles available in this version will appear on the screen. Choose the desired style that best serves as the subtitle for your film. To see the preview drag the title to the timeline and move the cursor around the clip to see how it looks. You can place it at the beginning of the video, at the top of the video, at the bottom of the video, at the center of the video, and at the end of the video. You also split the video and put the titles and subtitles in between the footage.
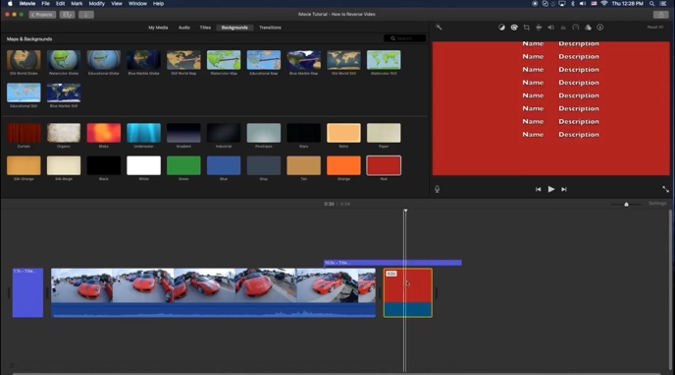
- 4. To change the background of the titles click on “background” at the top of the page and choose the color of your choice.
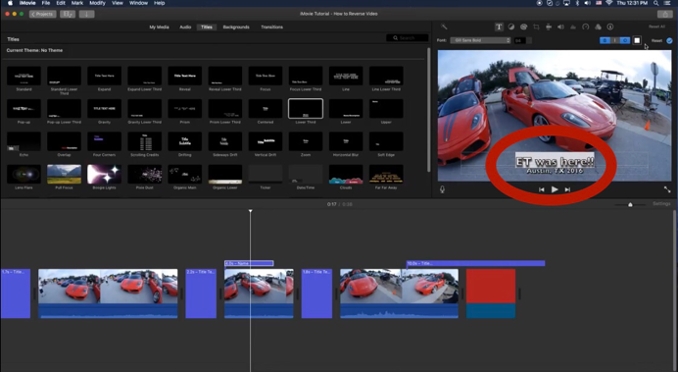
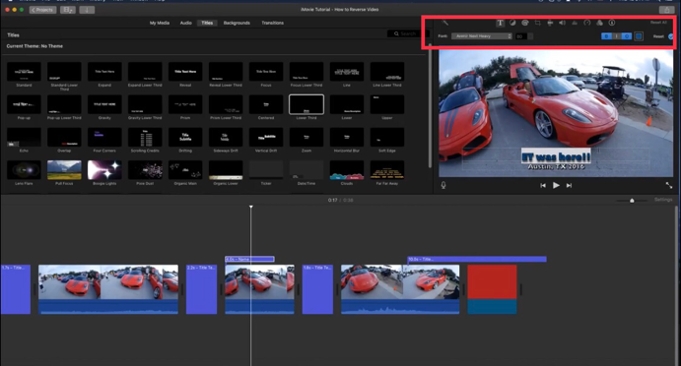
- 5. Now highlight the text and write your own text.
- 6. Once you highlight the text, a number of style options will appear above the viewer. You can make the text bold, apply italics, and outline it. Also, you can change the font style, size, and color too.
- 7. To adjust the duration of subtitles, drag one of the edges to increase or decrease the duration. You can also click on the small “i” icon above the viewer and enter the number of seconds for which you want the subtitles to last.
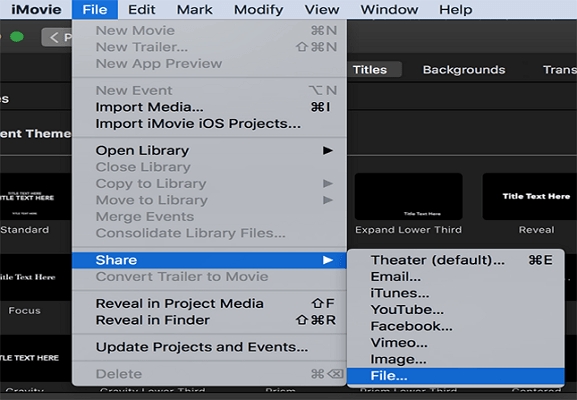
- 8. Now if you are satisfied you can export the file and save it on your device. Click on File > Share > File, or you can also click on any application you would want to share your work on.

Part 3: How to Add Subtitles in iMovie iPad/iPhone?
With the iPad and iPhone, it is extremely easy to add subtitles and captions in movies. The user only needs to download iMovie from the App Store and enjoy all the fun tools this software has to offer. Below are the steps which will help you adding text to your video conveniently.
- 1. Open up the app and tap on the “+” icon to create a new project
- 2. Now click on “Media Library” and select the video you want to edit in the timeline.
- 3. Once you have selected the video tap on the “T” icon. A variety of text styles will appear on the screen, each with a different font style and size along with unique animation associated with it. Tap on each design to see the preview and then select the most appropriate one.
- 4. Now write text and place it where you want it to be displayed in the video.
- 5. Once you are done, play the video to see if the subtitles are in sync with the video.
- 6. If you are satisfied then tap on done and upload it on any social media channel.


Part 4: The Easiest Way to Add Subtitles to Videos on Windows
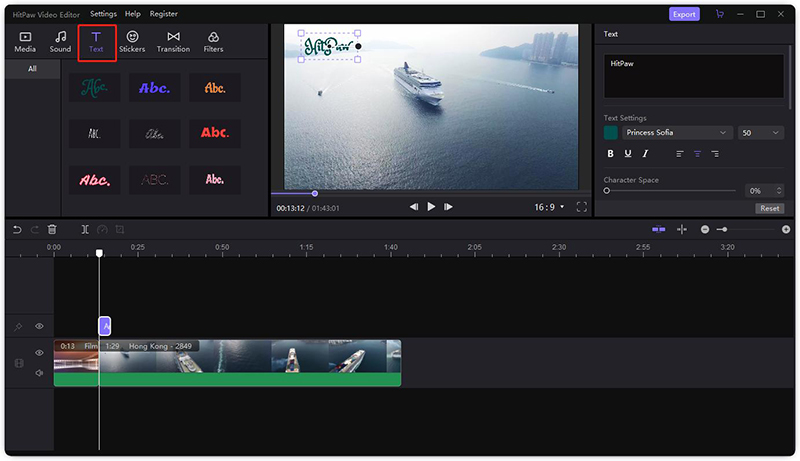
If you’re looking for a professional yet easy-to-use program to add subtitles to your video then download HitPaw Edimakor right way. The software offers many advanced editing tools like overlays, transitions, filters, and texts along with the option to cut, crop, split, trim, merge and add a mosaic feature which makes your editing experience very simple. No matter if you’re a beginner or an expert, the software fulfills the needs and demands of every user.
Usually, the iMovie software doesn’t offer a user-friendly interface. People often get confused and face difficulties while adding subtitles to their footage because the program has no specific subtitles feature. Hence, it is better to have a backup editing software, HitPaw Edimakor, in your Windows. Using this software to add subtitles to your videos is very easy, all you need to do is:
- Step 1. Install the program and open it once downloaded.
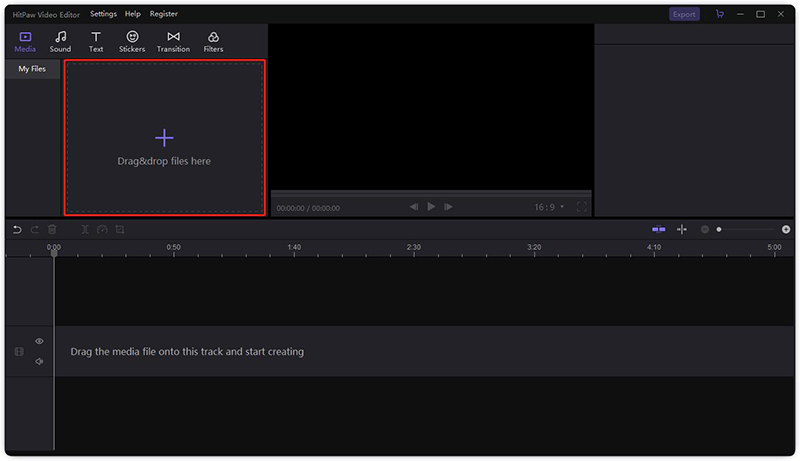
- Step 2.Tap on “Media” > “Drag & drop files here” and choose the video you want to work on.
- Step 3. Now drag and drop the file to the timeline.
- Step 4. Click on the “Text” tab and select the desired template for your video. Now drag and drop it to the timeline and double click on the “T” icon to open up the editing panel. Here you can choose to change font size, style, color, and other settings.
- Step 5.Once done, click on “Export” to save your work on the computer.
Conclusion
Subtitles are a great way of making your work easy for the users to understand. Not only this but adding subtitles also make your video accessible to a much wider audience, increases the viewer engagement by almost 14%. Hopefully, the iMovie title feature helps you just do that. And if not, try using HitPaw Edimakor, it is packed with amazing advanced features that you don’t usually find in iMovie. We hope that you find this guide on how to add subtitles in iMovie useful and make your creation a successful one.
Select the product rating:
Leave a Comment
Create your review for HitPaw articles


